


Kingdom Death:Monster – What have I gotten myself into??!!!


Recommendations: 862
About the Project
I finally bit the proverbial bullet last year and jumped into the deliciously insane, macabre and horrifically beautiful world of Kingdom Death. It all started when one of my viewers over on Twitch sent me a mini to paint as a gift. Loved it so much so I had a renewed look into the game and all the minis that are part of the world. Then I was given another mini as a present from another viewer and I was hooked and got the core game from BackerKit. So all I get done for this amazing game and world will be going HERE! Hope you enjoy as much as I am :)
Related Game: Kingdom Death: Monster
Related Company: Kingdom Death
Related Genre: Survival
This Project is Active
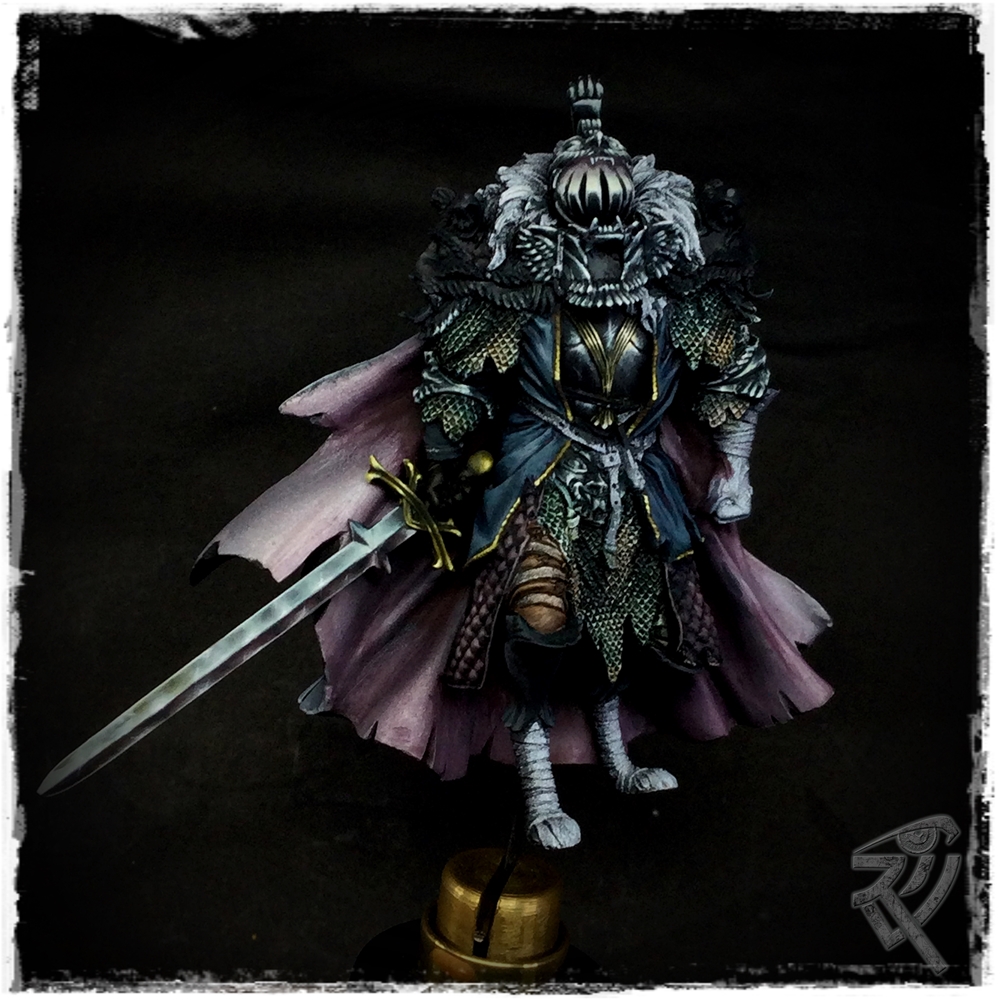
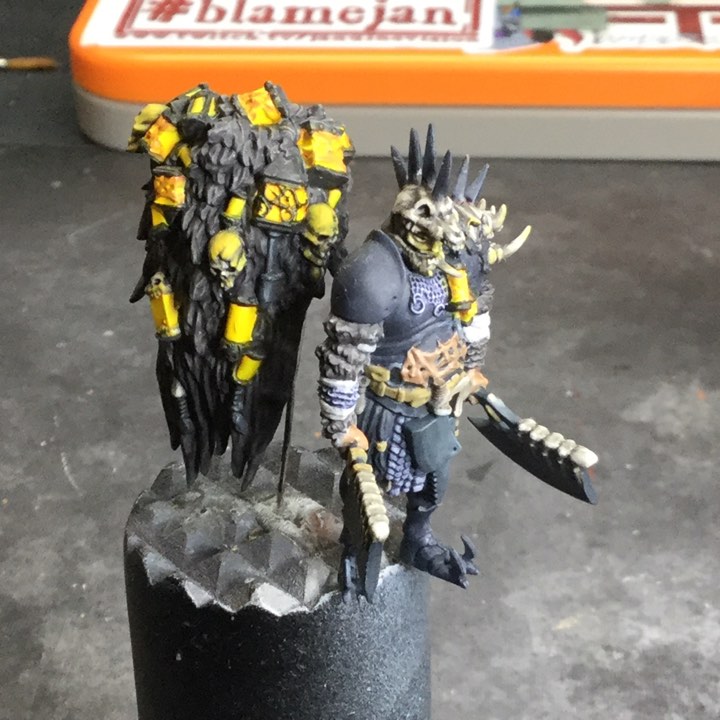
The Black Knight Pt 1
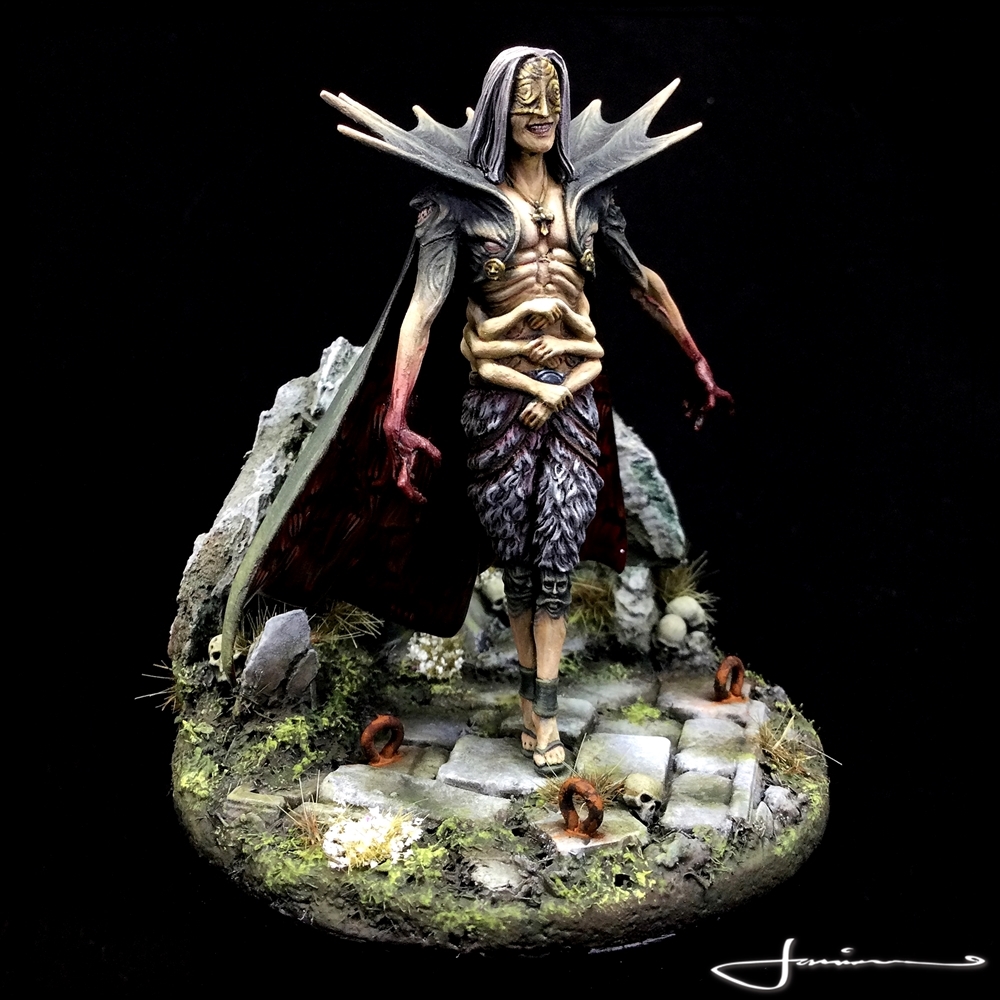
“They say if you take a lantern that never lit down the trail of corpses and past the whispering stars you will find an ancient figure atop a crest of determined faces. Treasured by a hidden cult of loyal squires, the figure will awaken for only the most honourable of challengers.”
The Black Knight has long been one of my absolute favourites of all the KDM sculpts/characters. He is rare~ish and when one does pop up for sale, he is usually priced horrendously………. Such is joy n pain of collecting KDM!! The Black Knight has become something of a white (or is that black) whale for me.
Anyways, recently a good friend became a client when he asked me to take on a commission to paint a Black Knight for him.
After some discussion and sharing of ideas, I was ready to go and had a few images in my head of how the finished piece would be. There will be a vignette scene built atop a blackened irish oak plinth but more of that later…………
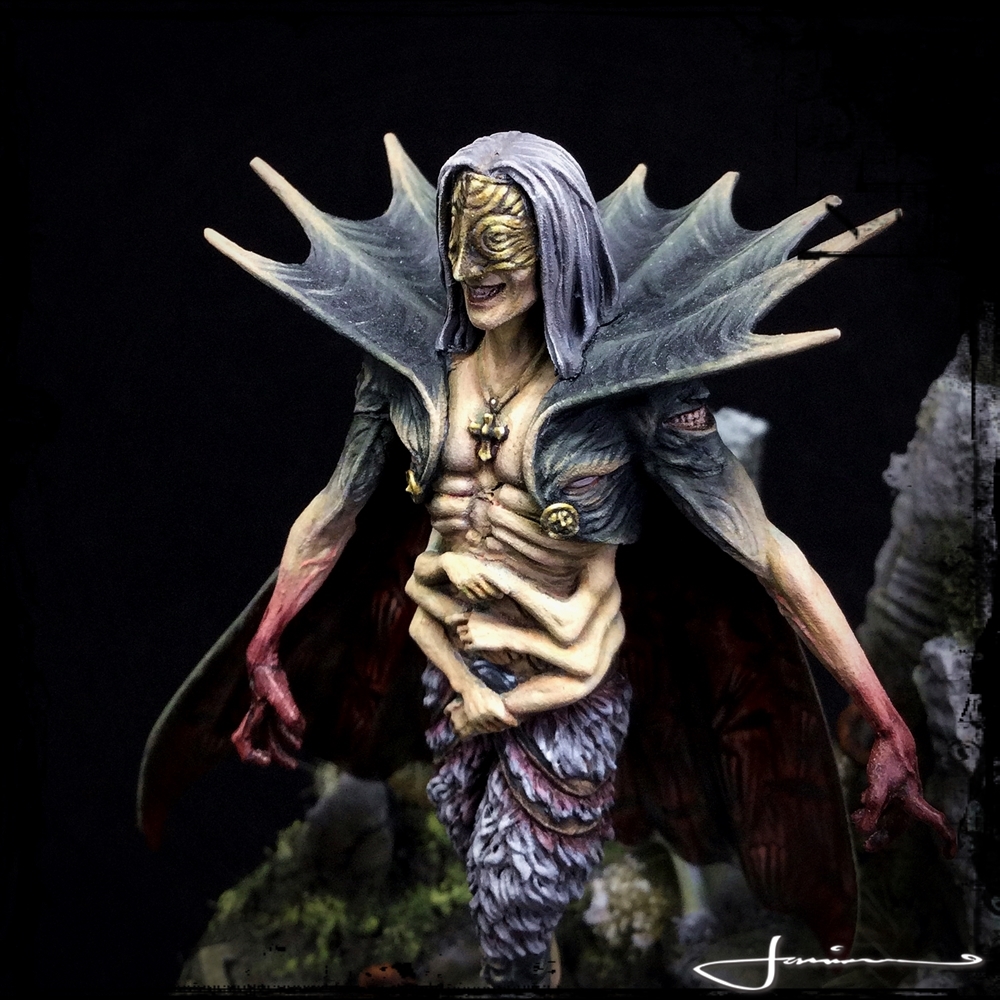
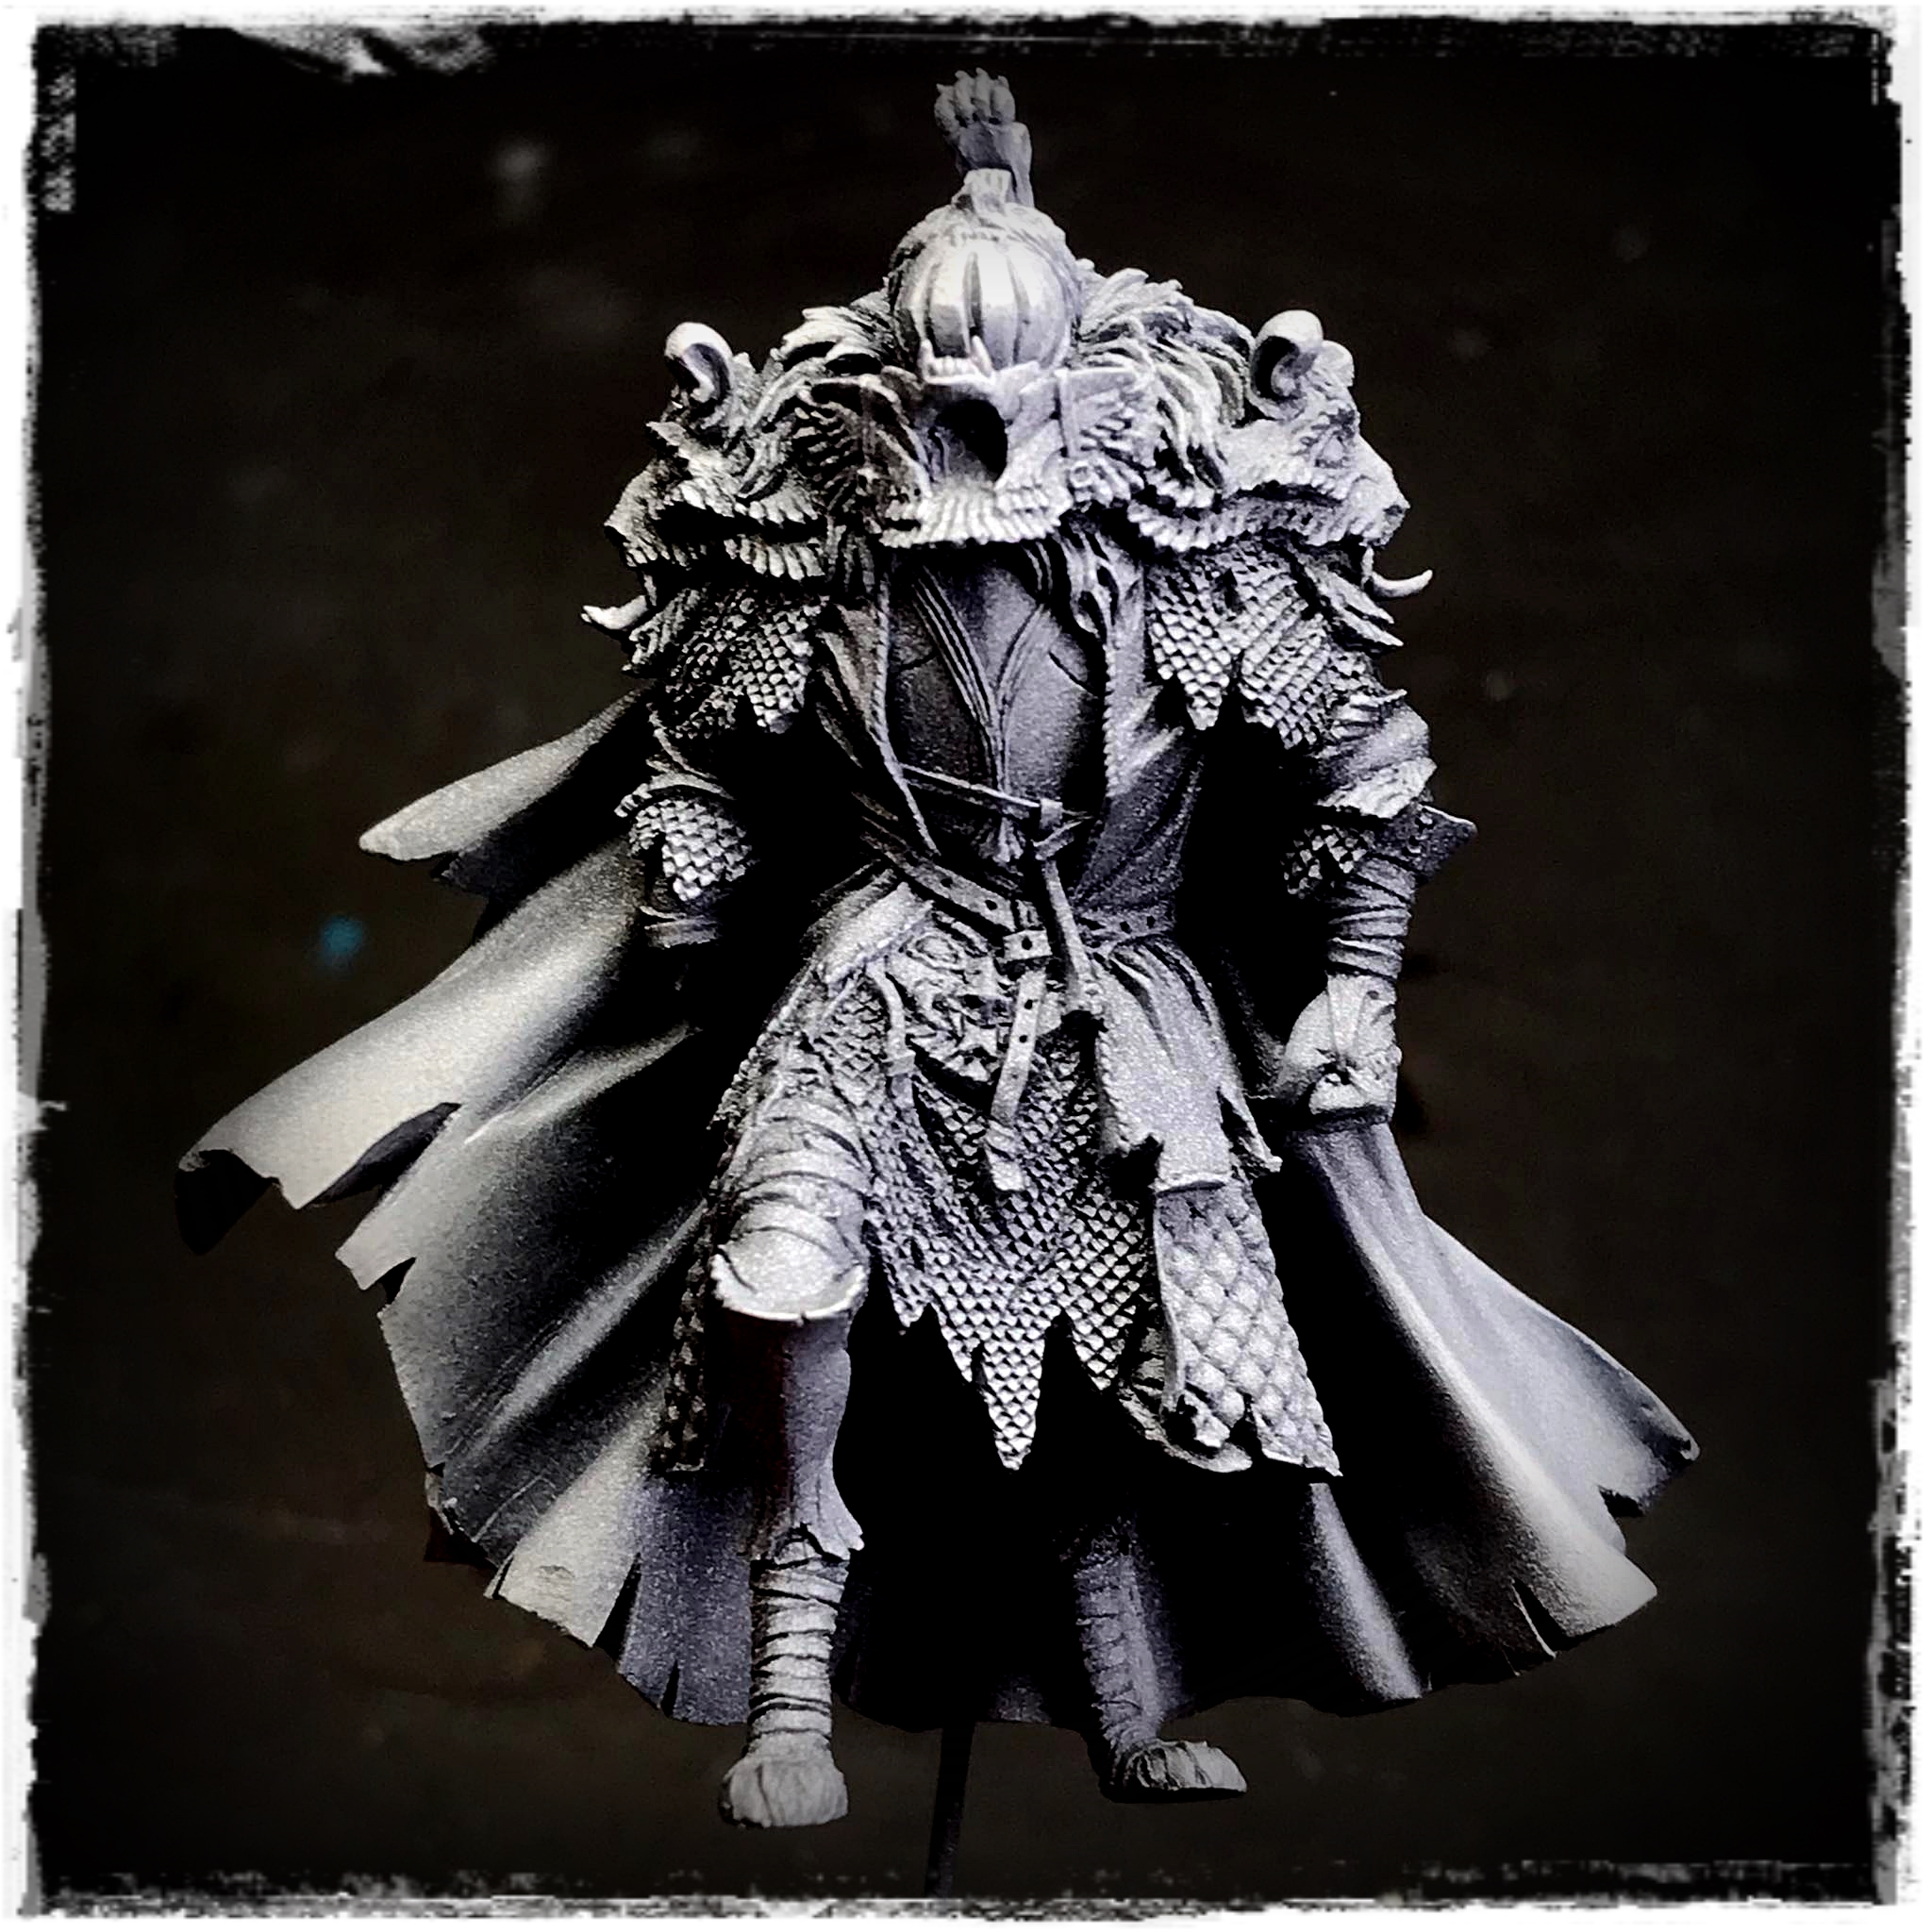 Prepped, primed and ready to go!
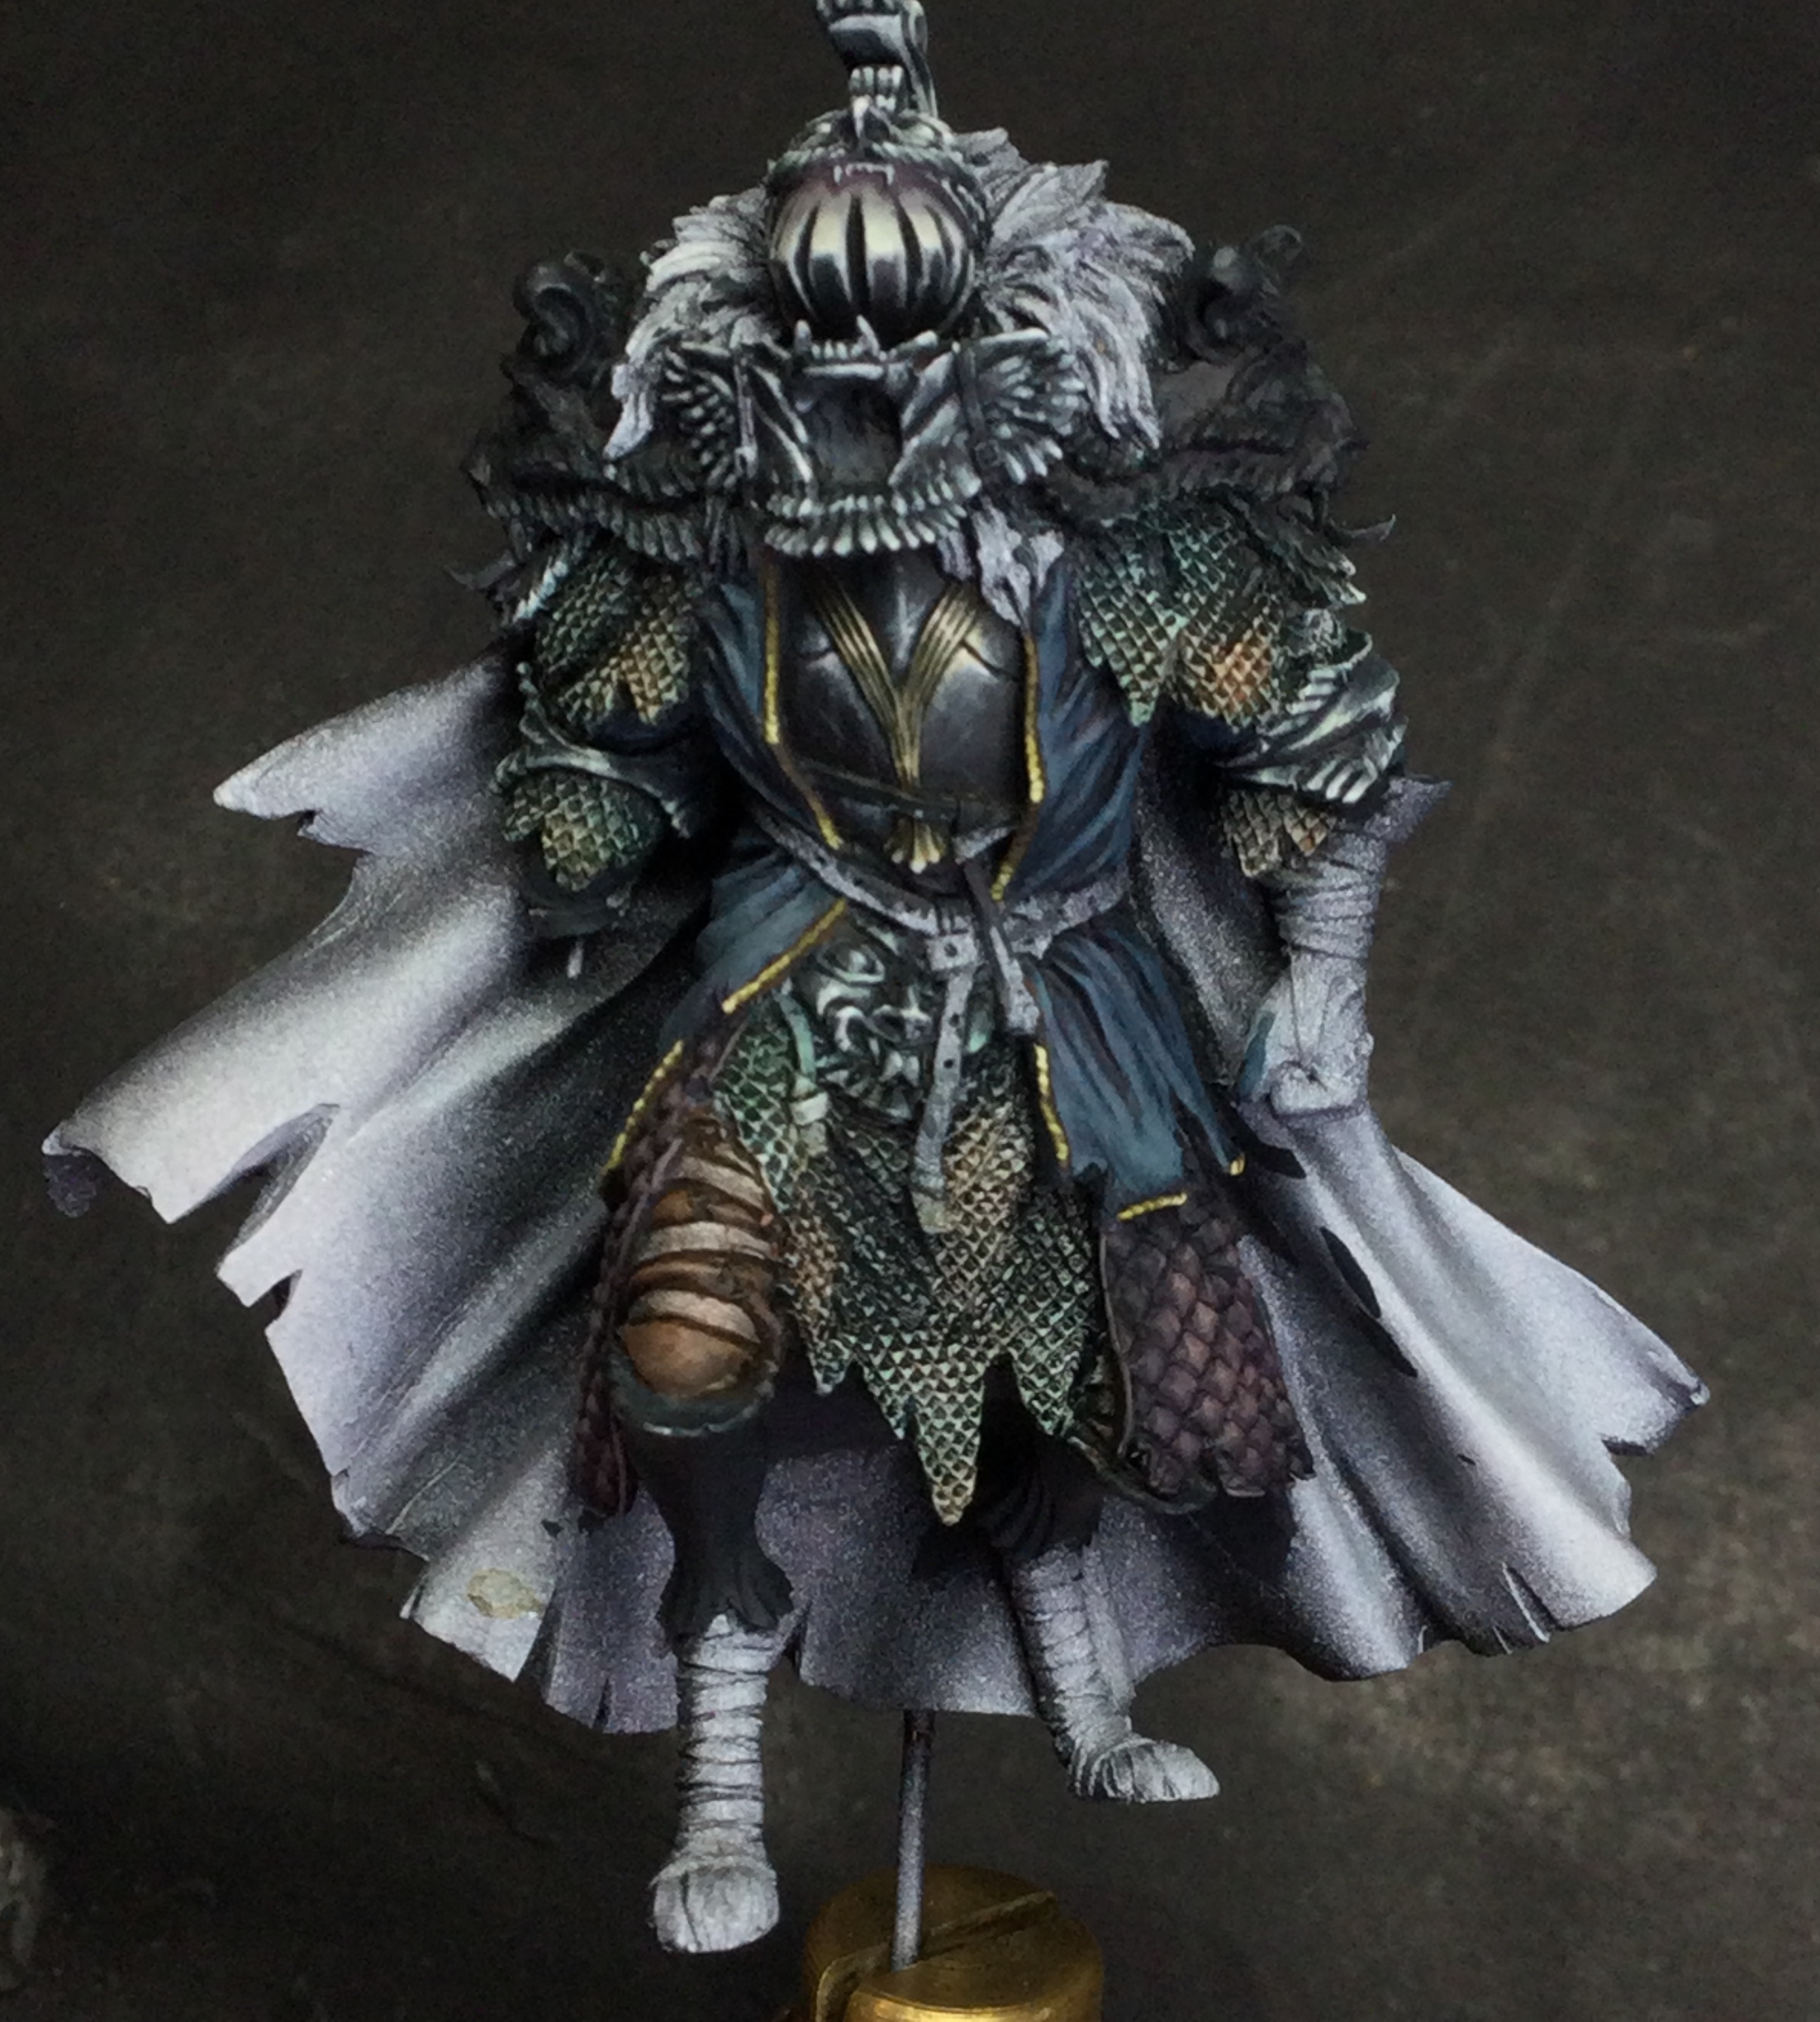
As usual with KDM, I was going the nmm route. NMM just suits the whole KDM aesthetic way more than TMM. I wanted to make his armour have a black feel to it, some age and wearing but still have some colour to it so it wouldnt get lost amongst the other details. I chose a slight blue tone to the workup by including some anthracite grey from AK Interactive 3rd gen paints in the mix.
Starting form the centre, as i usually work from inside to out, I began with the plastron as the test panel for the non-met workup i wanted to go with. From there to the gorget and his…… groin face plate thingy
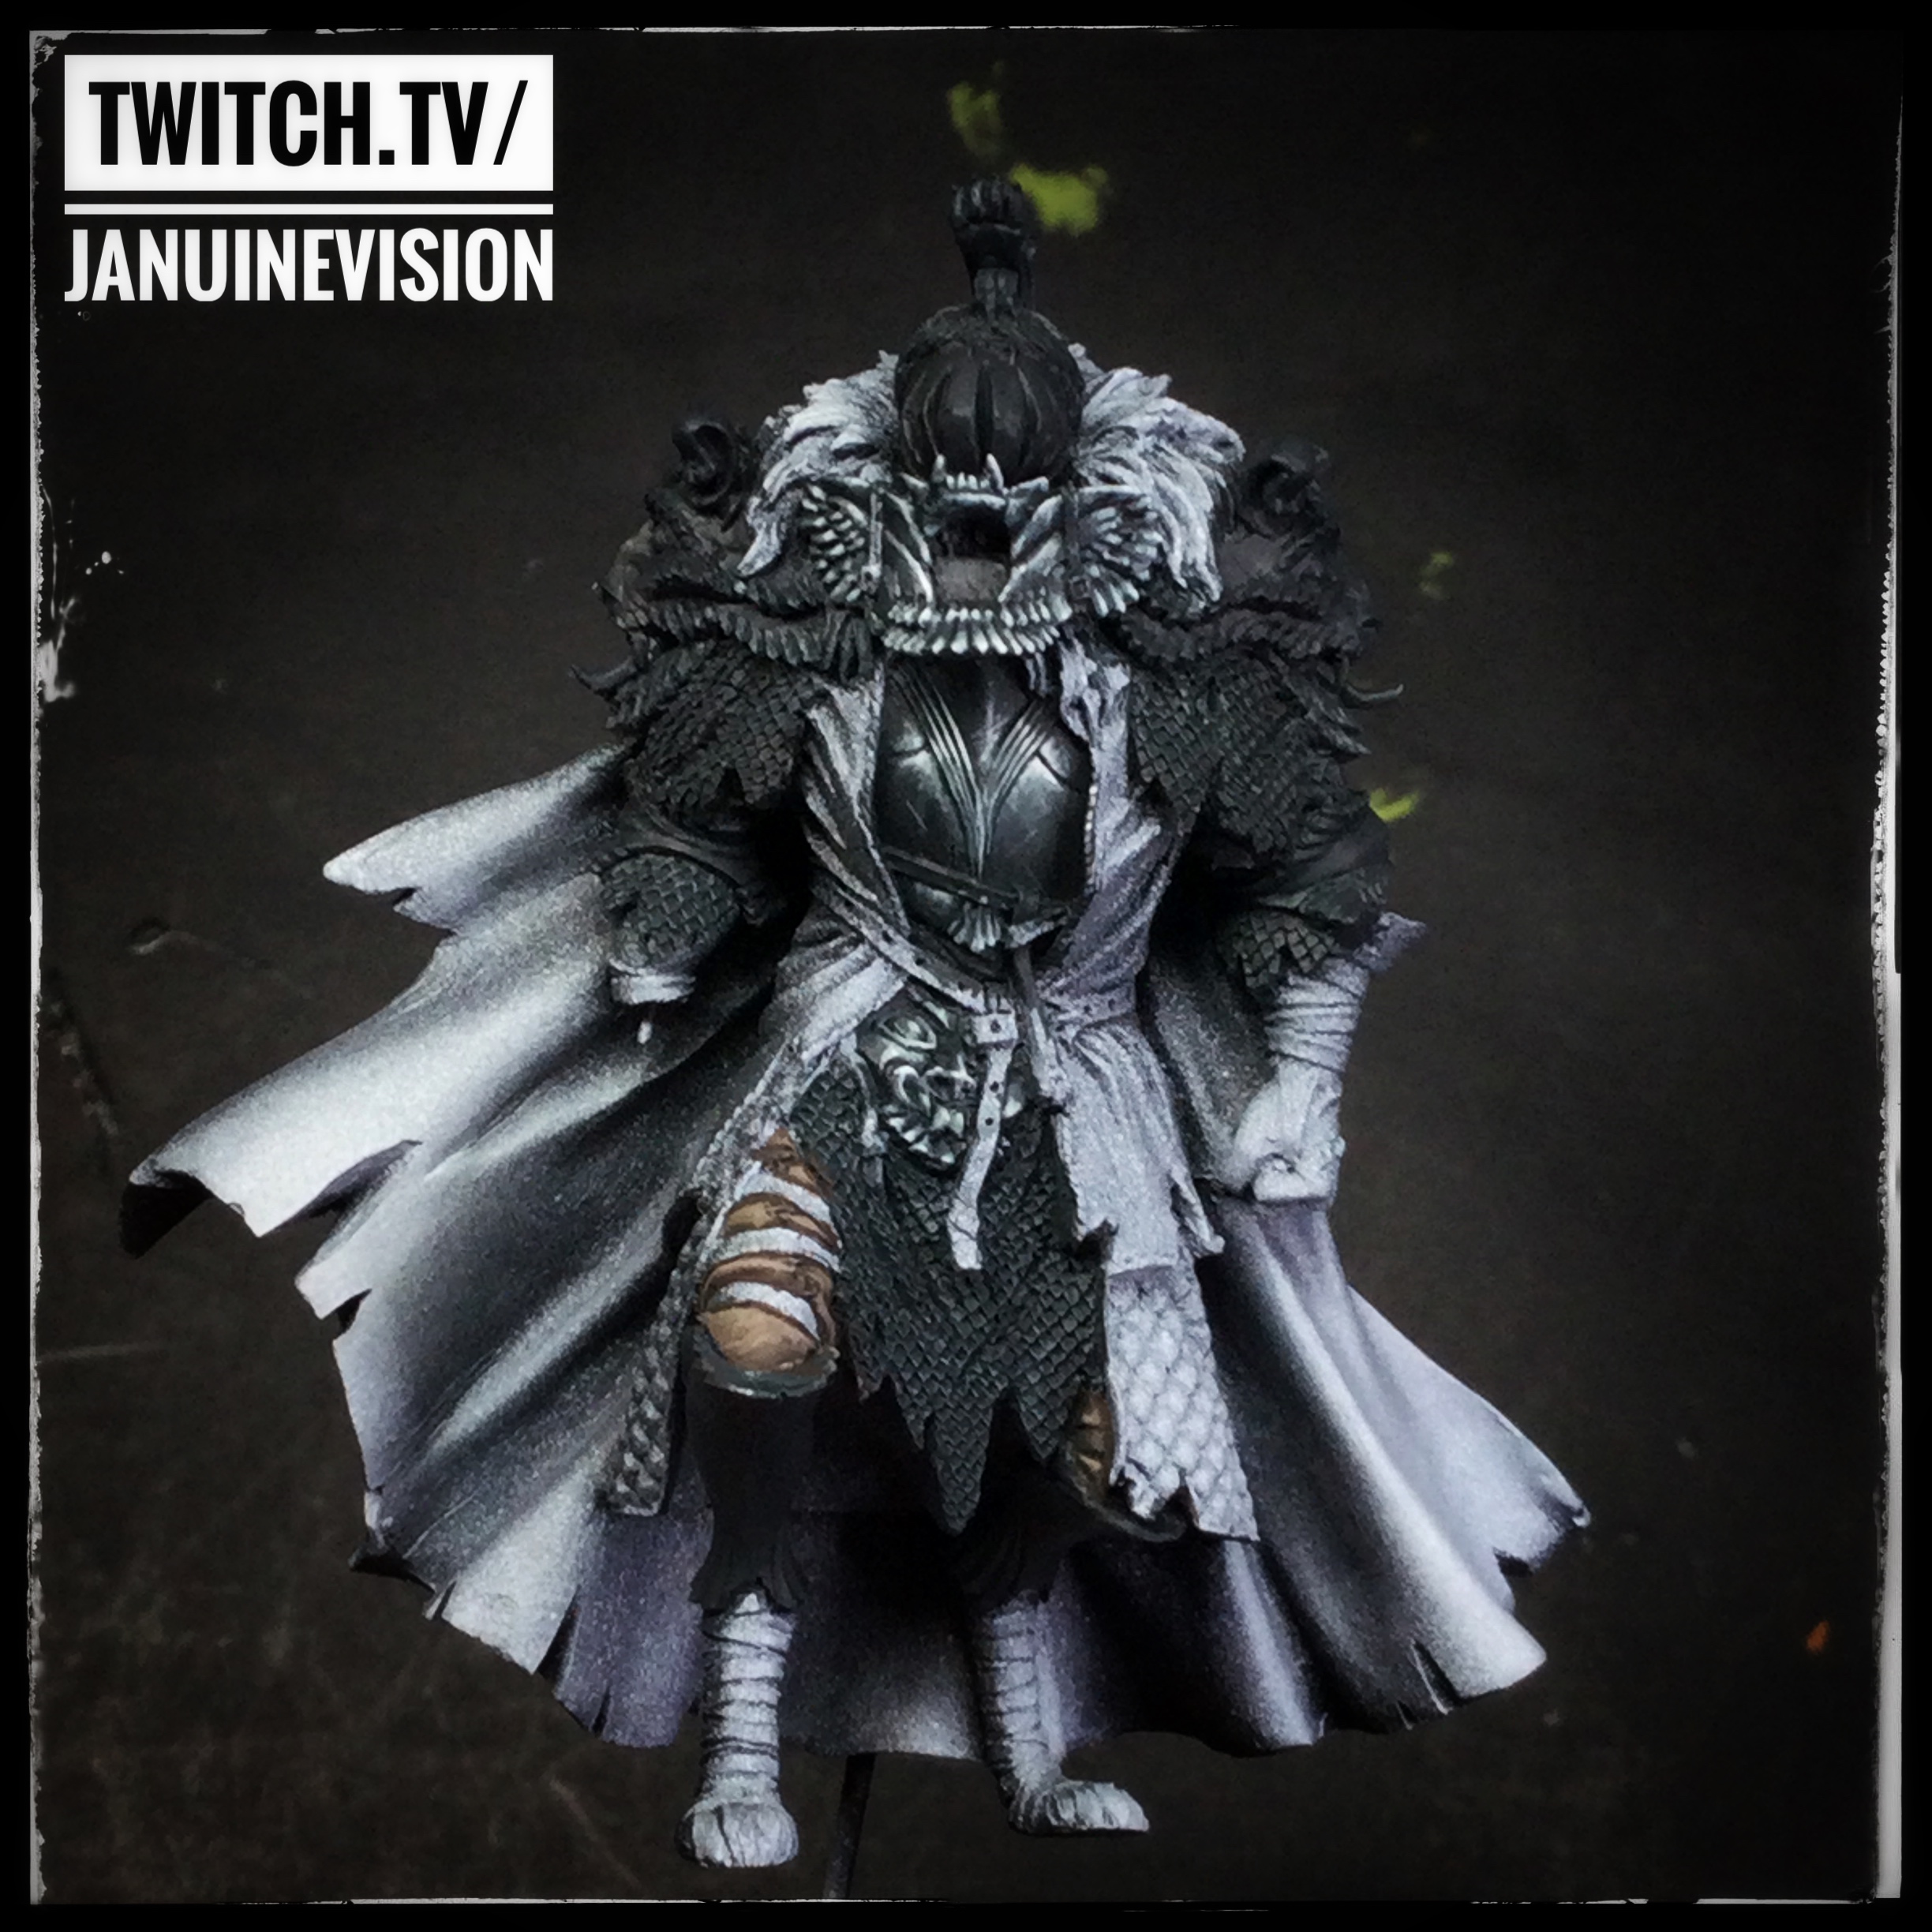
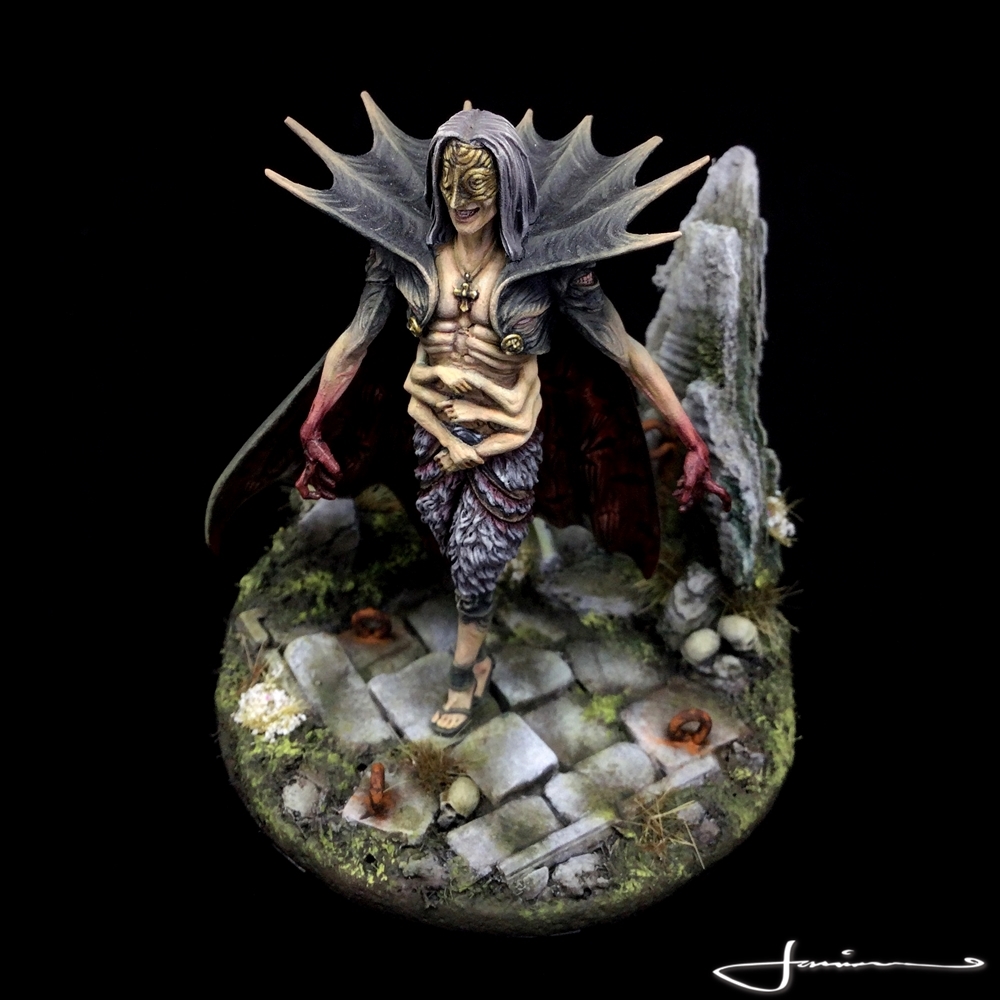
After a bit more of the armour plates, I decided to move to his scale mail. This was gonna be tricky………..
This Knight’s overall look is going to be quite dark as it is: armour, cloaks adn so on. And that is fine. However without the inclusion of some colour and some variety in the worksups for the differnt types of armour, the detail and character of the model will become so dark and without any clear definition.
So I chose the scale mail to combat this. Scale mail is made up of looooooooooooooads wee individual small armour scales which are then fastened overlapping each other on a backing of cloth or leather. Soooooo they move about a lot and can reflect light in many different directions and with light….. comes colour!!
So firstly I painted the scale mail for value; lights and shadows and then in contrast to the more monochromatic plate armour, I added in some splashes of colour to seperate and define the scale mail vs the plate armour.
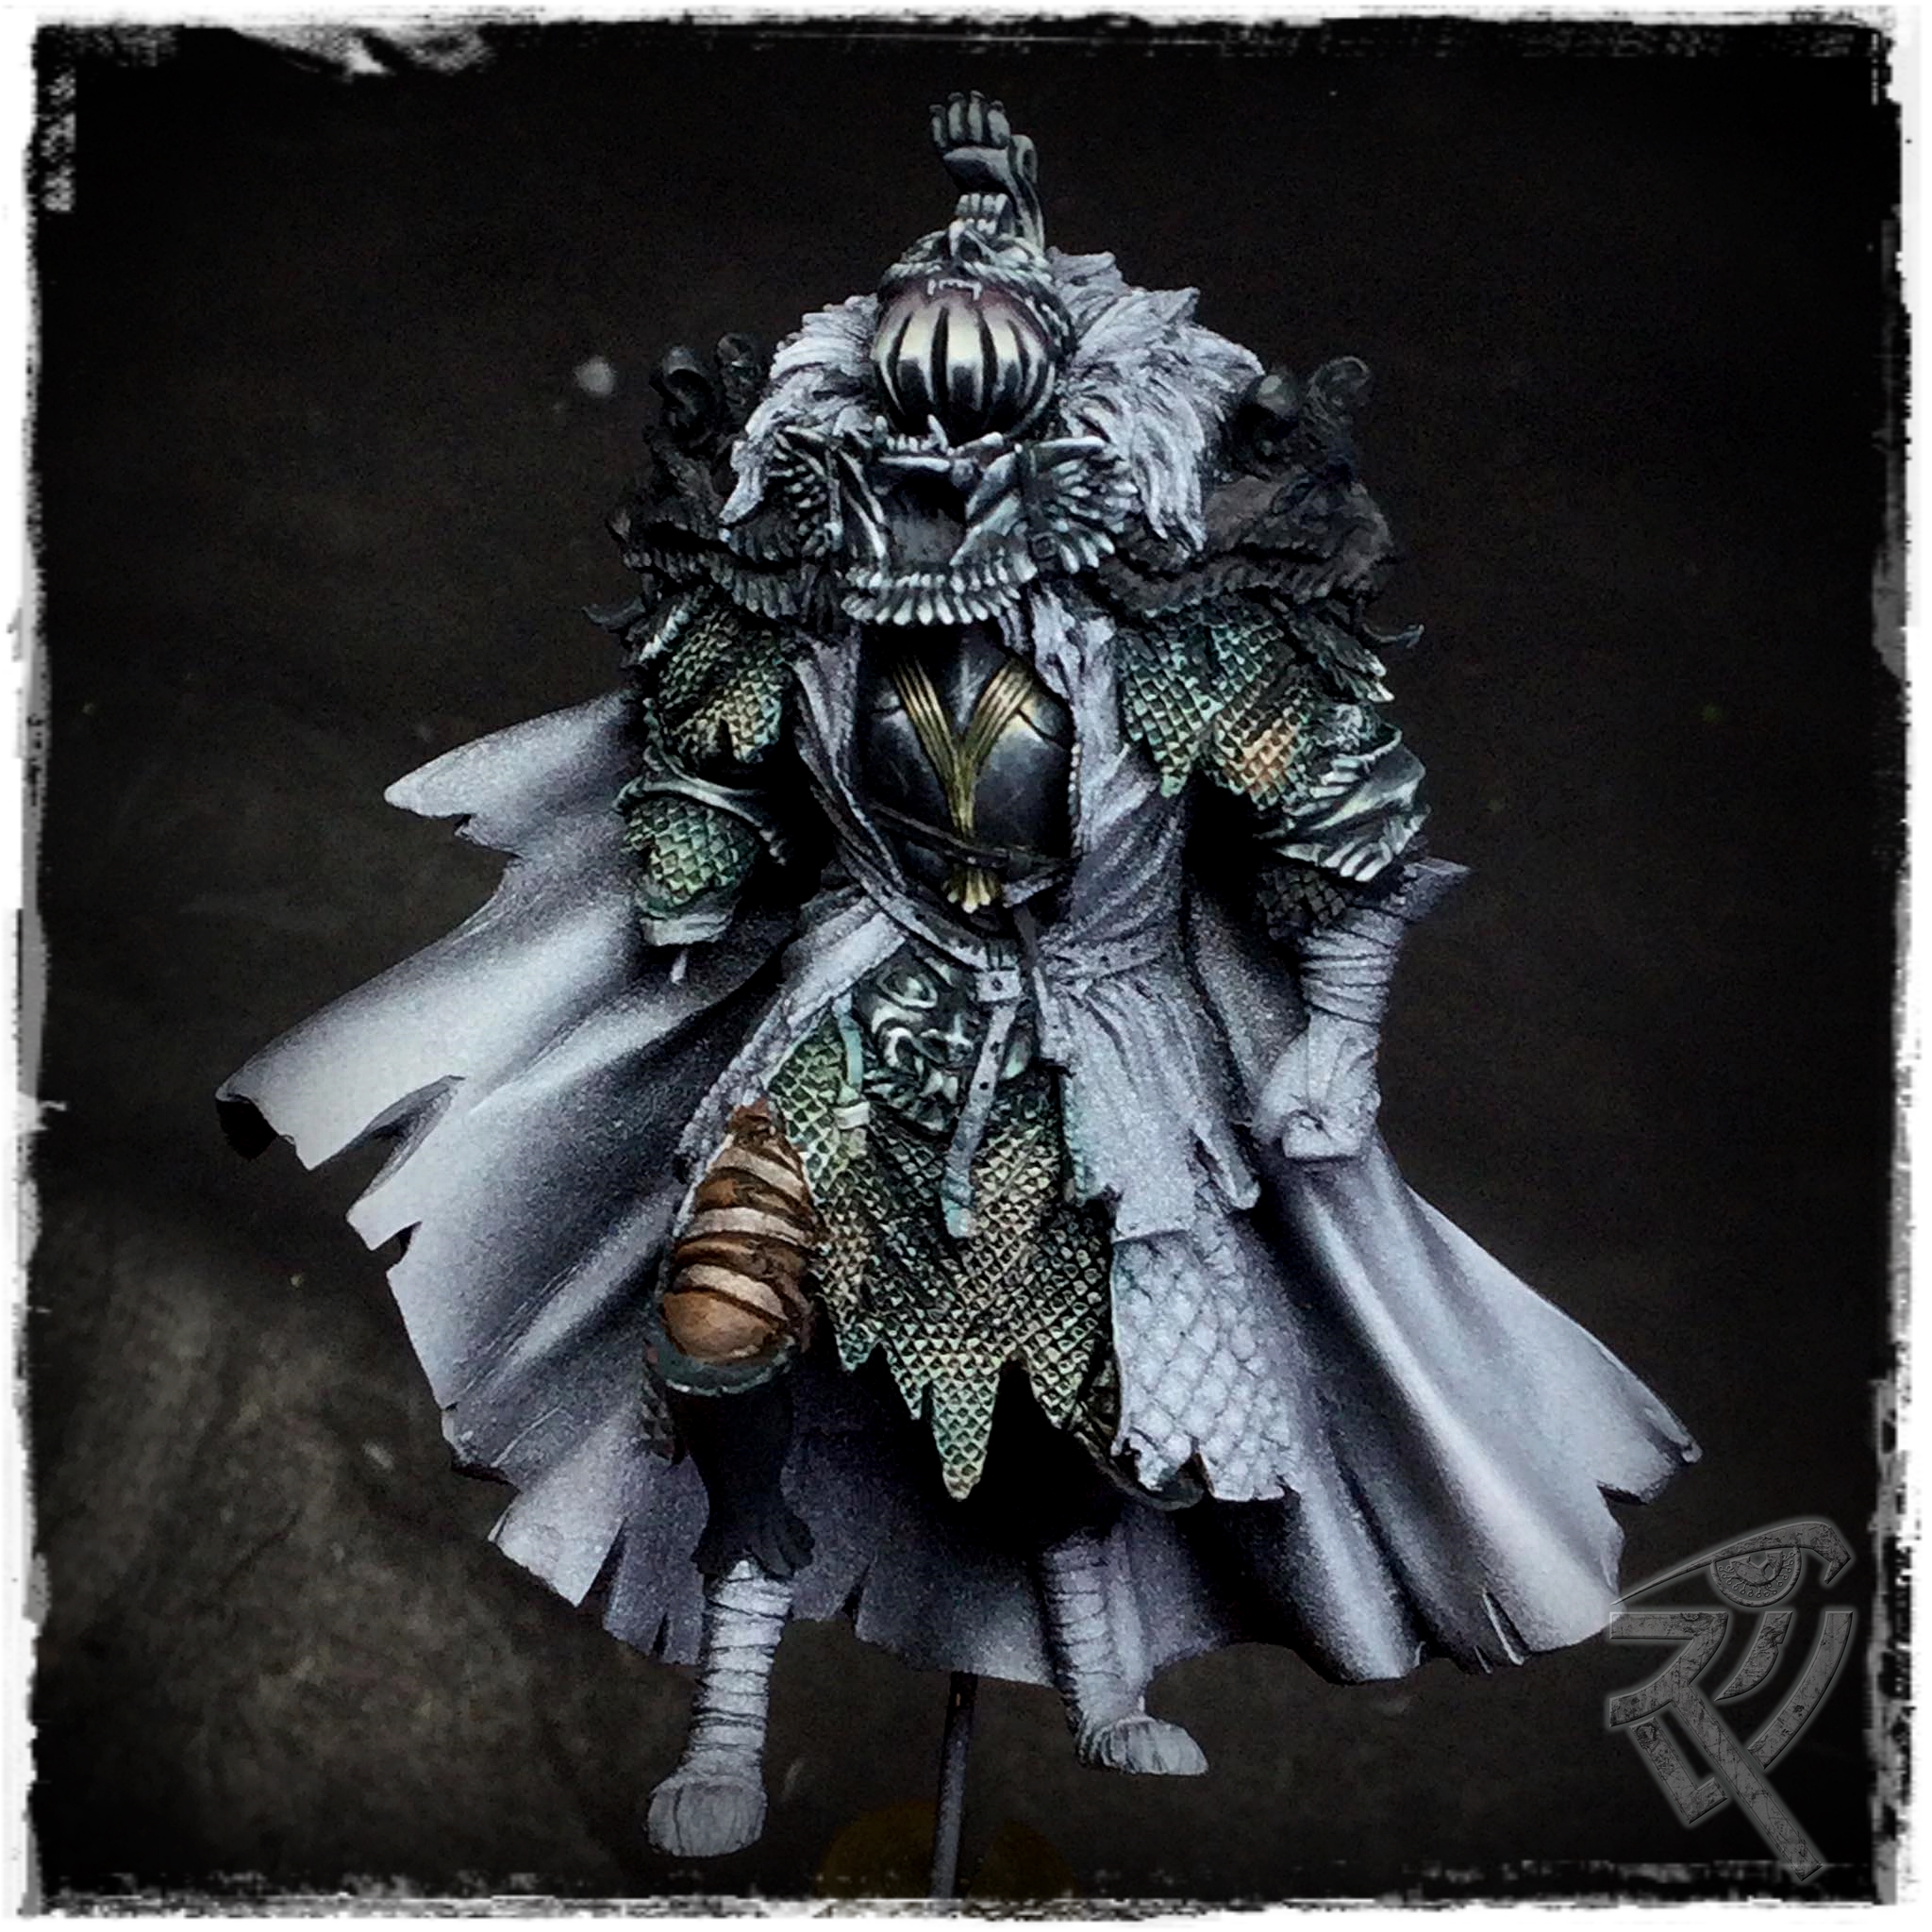
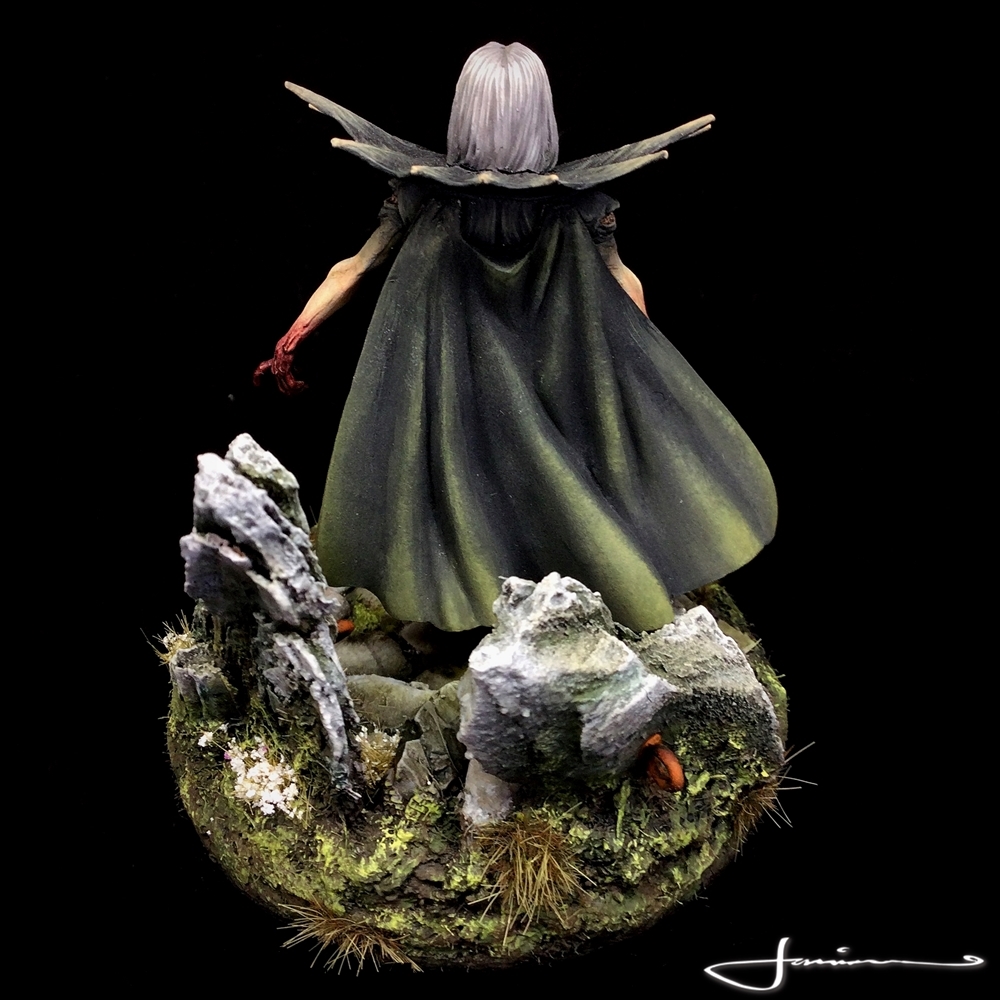
With the armour well under way, (I also worked the helmet with a high value reflective top to the visor) it was time to tackle some of the softer elements of his attire – the cloth. Under his volumenous great cloak, our knight is sporting a rather dandy quilted surcoat over the armour and what looks like a loose raggedy gambeson unusually worn over the surcoat.
I chose a cool blue for a the gambeson, to echo the blues in the armour and a deep purple for the surcoat which would tie in nicely with the future lining of the cloak and the core colours used in the fur.
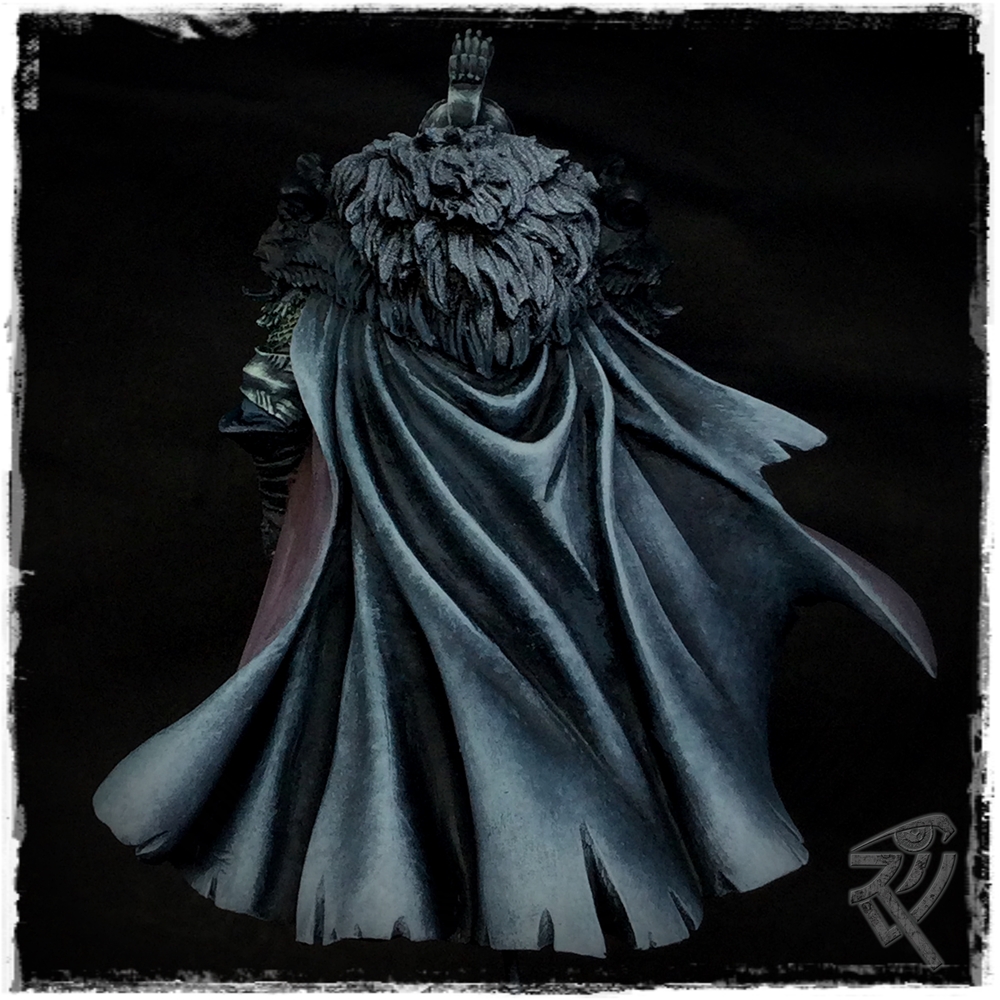
From here it was time to bring some work to the great cloak.
I decided I wanted a rough hefty texture to the other cloak and a smoother texture to the lining. Something some companies (cough cough GW) always seem to forget is that cloth, no matter what its manufacture or textile, has texture. heavy outer cloaks were usually made from heavy, weather beating materials such as wool.
So for the outer side of the cloak I wanted to bring in a rougher more dogged texture. This was done with a very simple stipple and smudge technique and again using cool blue greys for the colour.
The inner, or at least how much of it is done so far, was keep smoother by working the values up using a wet-in-wet technique.
Still a lot of do, not least building his base, buuuuuut we’re getting there and most importantly, I really really having fun with this one!!!!
Lion Knight First & The Pariah all done!!
Oh its been a busy year so far!! Have been trying to get some things finished that are long overdue to be completed!
Finally painted and finished the base for Lion Knight and got him ticked off!!

The Pariah is another of the larger KDM models and I pretty much finished painting the character in 2020 – he even got featured in the KDM newsletter earlier this year but i was draggin my heels on his base.
Finally decided enough was enough and this ‘lovely ‘ fella needed to be base and done!!
Base is as usual made with a lot of bits from my garden; bark, mulch and so on with a few resin bits from Scribor and Spellcrow thrown in .
Base was a lot of fun to paint and I did a lot of it live during a subscriber bonus stream on Basing over on Twitch.

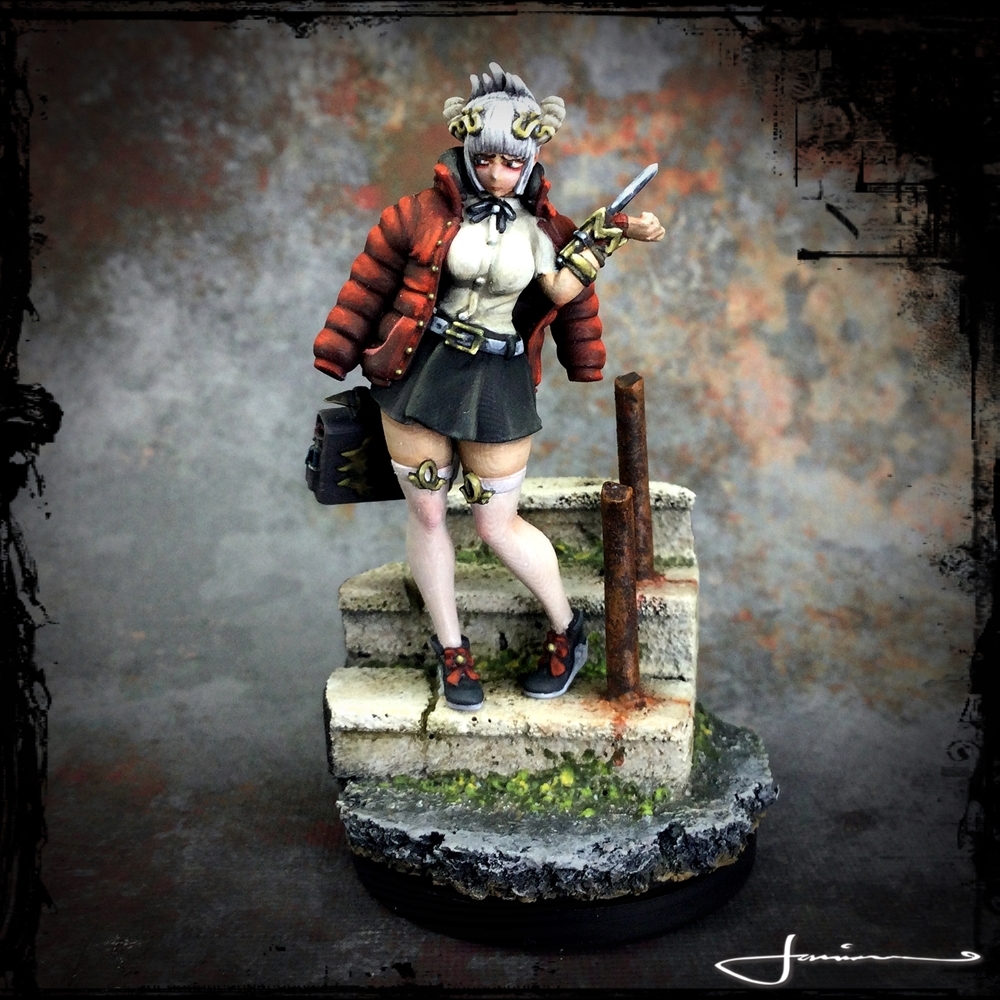
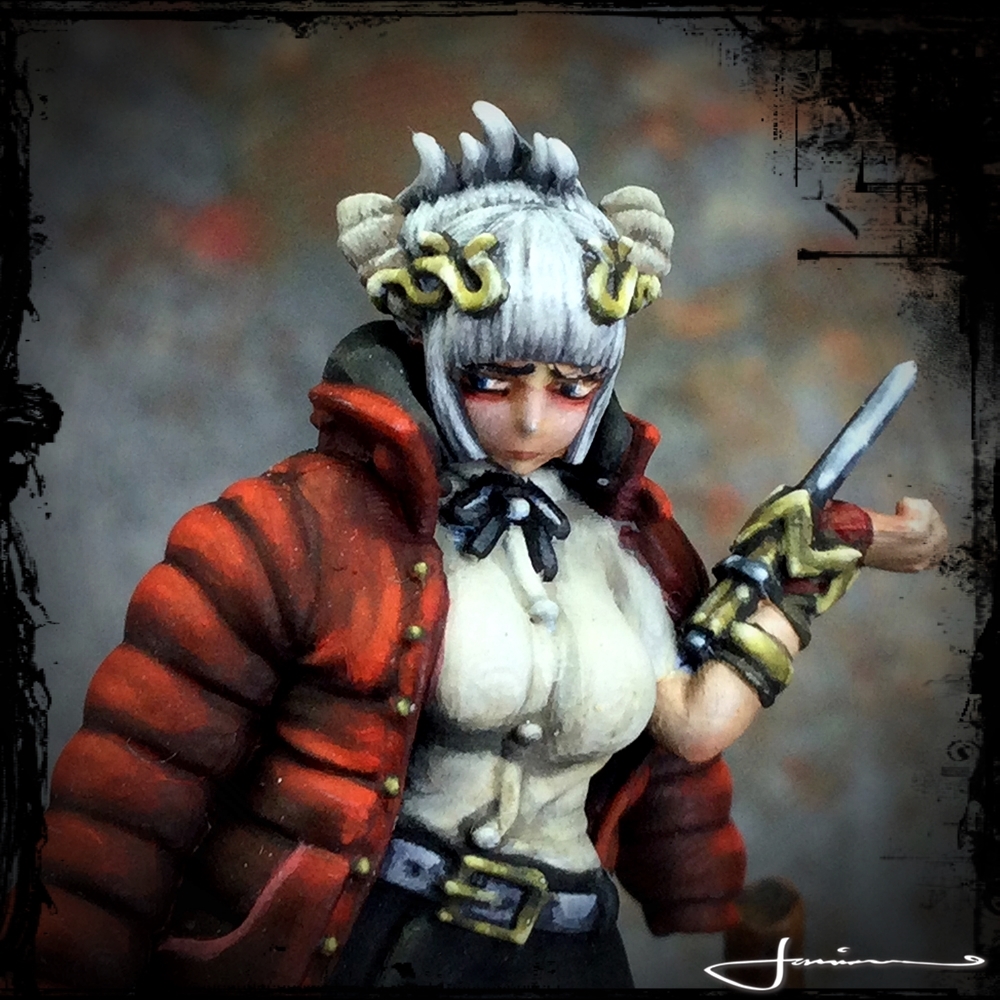
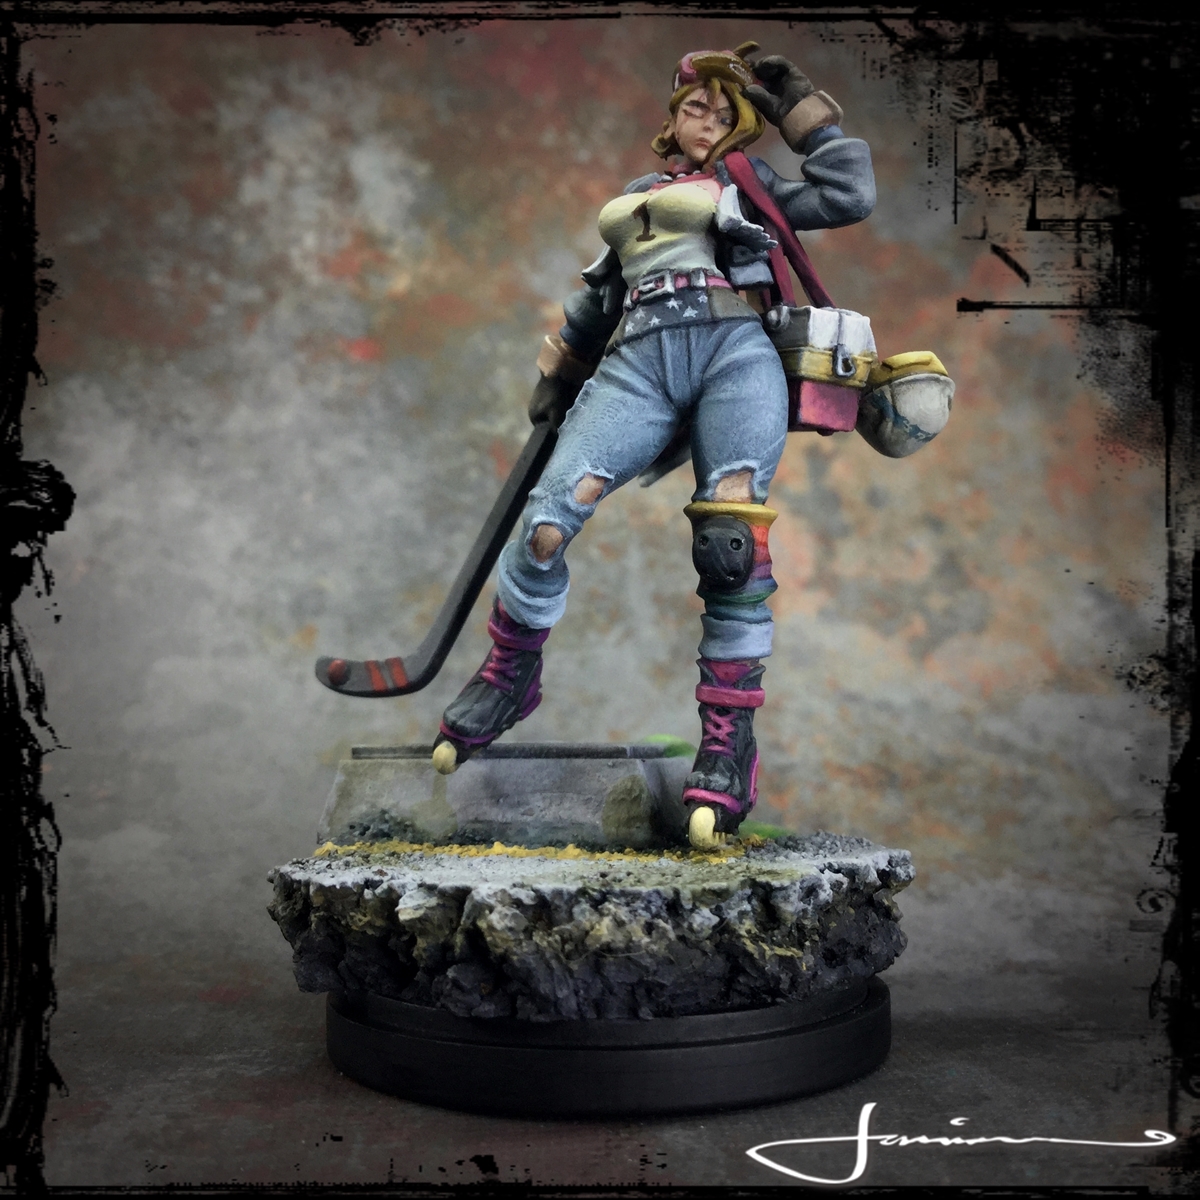
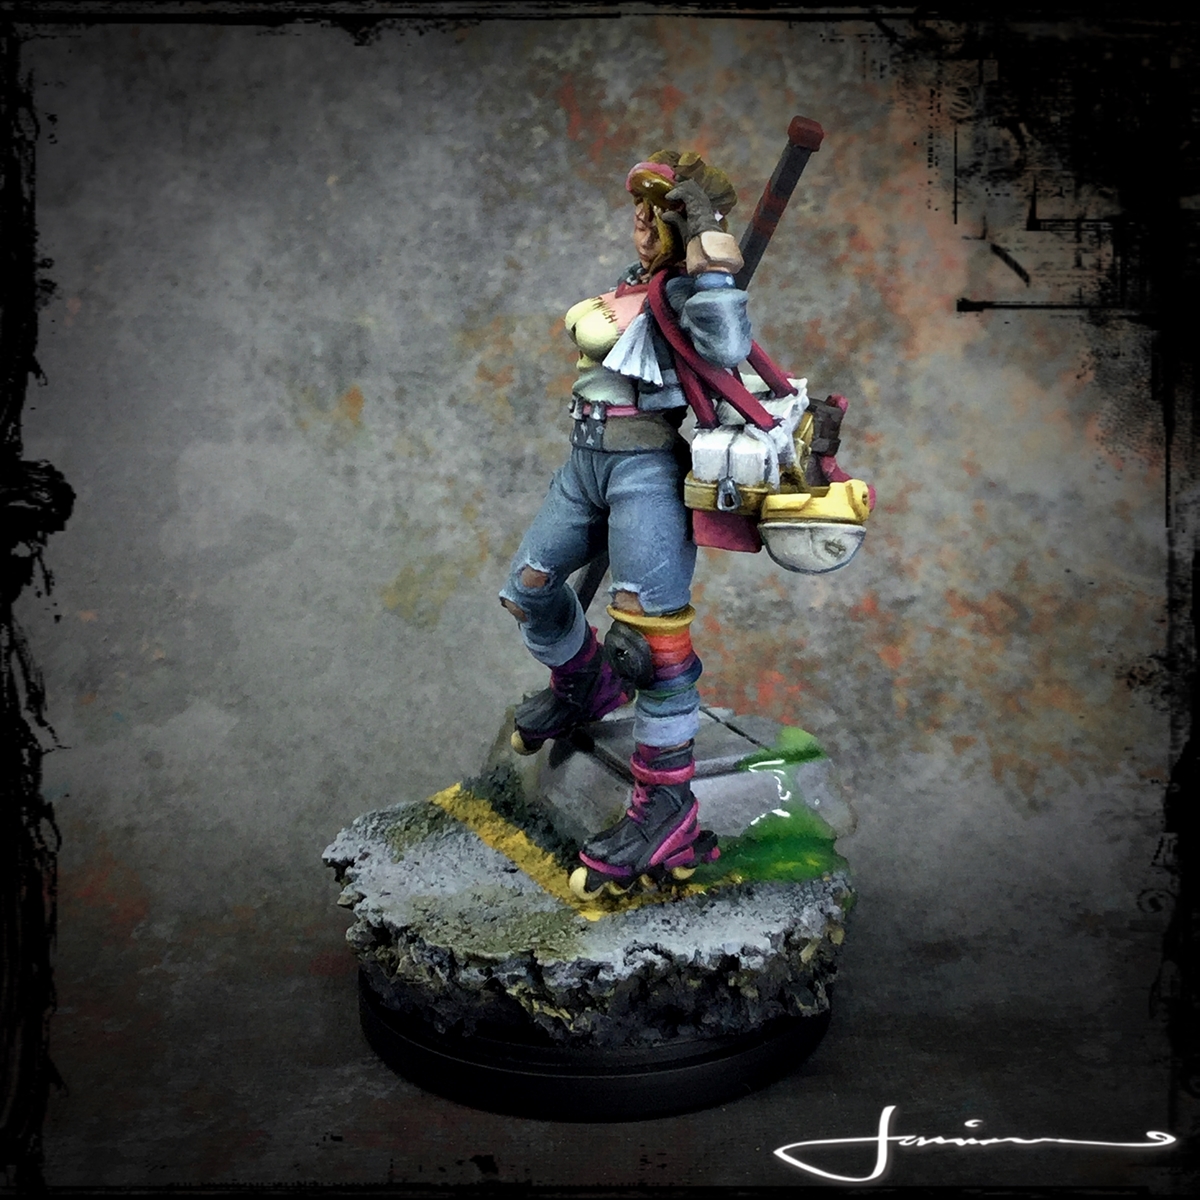
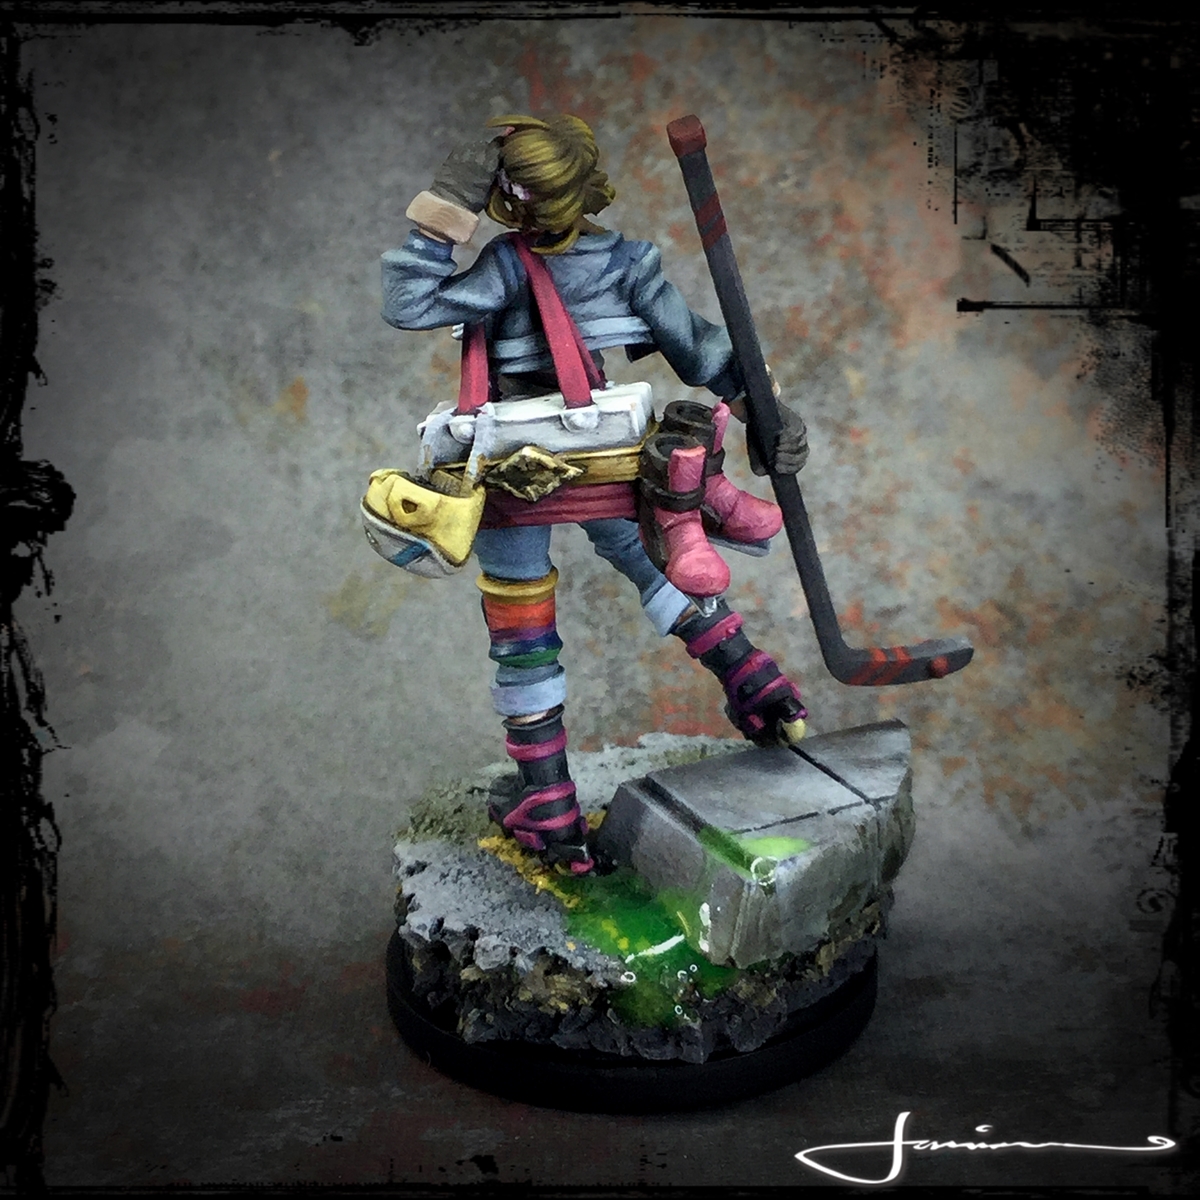
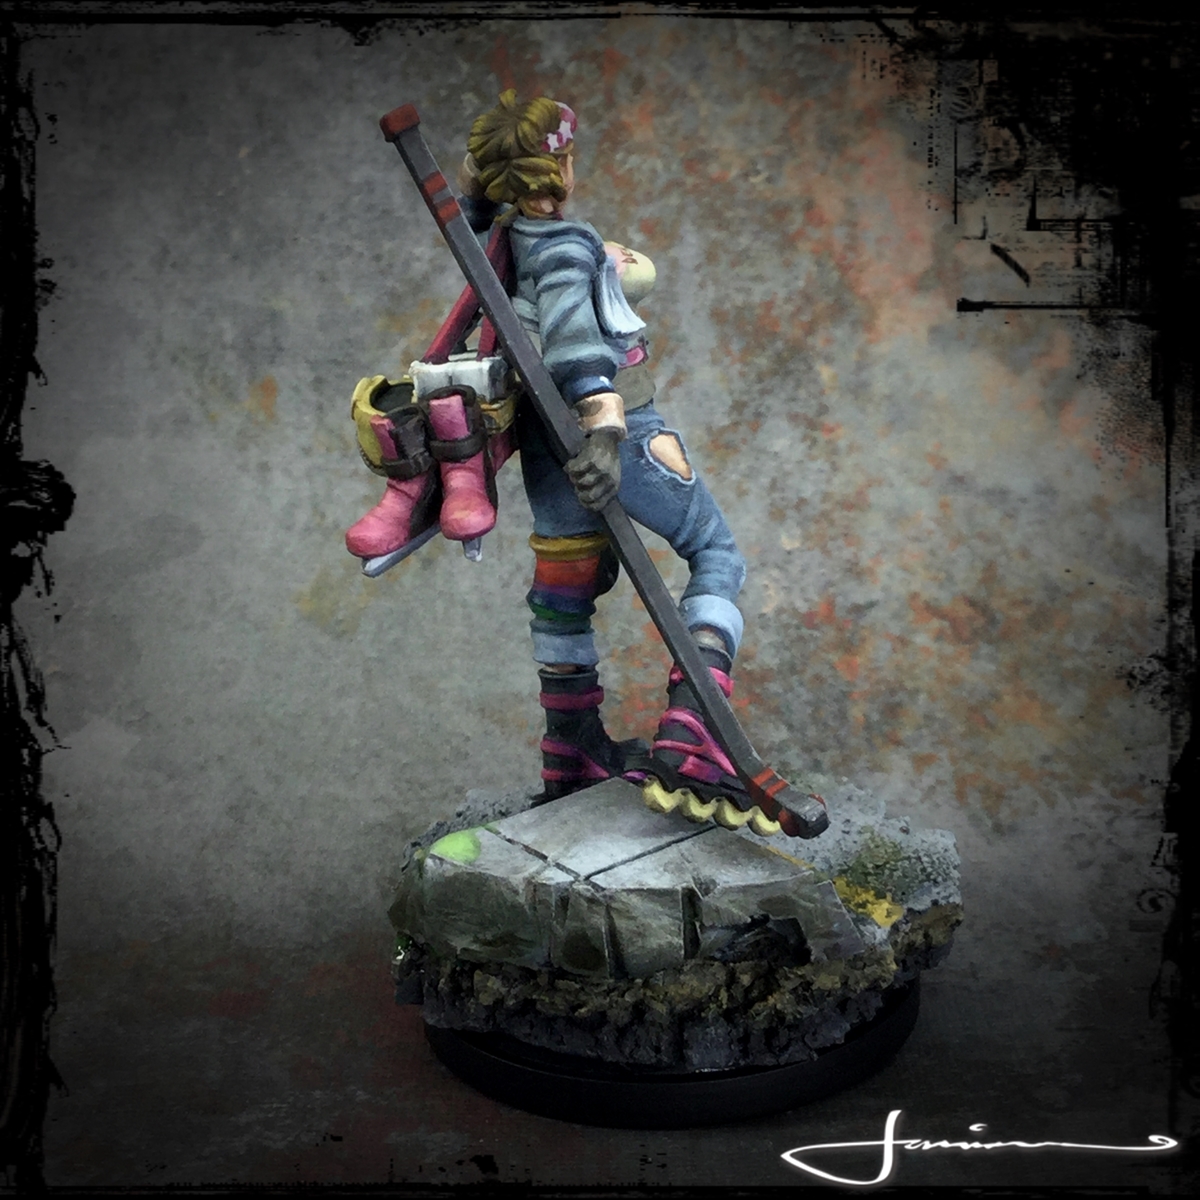
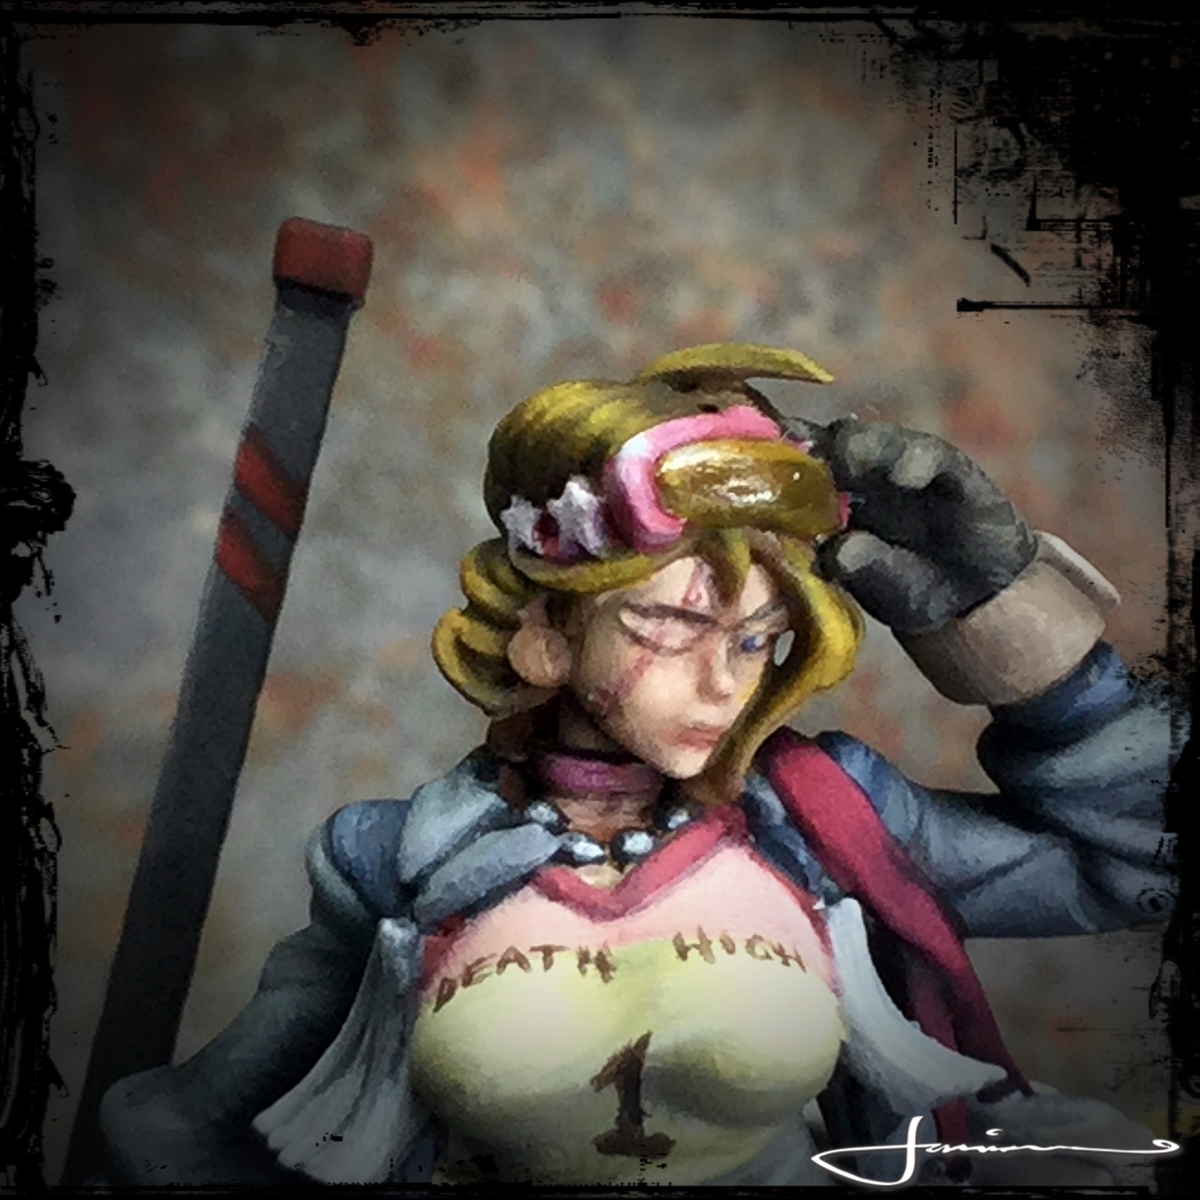
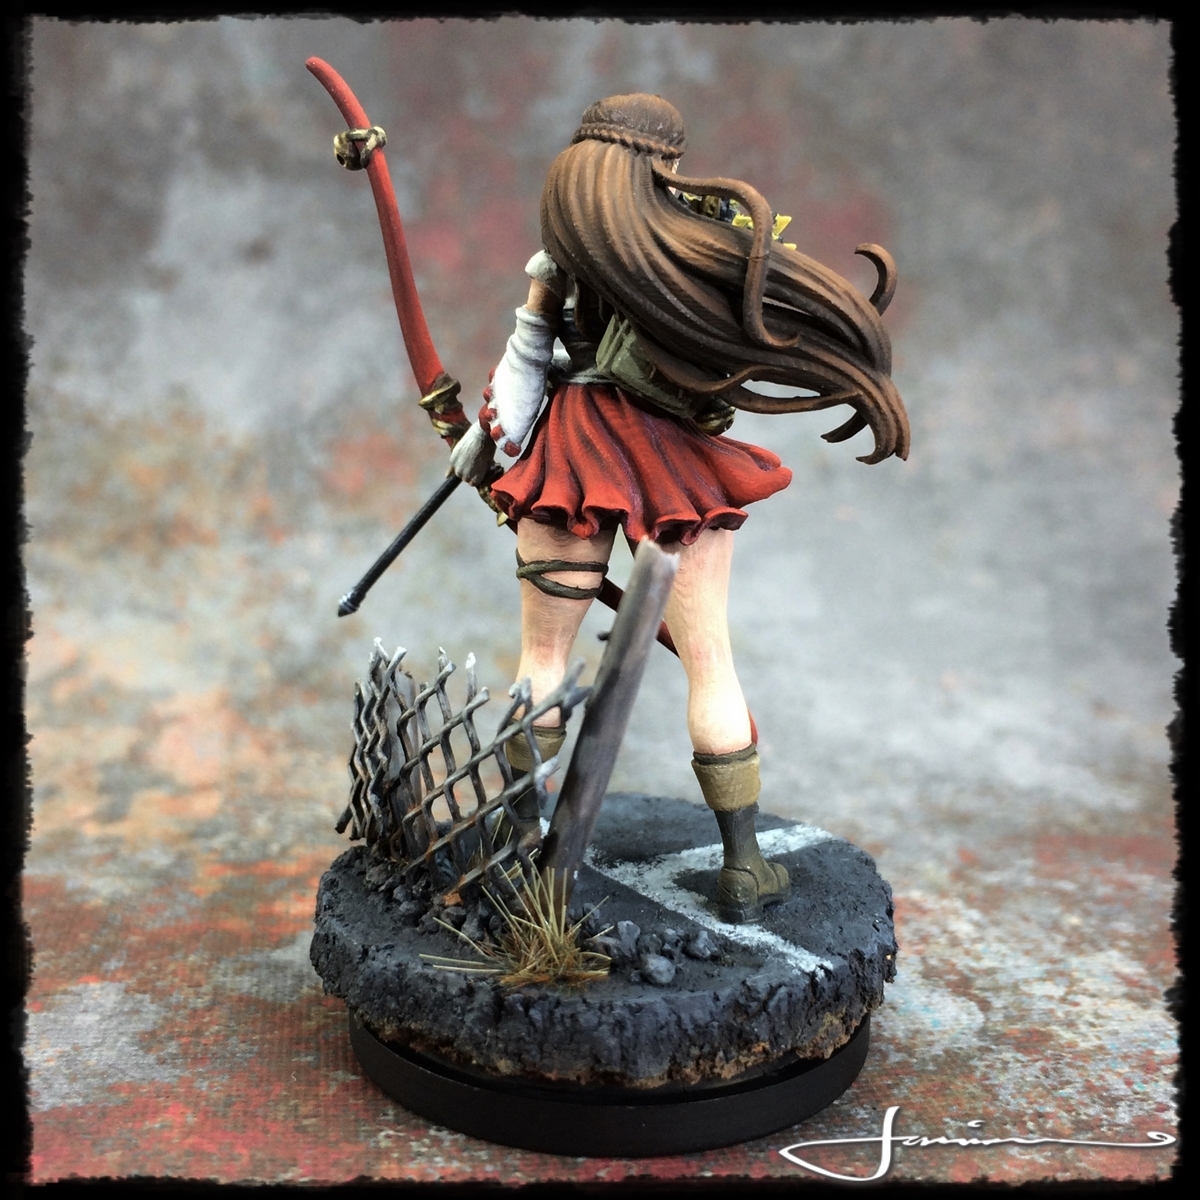
Death High - Dragon Sacrifice (2nd Mini of 2021!!)
I love the Death High series that KDM adds to from time to time. Noooooow not all KDM fans would agree with the series and some folk really hate them as they take time from developing more content or just actually fulfilling the now very overdue kickstarter. buuuut I’m primarily a painter and I loves them!!
My 12th one of the series to finish is the Dragon Sacrifice aka Lil Ms Sassypants. And was to also be the 2nd mini of 2021 to be finished. A rate that I have no chance of keeping up!!
 'you looking at me? Like uh reeeeeeeeeeeally"
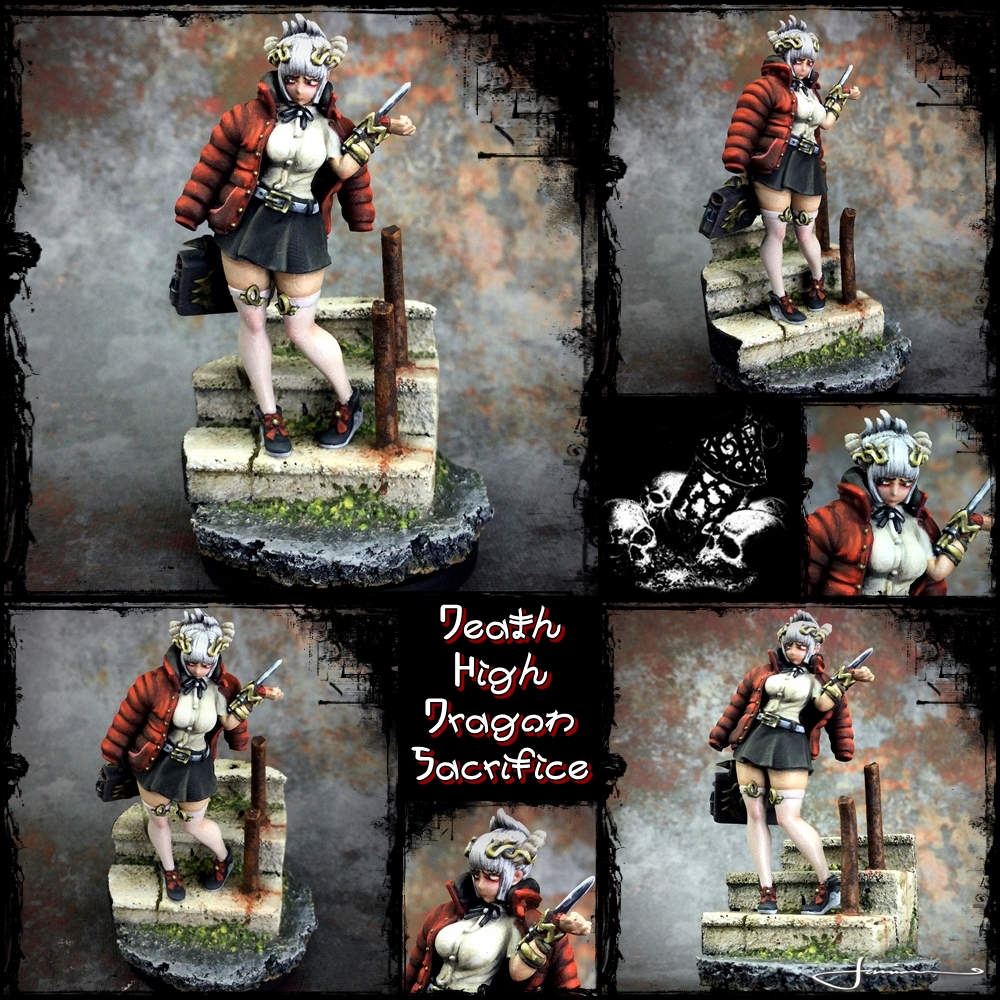
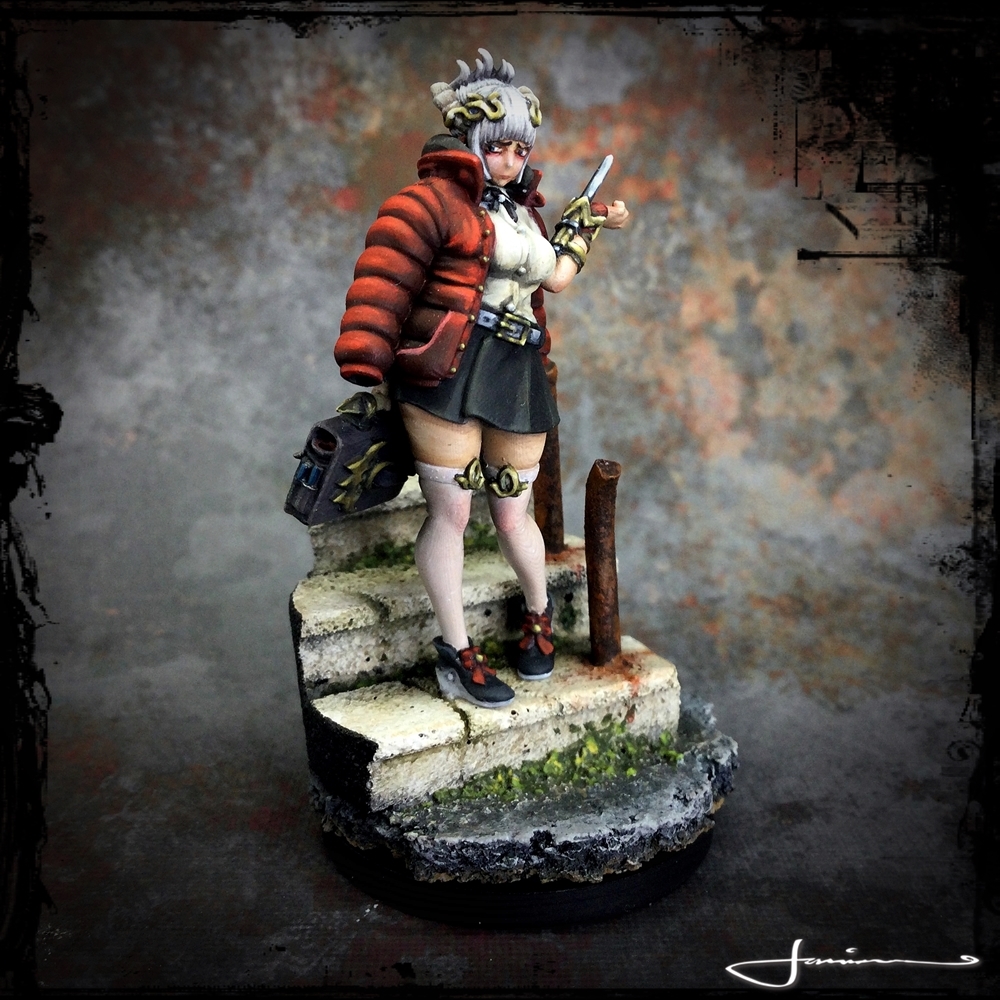
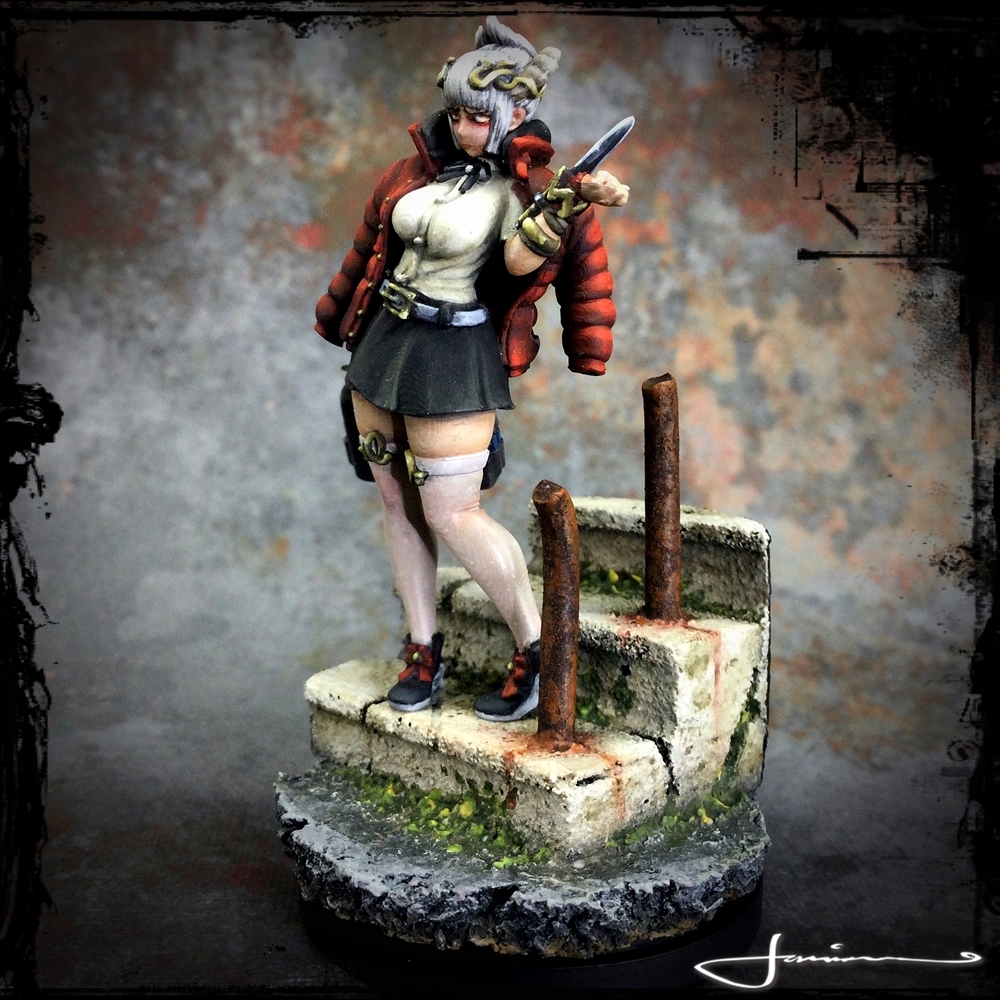
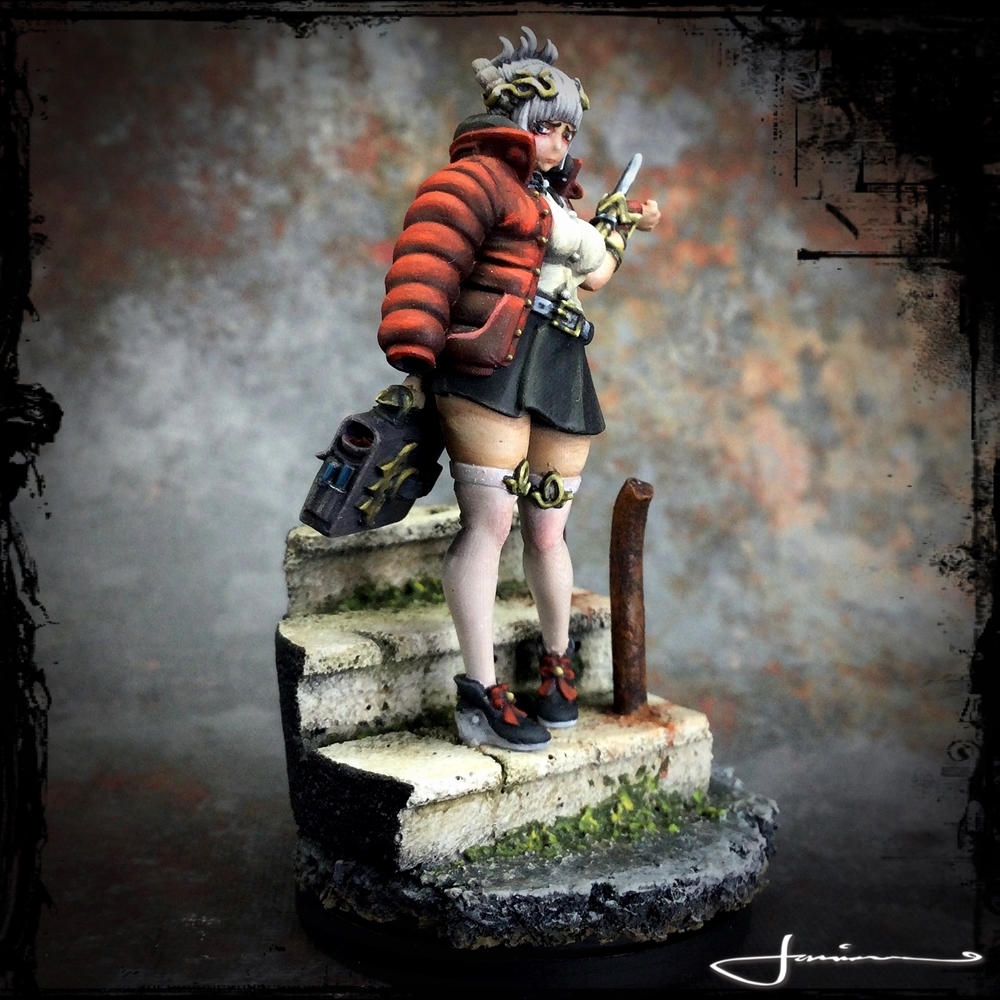
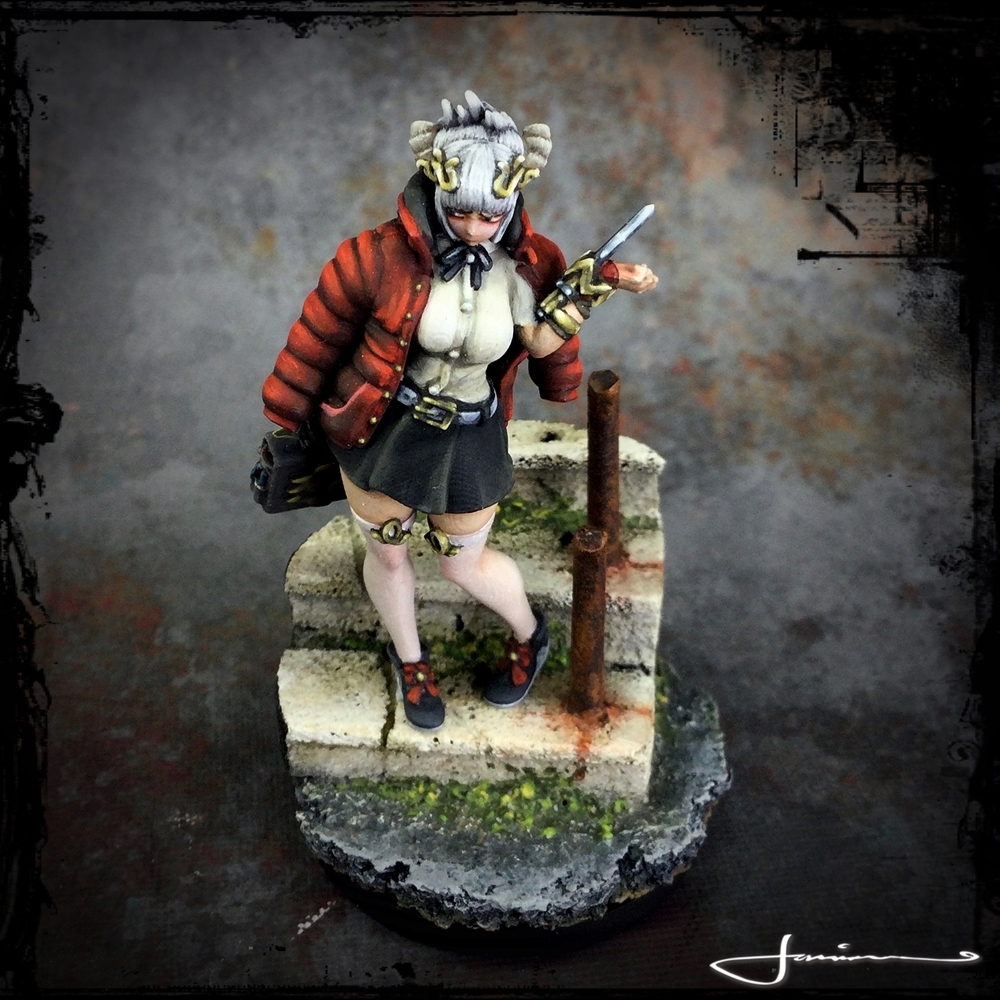
The base is a ground layer of cork (cork coasters are awesome buys on amazon) and then I sculpted the steps from Sculpture Block (same stuff I used for the Hamelin base over on that project) and then rammed to pieces of styrene rod in for the broken handrail.
A very simple base but pretty effective. I did the building and painting on stream as a live demo for the the viewers on how to make simple narrative frame bases
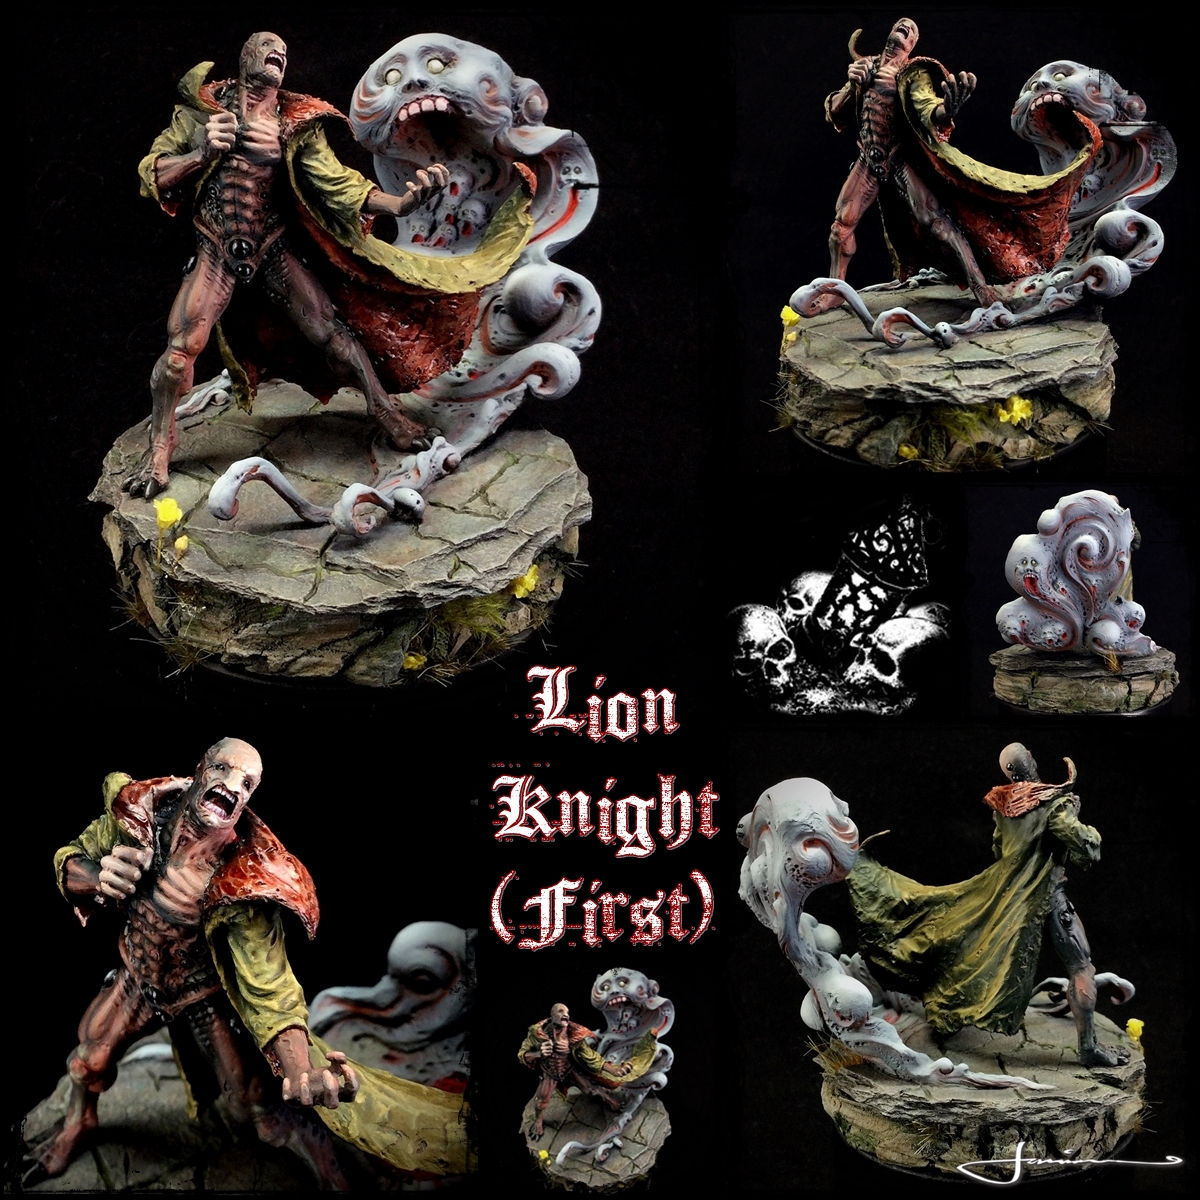
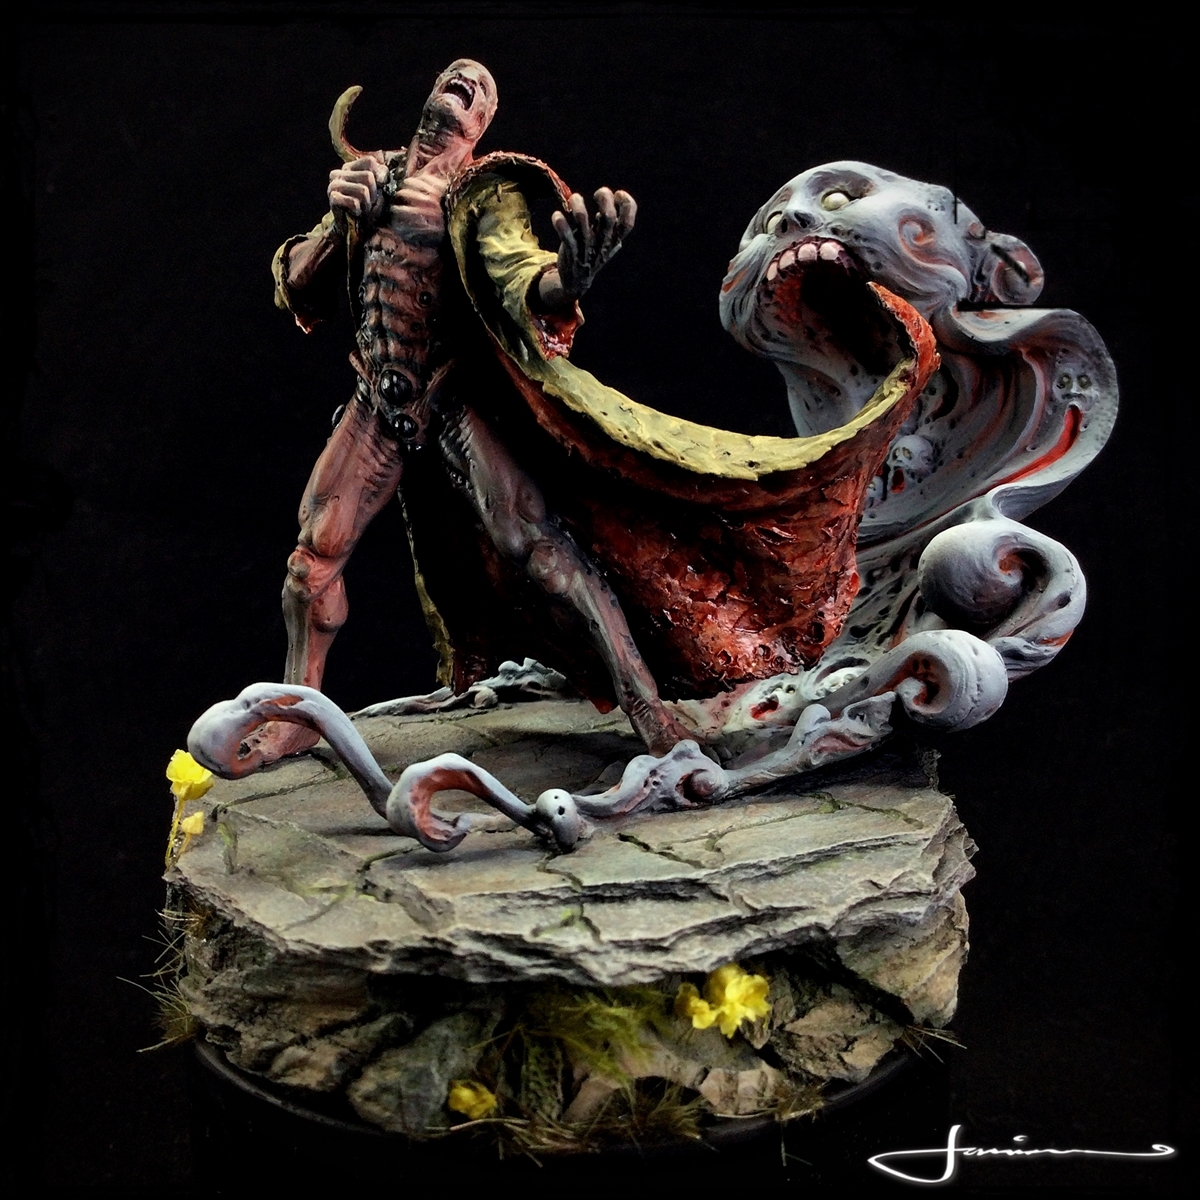
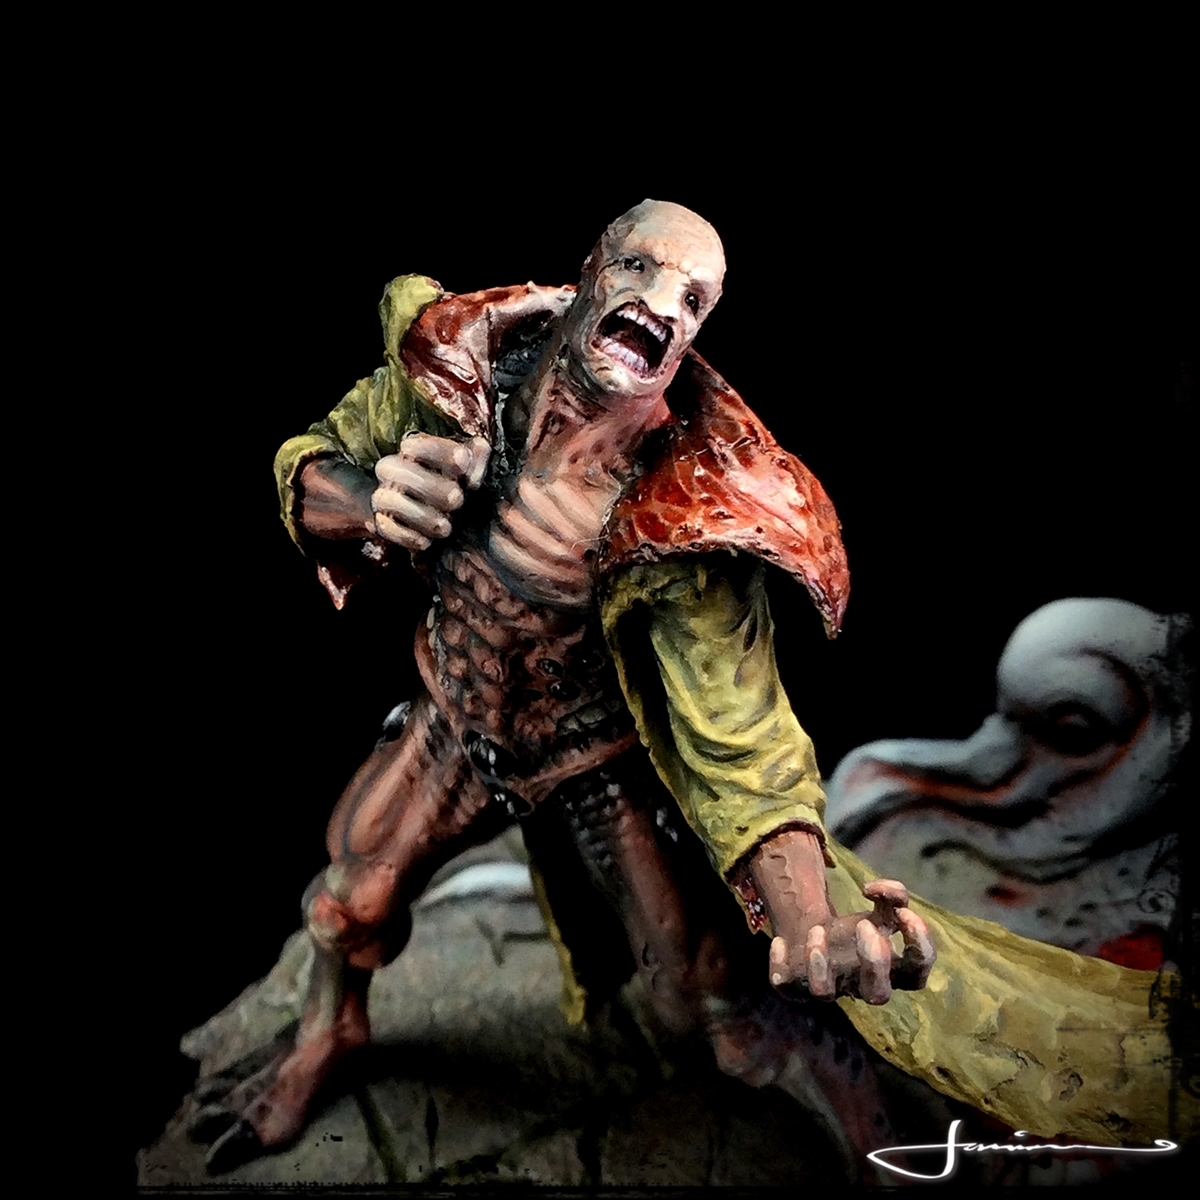
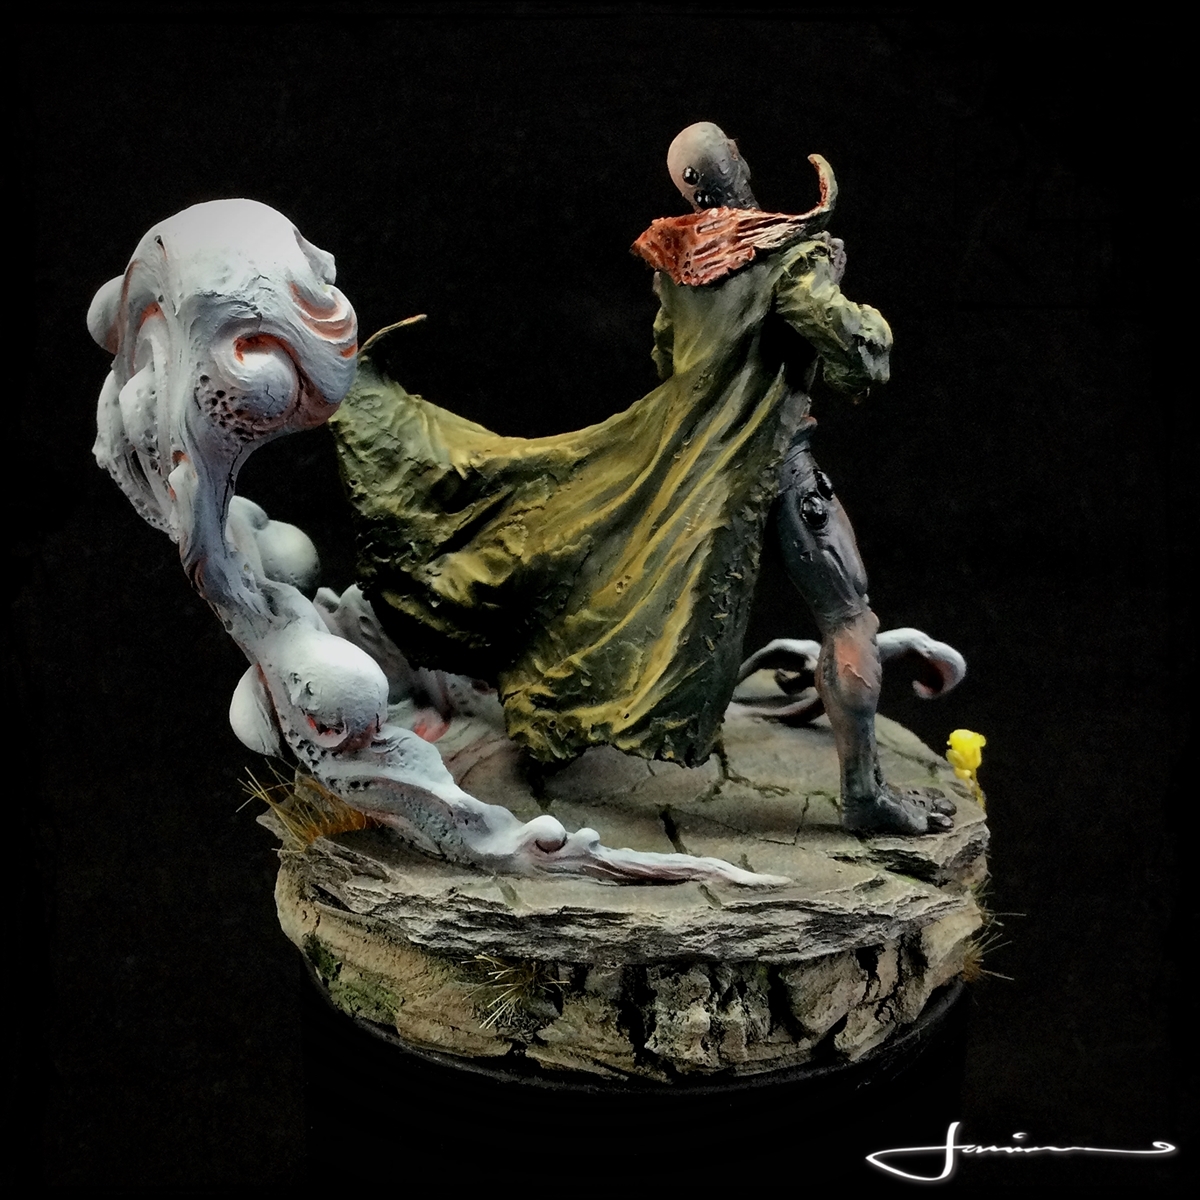
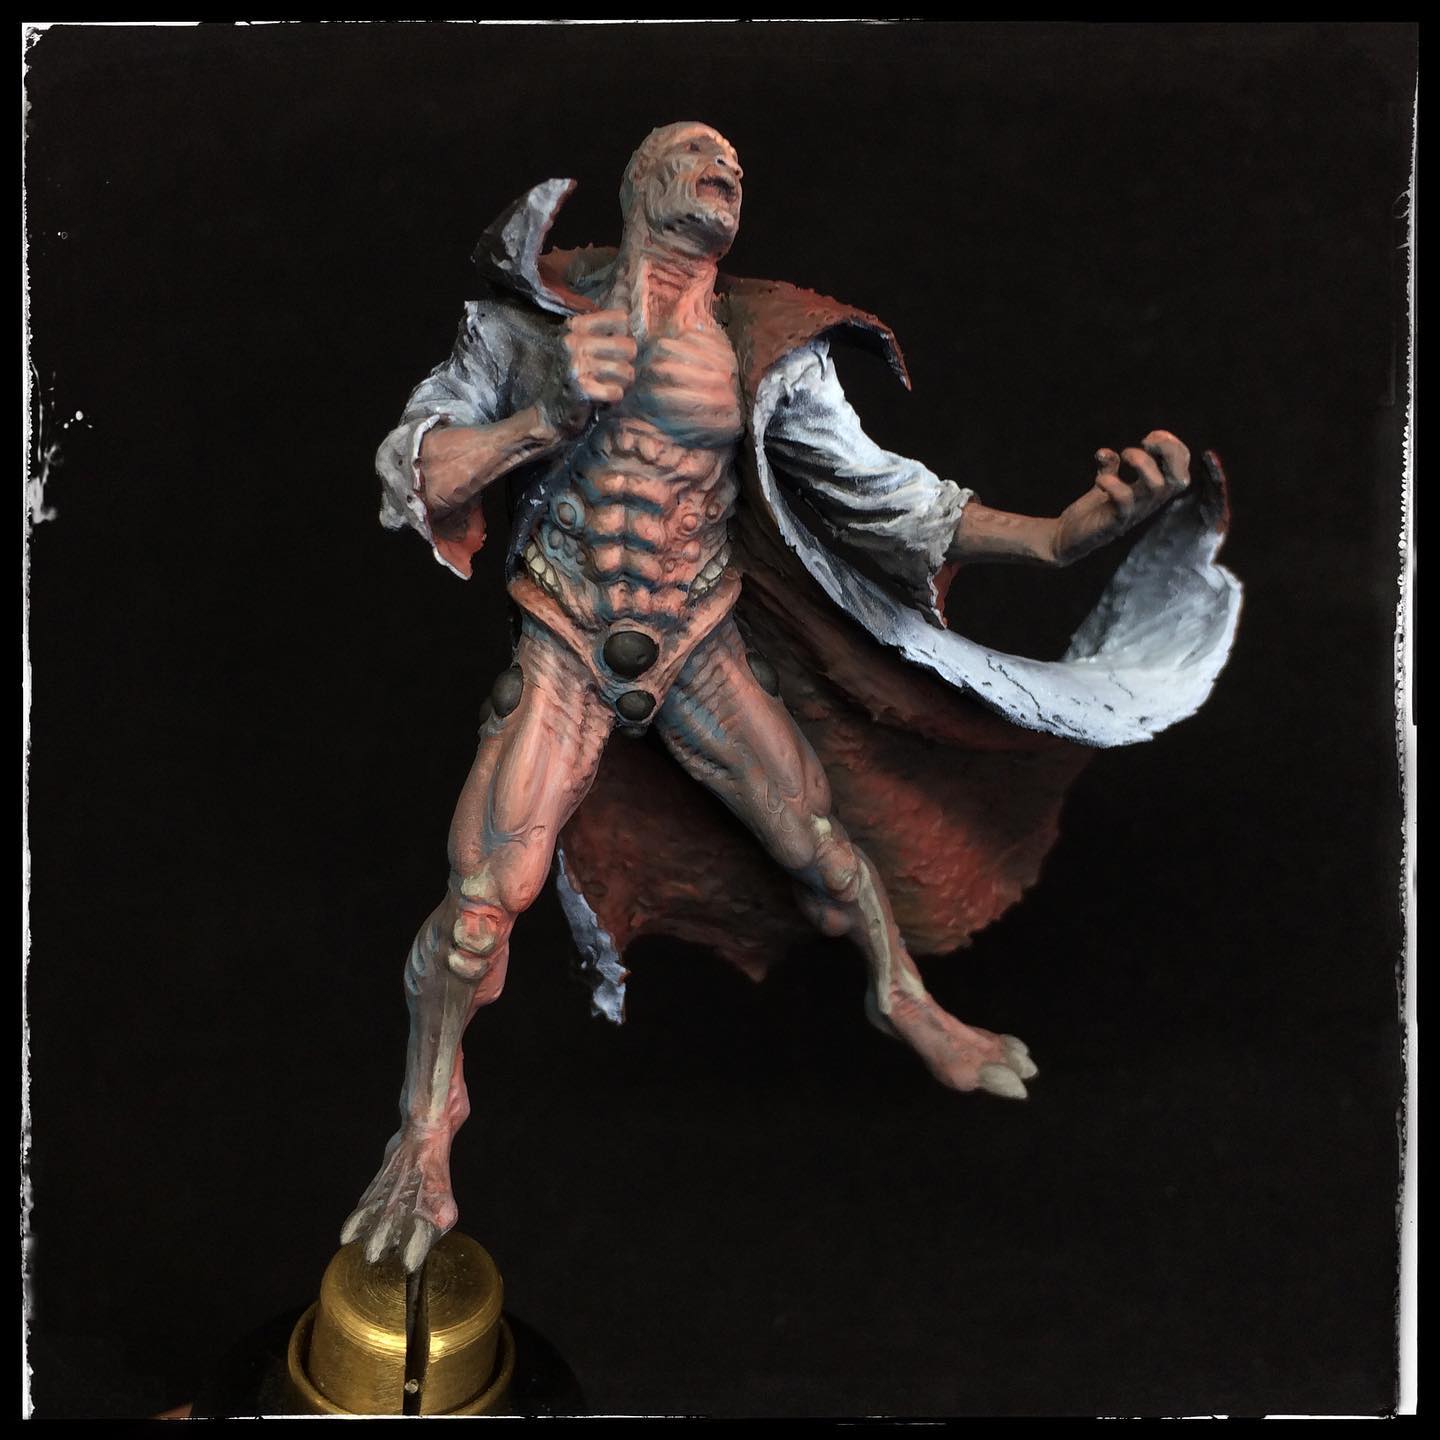
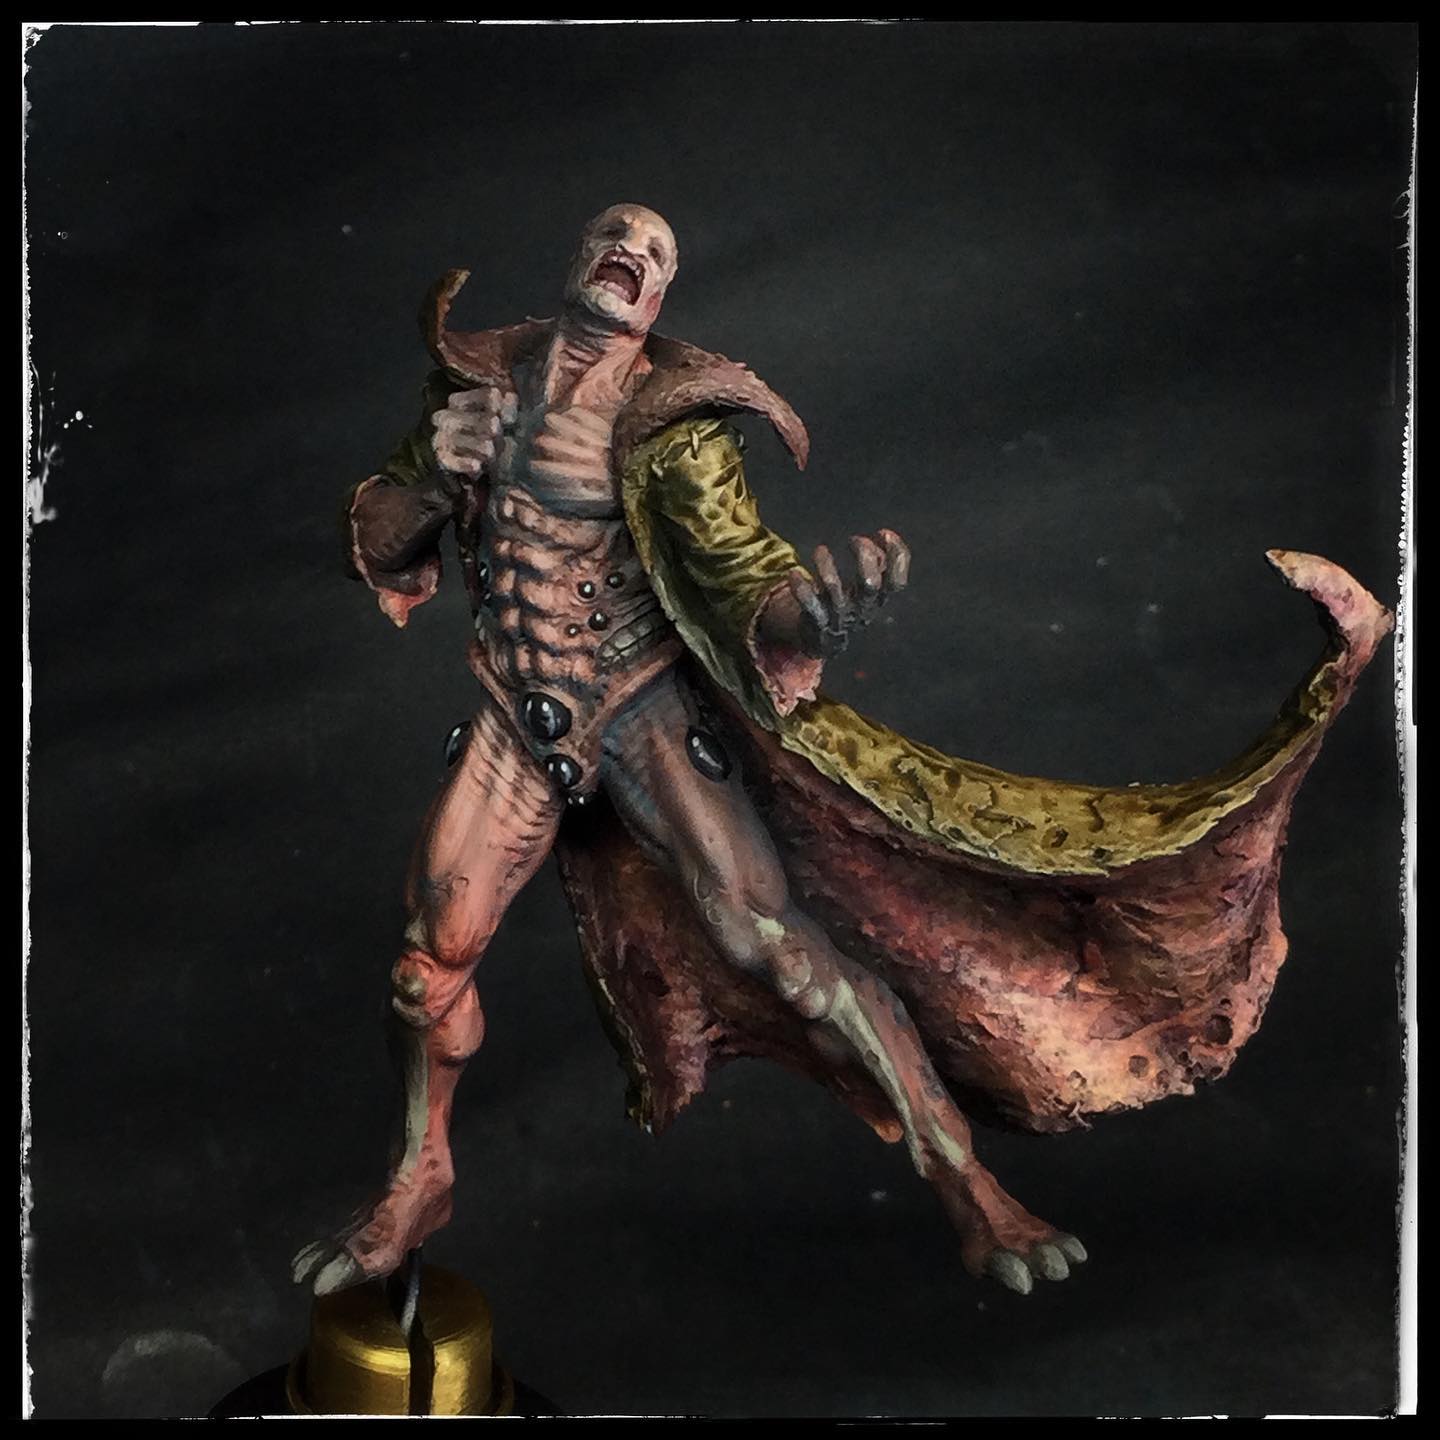
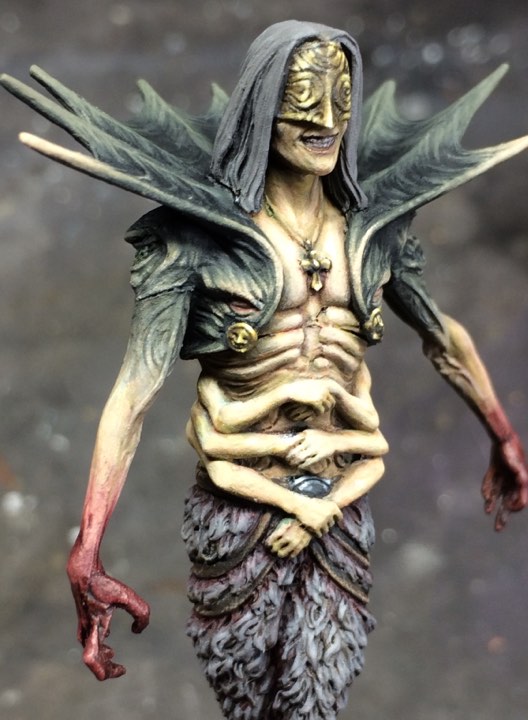
Lion Knight 1st - Is that ...... his skin he's wearing?
Work has continued on Lion Knight albeit slowly…….!!!
The main figure is now about 80% done and I finished off the interior of his ‘flayed coat’
There are still a few final refinements to be done yet and some apex highlights to be introduced.
The base needed some sculpting work done to the wailing smoke so I finally got around to that. For sculpting and fill work I use a mix of greenstuff and milliput extra fine usually – 1 part of greenstuff to 2 parts milliput.
With the sculpting finished I primed the thing before remembering that i wanted to use a dremel to etch some details into the slate that I had used under the wailing smoke……. le sigh.
Anyways the base is nearly ready to be painted …… neeeeearly
Lion Knight 1st - Off to a flaying start
KDM minis for the most part are NOT cheap. If youre lucky to snag them from the KDM store updates n sales you get to avoid the filth that is eBay and the scalpers that lie within in. Buuuuuuut if you miss something and really really need that model…….. well……. good luck. Finding a mini sought on ebay at less than a 200% markup is unusual and some of the prices there for the more sought after minis can be seriously nuts.
One of the more rare and sought after minis in KDM is the Lion Knight 1st which came out (iirc) about 2015. It originally sold for about $50 as its a monster and larger sculpt than the smaller survivors variants. The last time I saw a first run of the Lion Knight 1st there it was going for north of $400.
However, sometimes. just sooooooooometimes Lady Luck takes pity and smiles down on a KDM collector and just the right time~! Checking FB one day I found that a well know French miniature painter was selling off some of his rarer KDM pieces and not for horrid scalper prices!
I jumped in and managed to get first run versions of both the Lion Knight 1st and the Storm knight (another mini I’ve been trying to track down for a fair price for a while) for the very decent price of 60euro each!!!!
I have been wanting to paint the 1st Lion Knight since I first saw pics of him over on the KDM collector site. He is, at least to me, one of the most emotive, sad, narrative and disturbing sculpts that KDM has ever produced. His story is a sad one and the sculpt that Thomas David came up with for him is just amazing. Hand sculpted rather than by CAD, there is a gorgeous traditional feeling to the model and it exudes a presence and character than I feel can often be missing form the almost perfectly sculpted computer designed models.
 The Lion Knight himself in his insane, isolated anguish
The Lion Knight’s wee bit of fluff gives a start to his sad tortured story –
“The first Lion Knight was a failure. Its vision permanently fixed a few moments into the future, it was driven mad living outside of time and deemed too unstable to lead the Golden Entity’s armies. Now imprisoned deep within the Golden Labyrinth, the first Lion Knight stews in its derangement, the heady stench attracting Wailing Smoke from all corners of the abyss. The first Lion Knight spends its lonely days in lively conversation with them.”
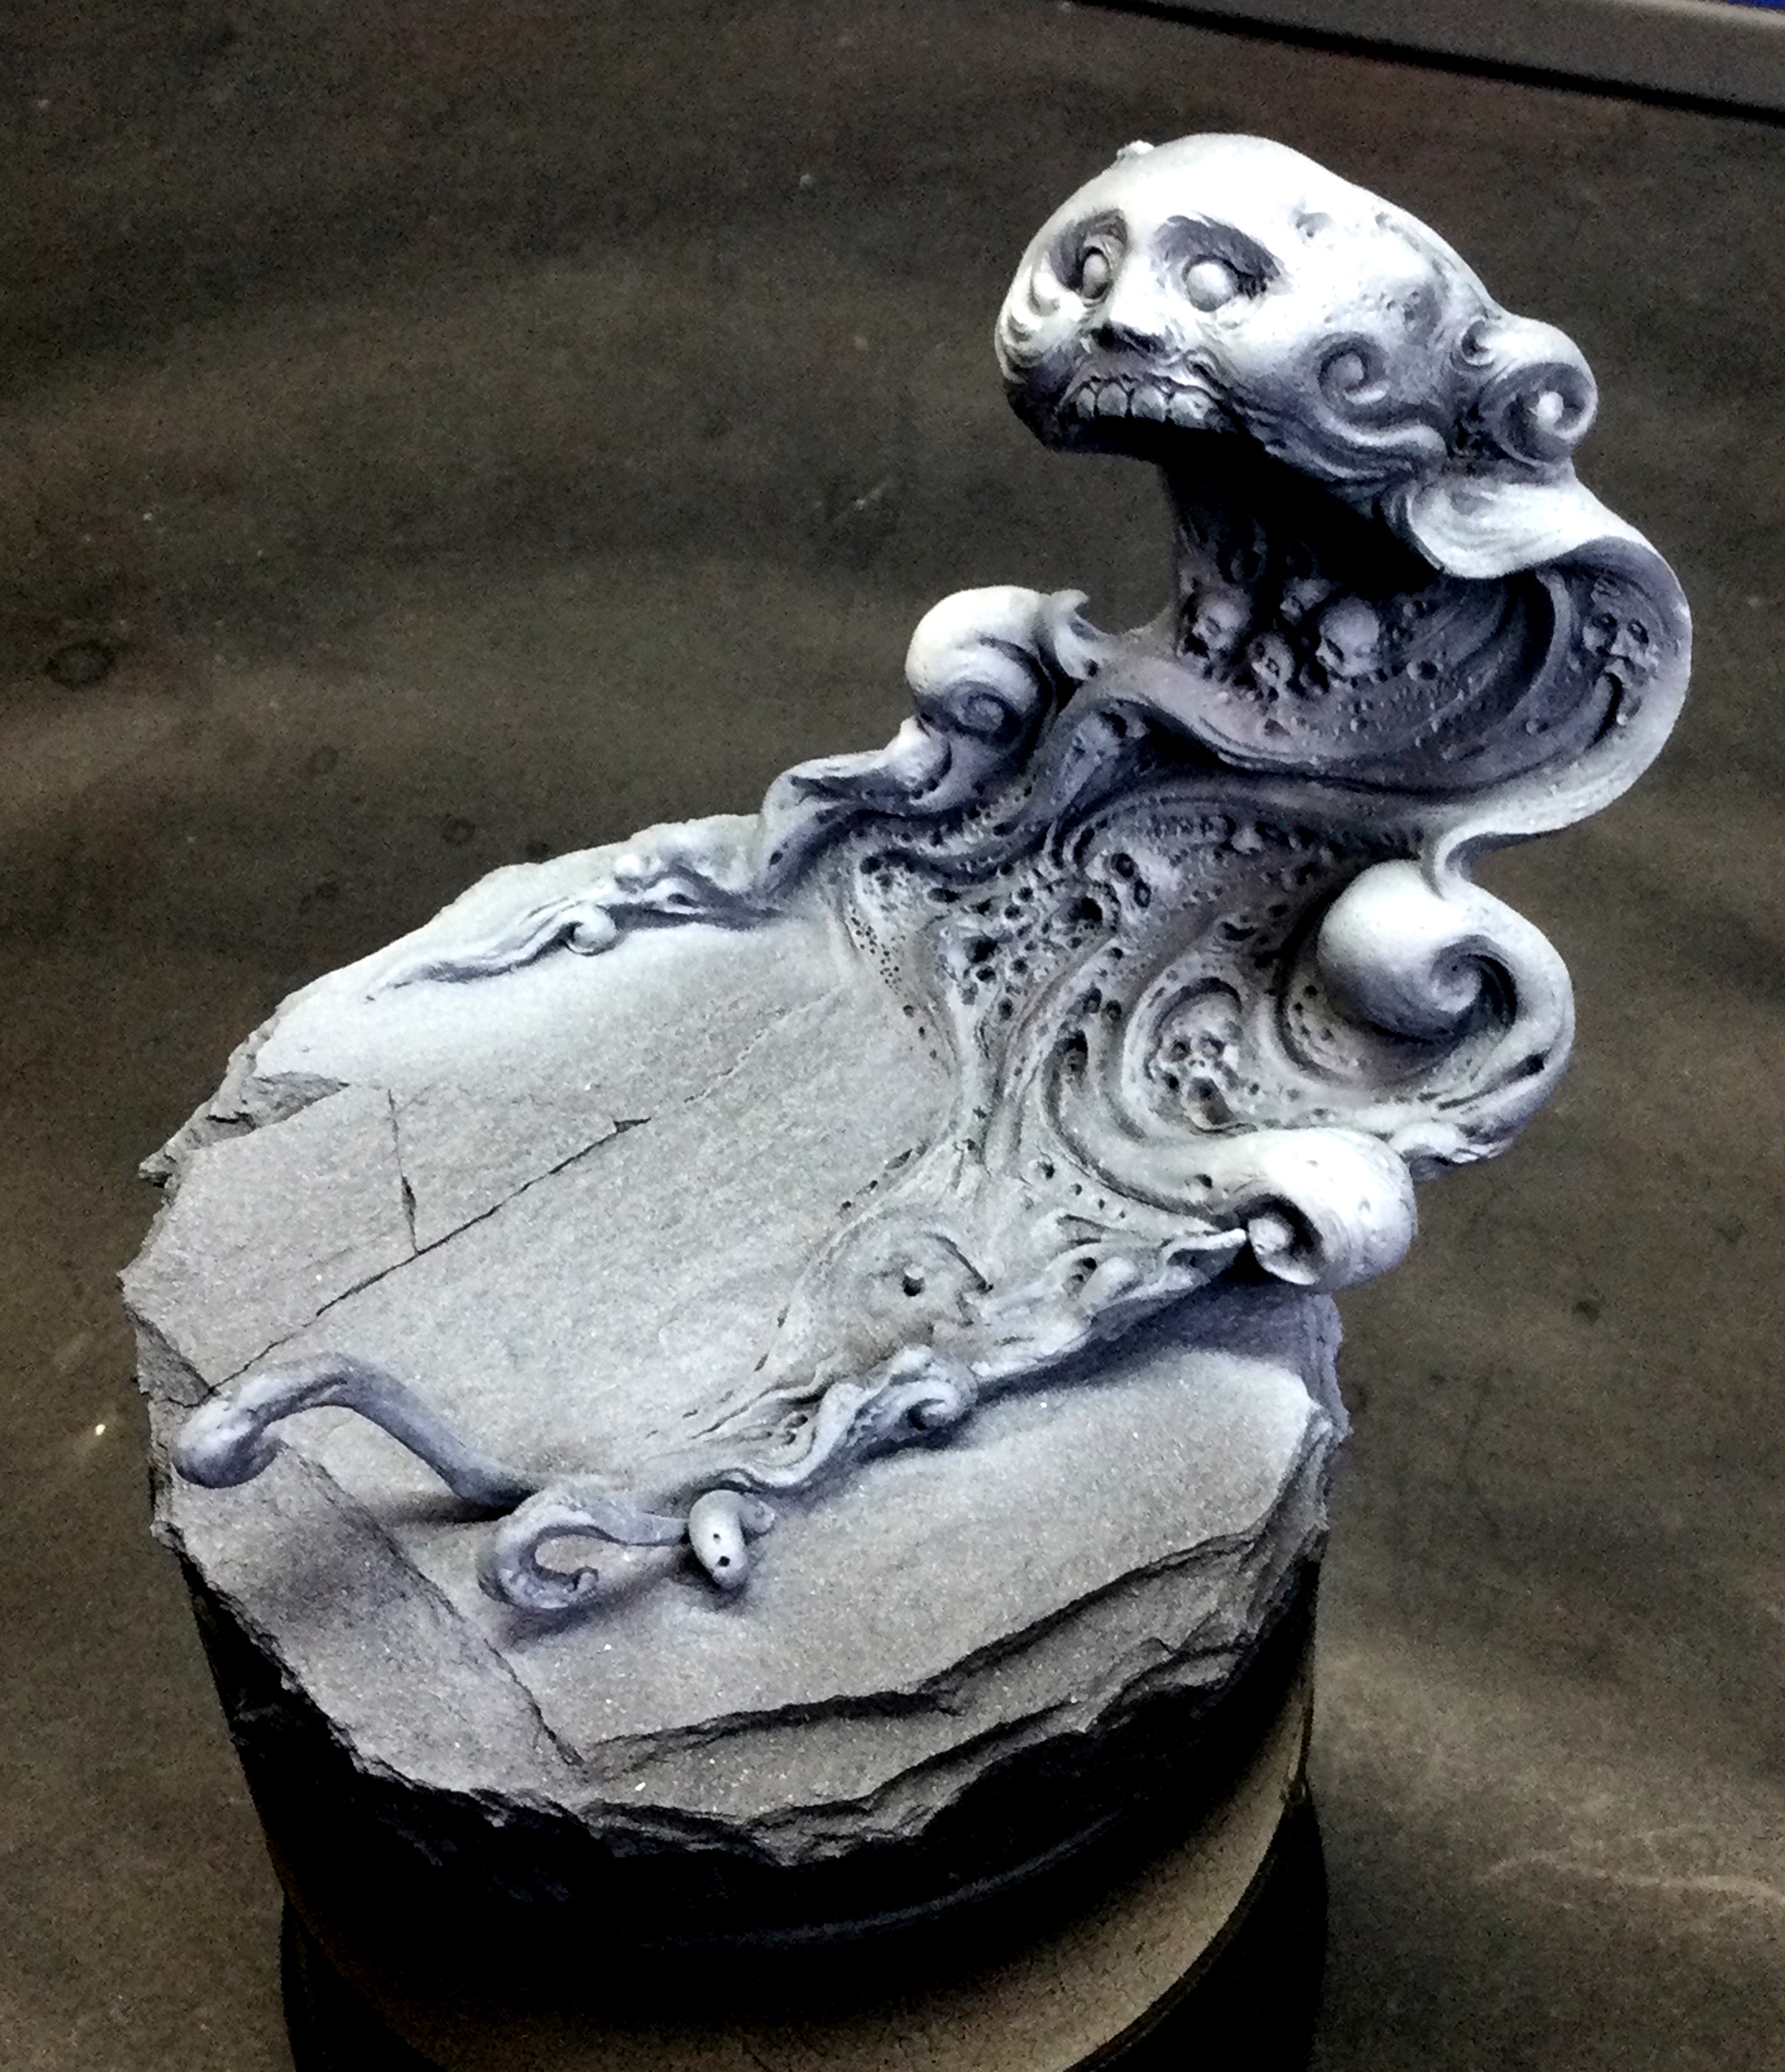
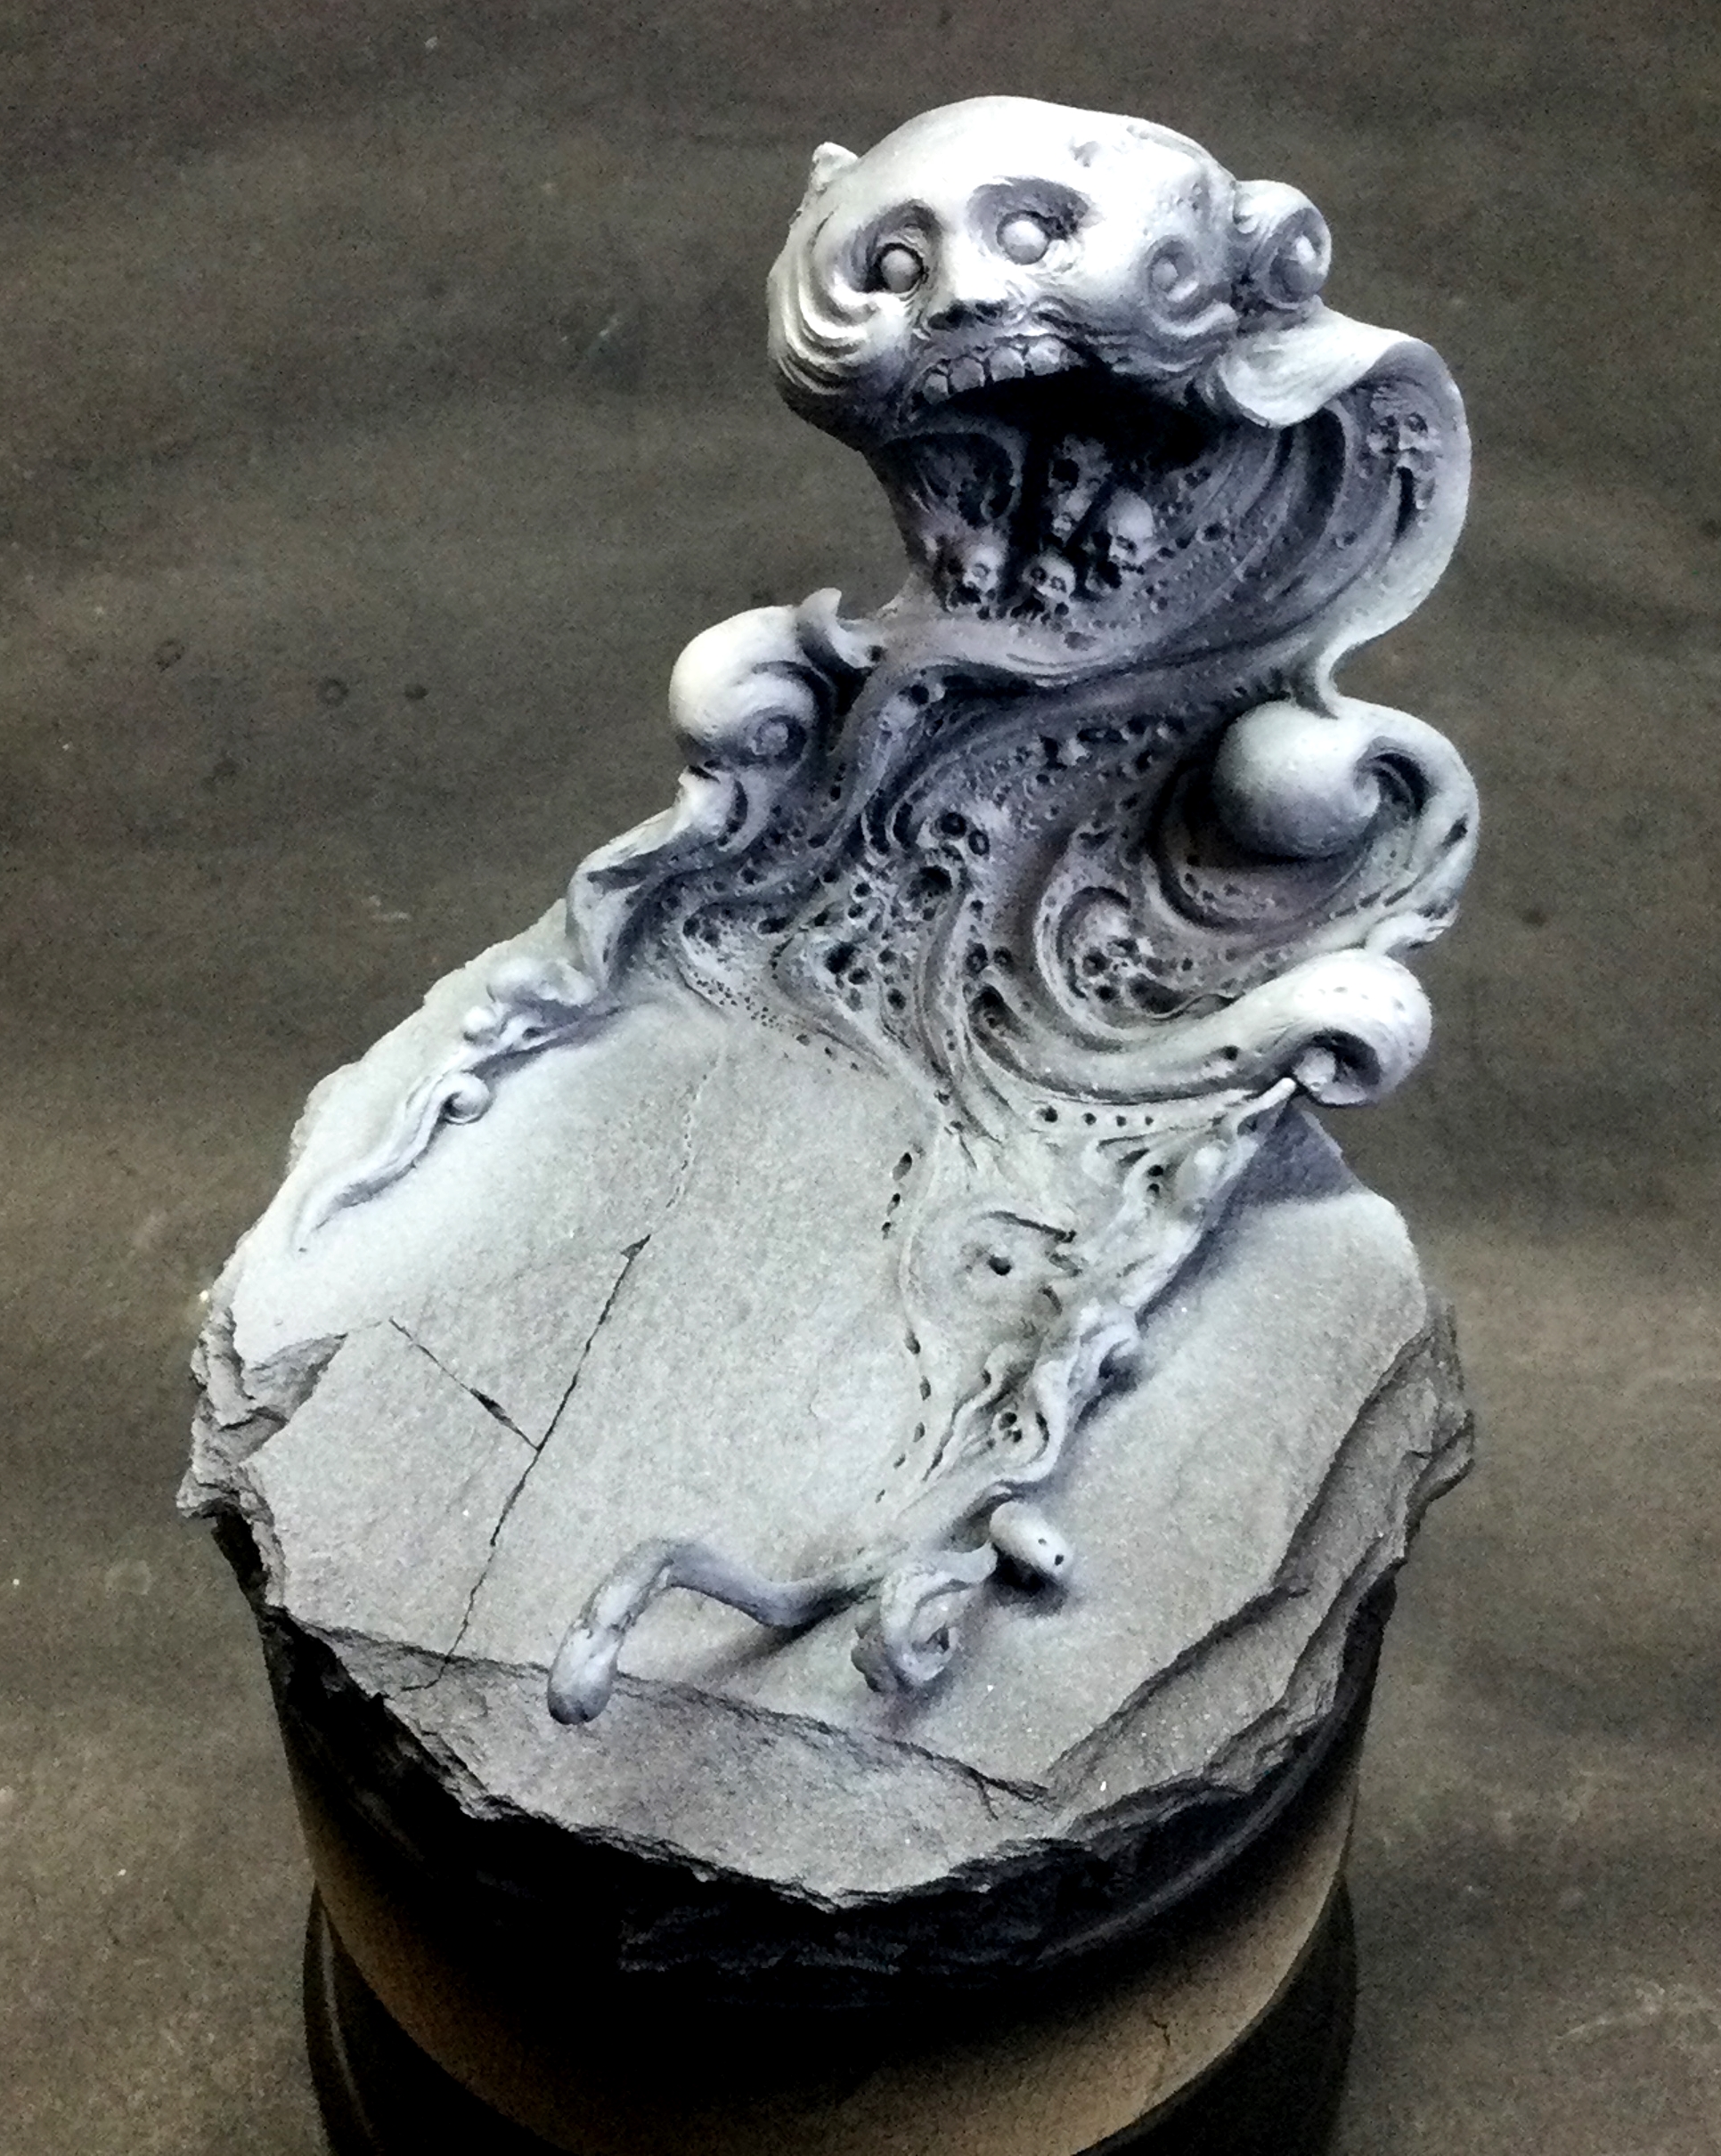
There are two main parts to the Lion Knight 1st model. The Lion Knight himself in a cloak of (as I imagine it) his own flayed skin which in stripped from his own body whilst in the throes of his insanity and then fashioned during a lucid moment to ‘re-reclothe’ himself and the above mentioned Wailing Smoke, his only company and conversation while imprisoned in the Golden Labyrinth.
I’ve left the Wailing Smoke part aside for the minute as I intend to pin that to the plinth base and then add some detail and blending to it with a mix of milliput & greenstuff before painting it. We’ll come to that part of the project later on.
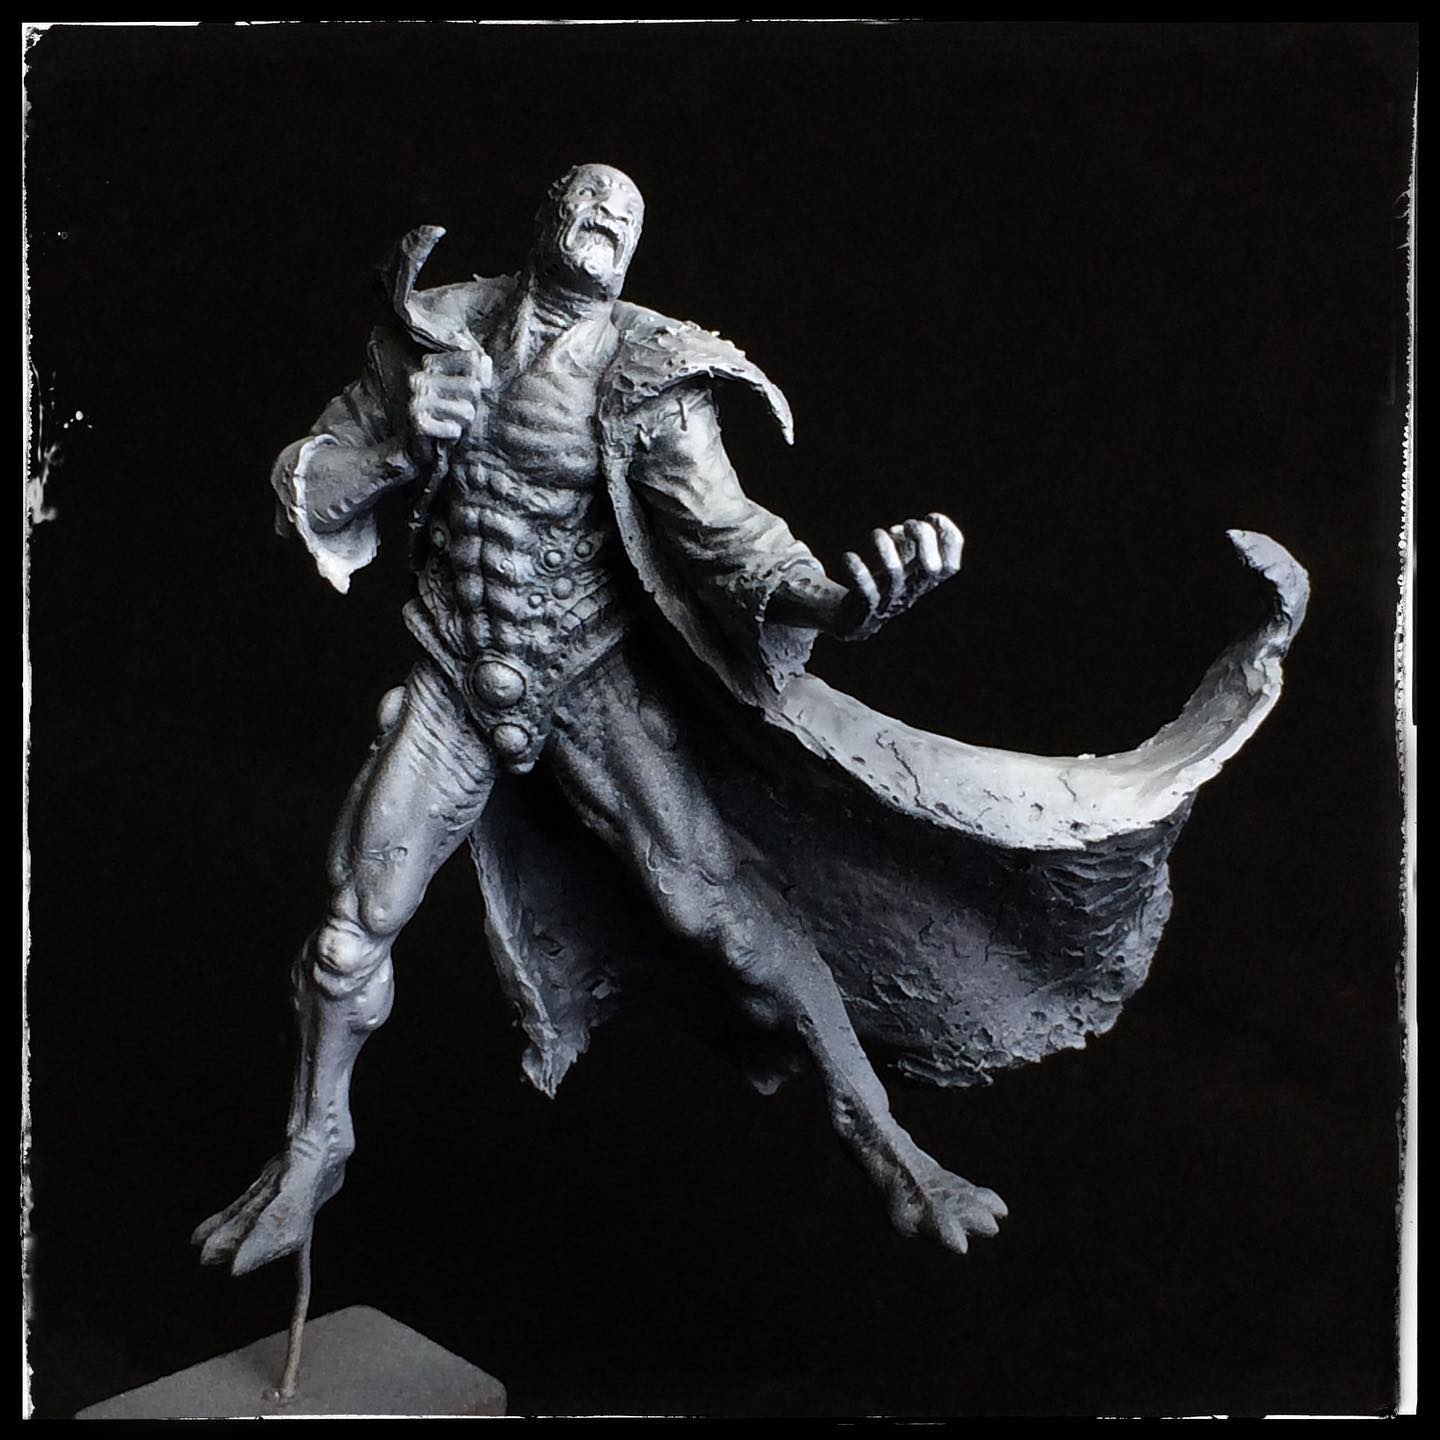
I assembled the Lion Knight himself fully and after giving him two coats of black primer through the airbrush, switched to white primer and laterally primed the model again from a specific angle, directly looking into his anguished face, as if he were staring up into the only small bit of light allowed him in his cell.
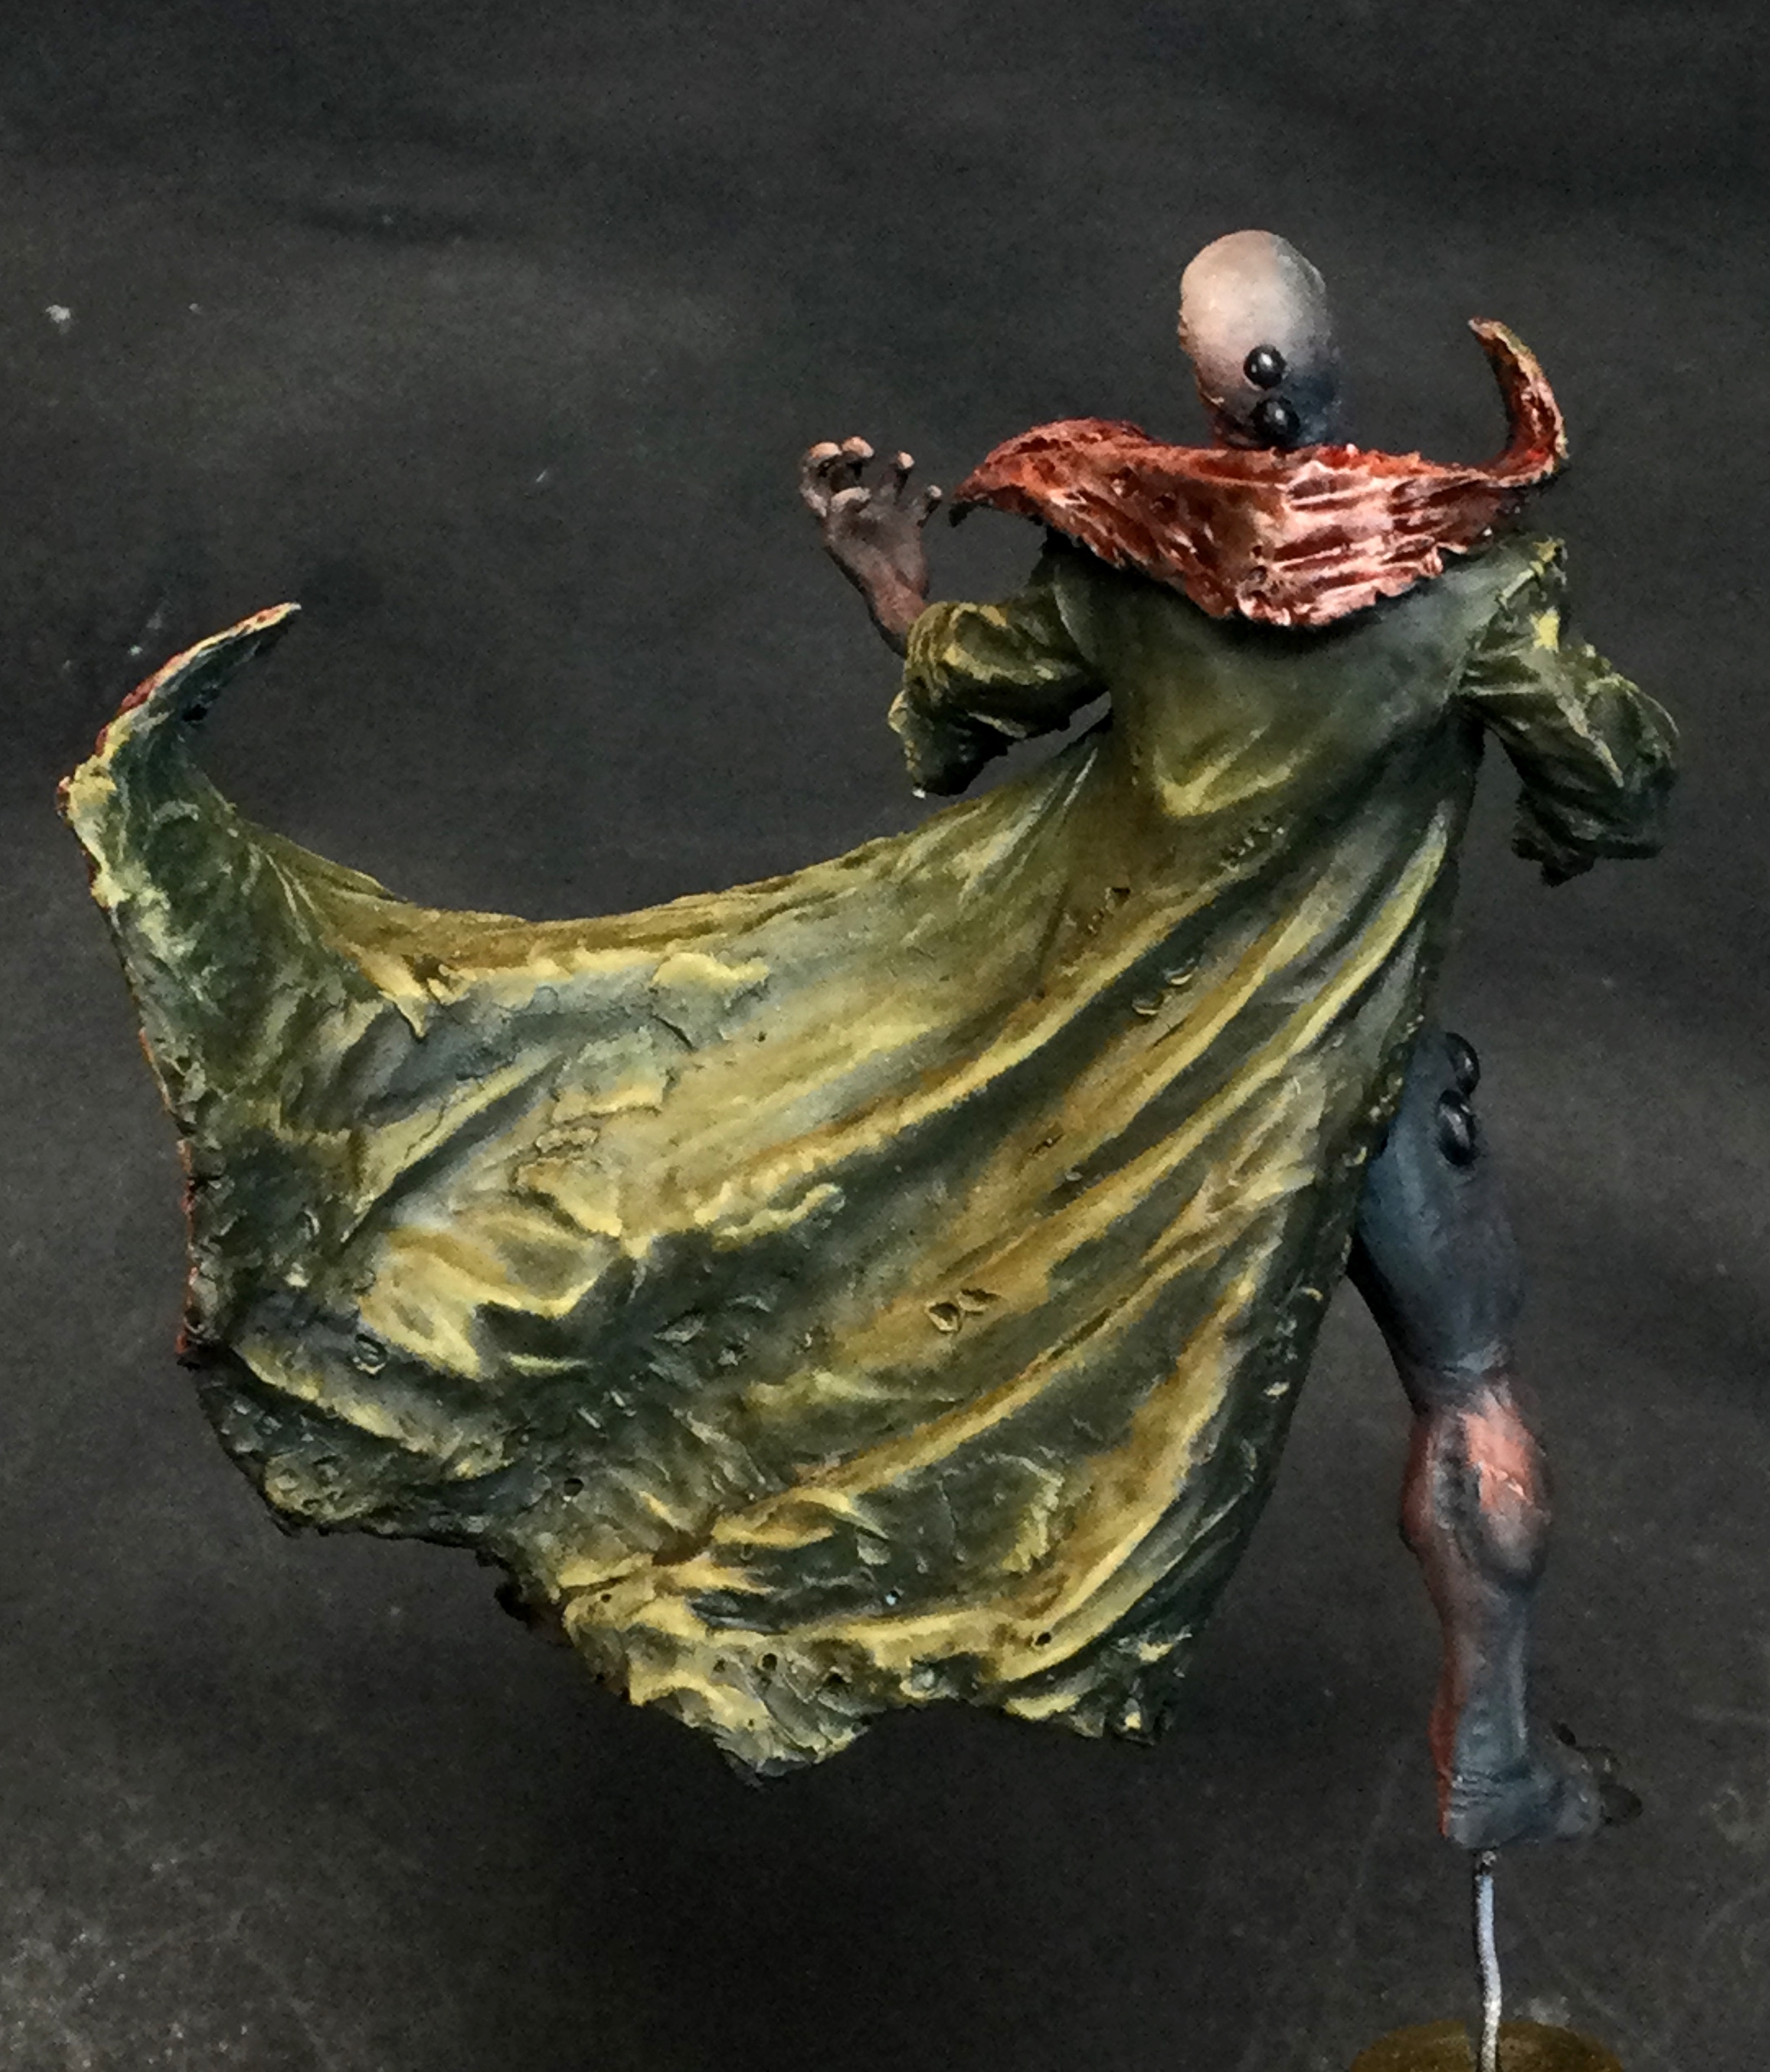
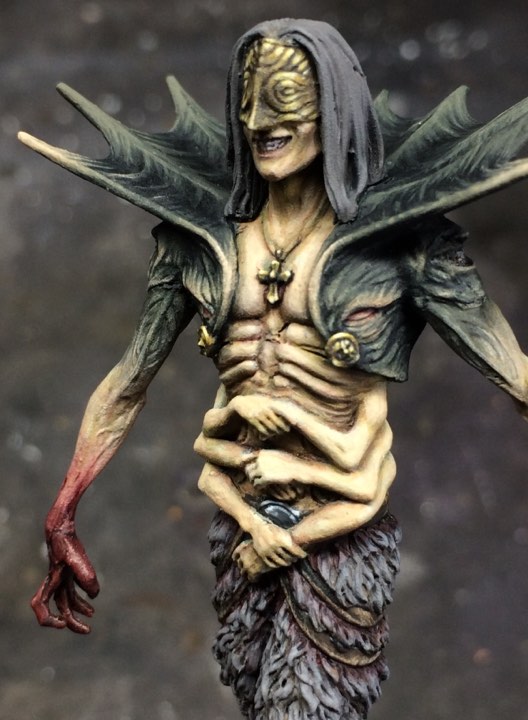
 Flayed & Forlorn
As I noted above, and inspired by the details of the sculpt, I imagined the Lion Knight as having a raw, flayed look to him and his cloak a bloody look on the inside.
I started painting the figure first by working the flayed body wet in wet to get a preblended base coat – going from a dirty turquoise in the shadows up to an angry red skin tone for the mids and then up to a still quite pink highlight pulling the eye up to his screaming face as it looks up to light and possible escape above him forever out of reach.
 He has these curious 'stones' on his legs, groin, ribs and back of his head - my initial thought was to paint them as eyes but the more i thought about it, eyes seemed kinda cheesy and would also take something away from the idea of lonliness and solitude I want to focus on so I've decided to go with a strong dark contrast to the rich flayed flesh and do them as obsidian stones.
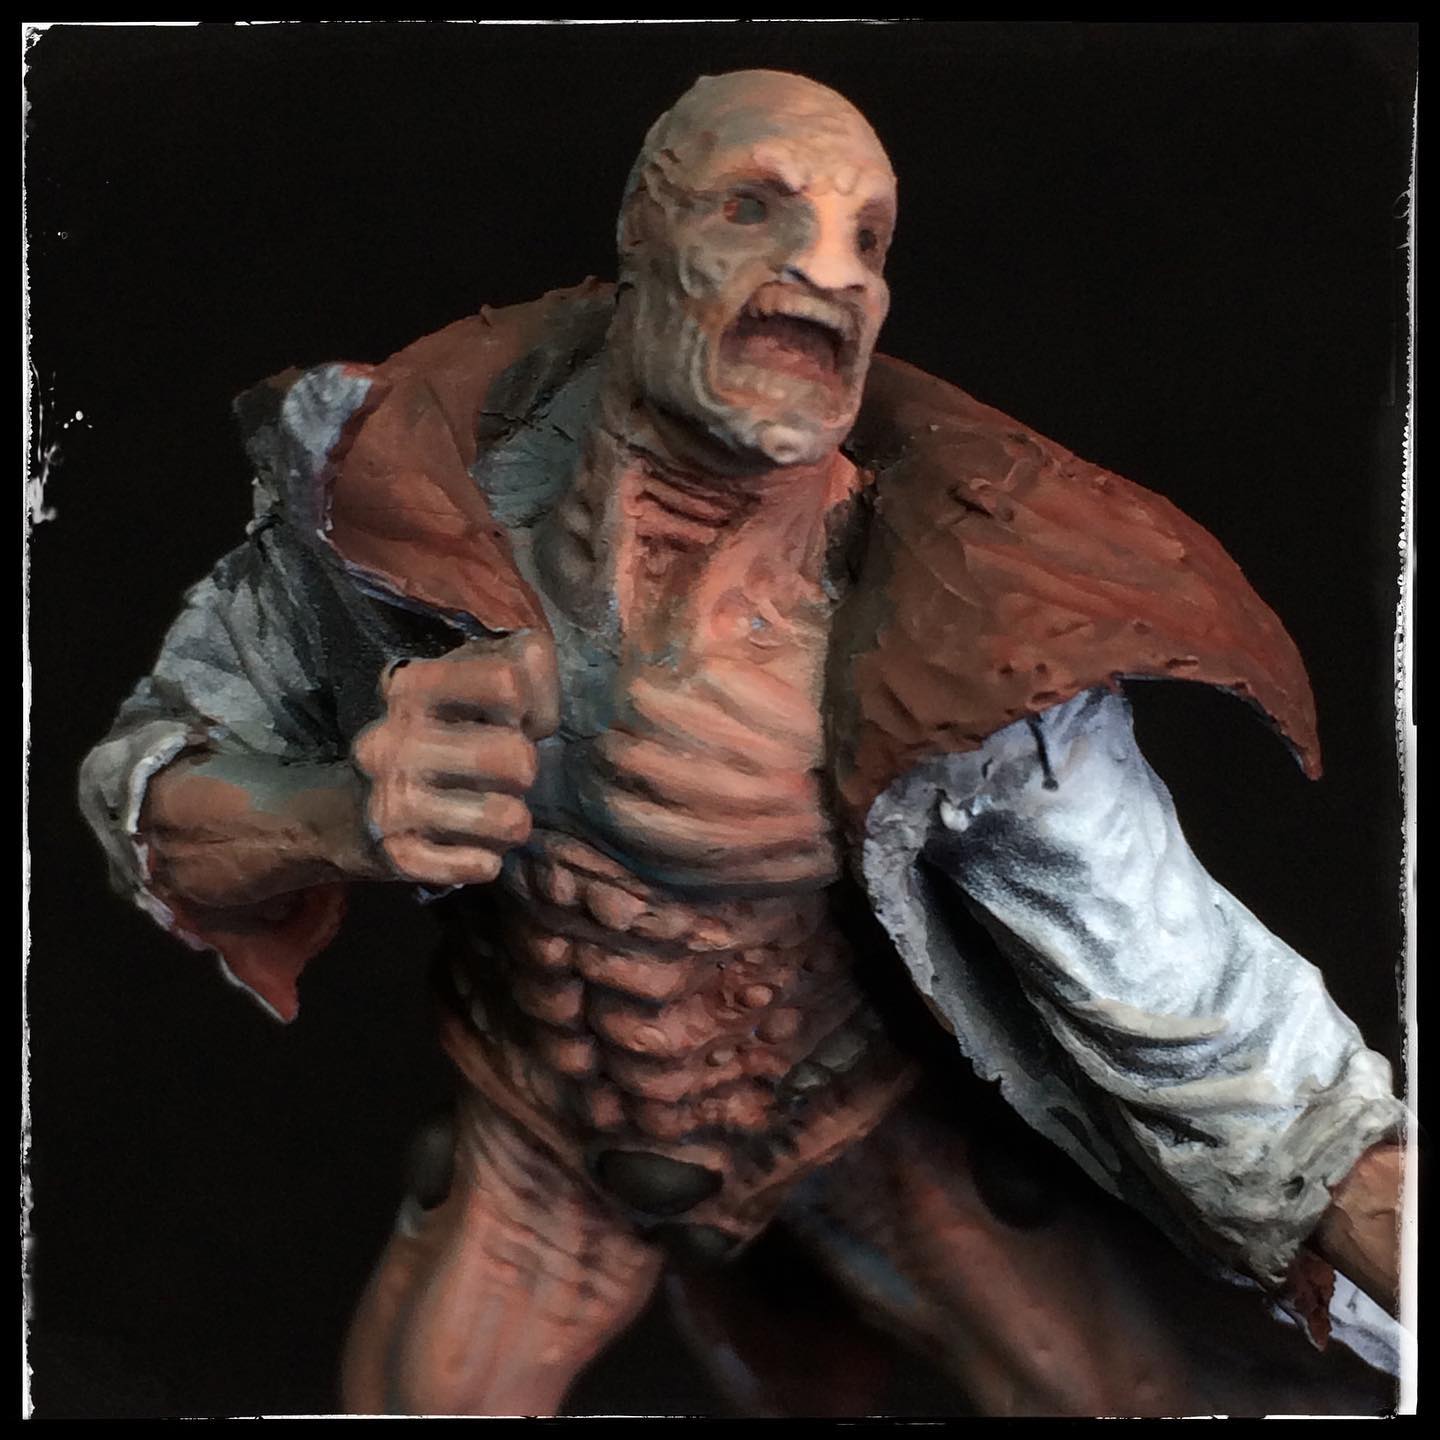
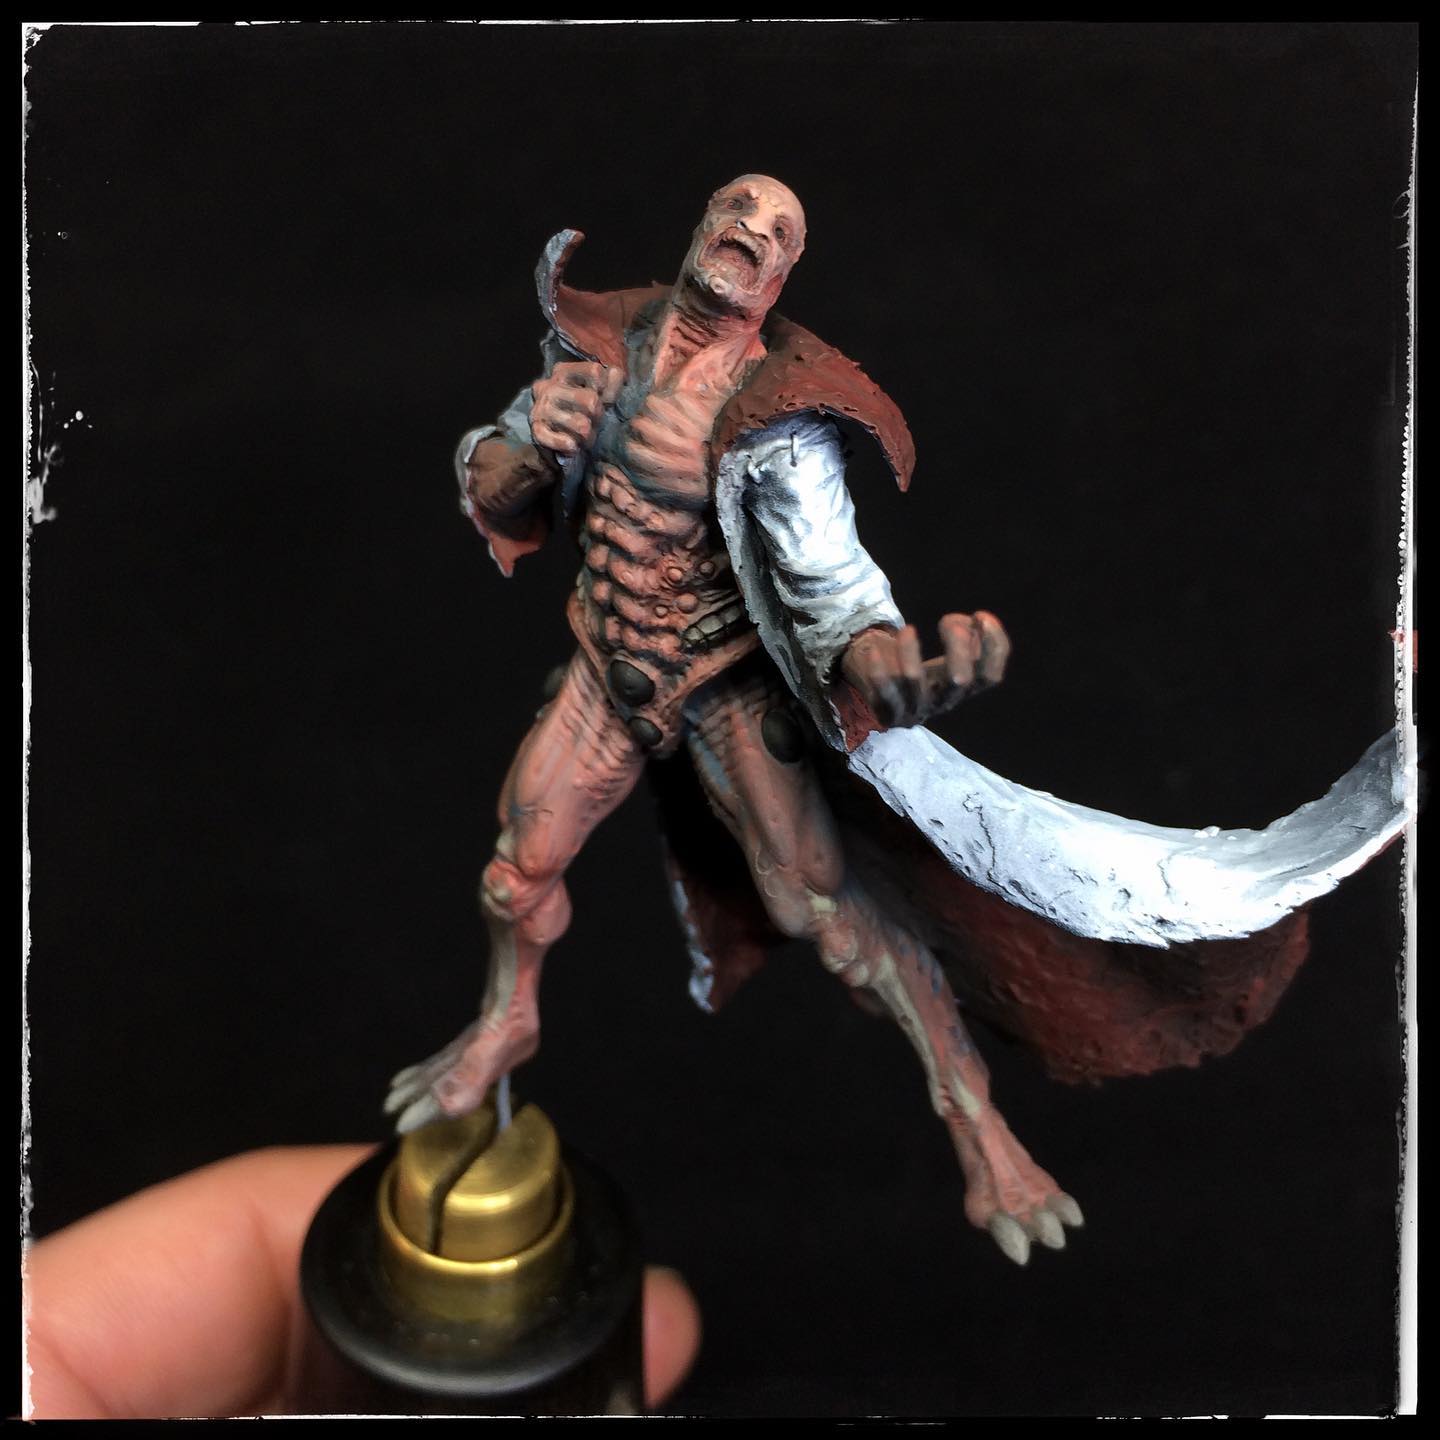
 With the flesh based in I started to refine certain areas like the face and other points of highlight and turned my attention to the cloak. I had already started to base the bloody inside of the cloak with black and reds but now started to refine and define areas more to give the idea of fat and tissue. I also made a mix of army painter strong tone and Scale 75 Cockum Copper to build up a tanned leather case for the outside of the cloak. This is where the careful lateral priming with white primer over balck really comes into its own as several layers of the 'leather' wash mix build up the colour over the preshaded and highlighted volumes of the cloak
Let's Play Catch Up......... Again!!! Death High Update
Well this really has been a year eh?! Things have been pretty nuts but at least the paint has continued to flow~!!!
Been getting some KDM work done and down recently though and really enjoying the models and the progress.
Let’s have a wee gander at which ones I’ve finished before looking at whats currently under the brush!
3 Death Highs to kick us off!!
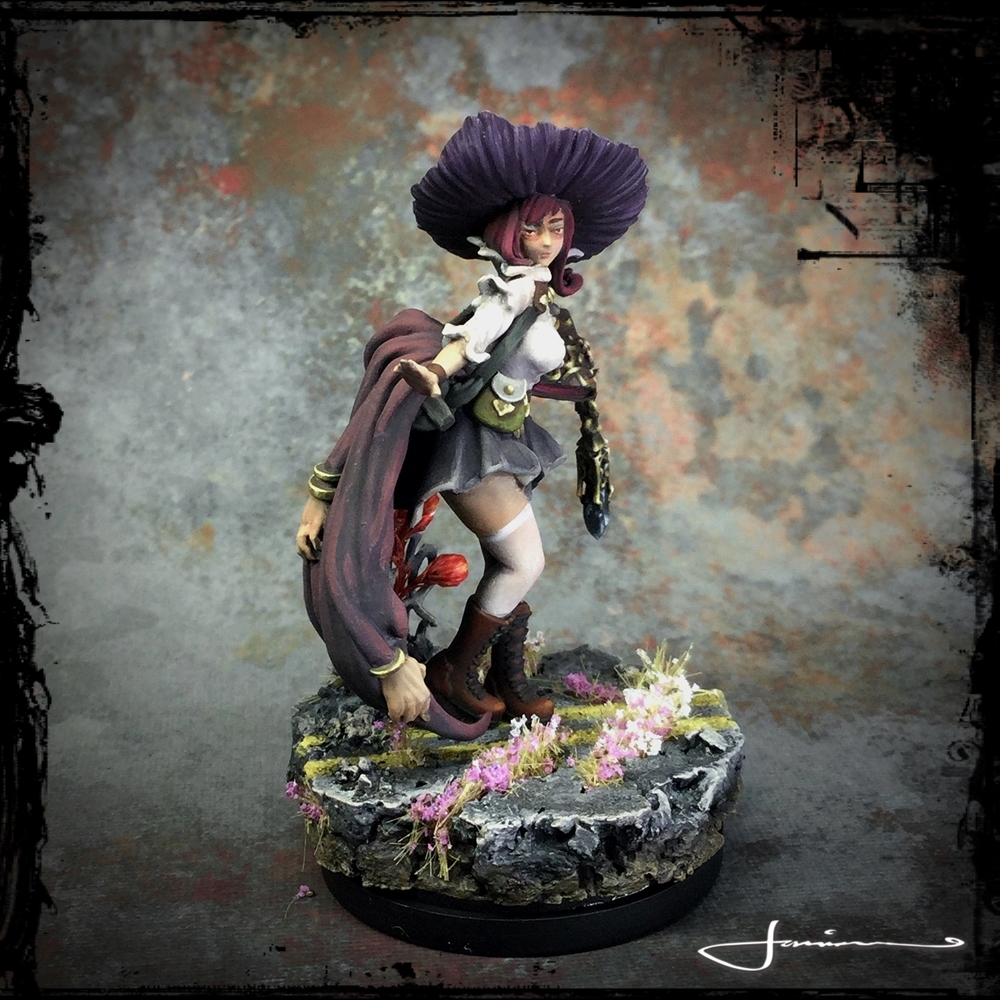
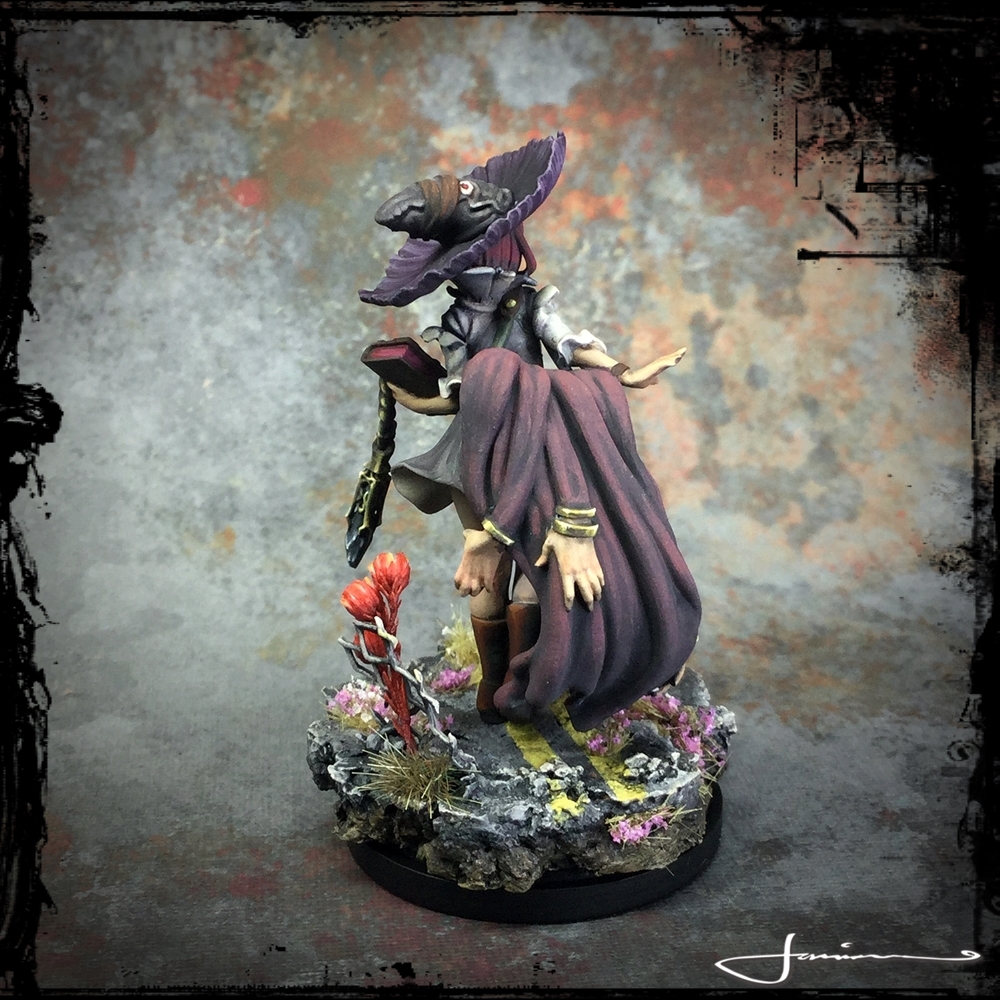
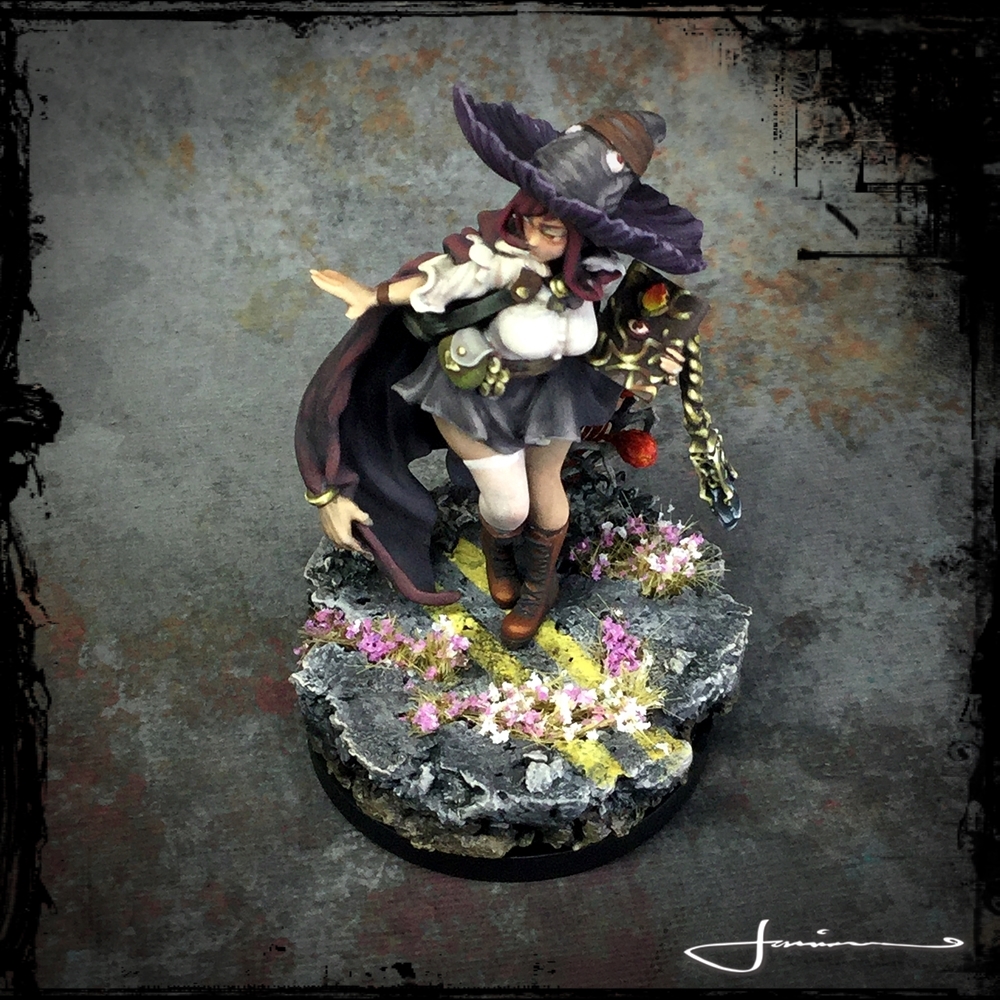
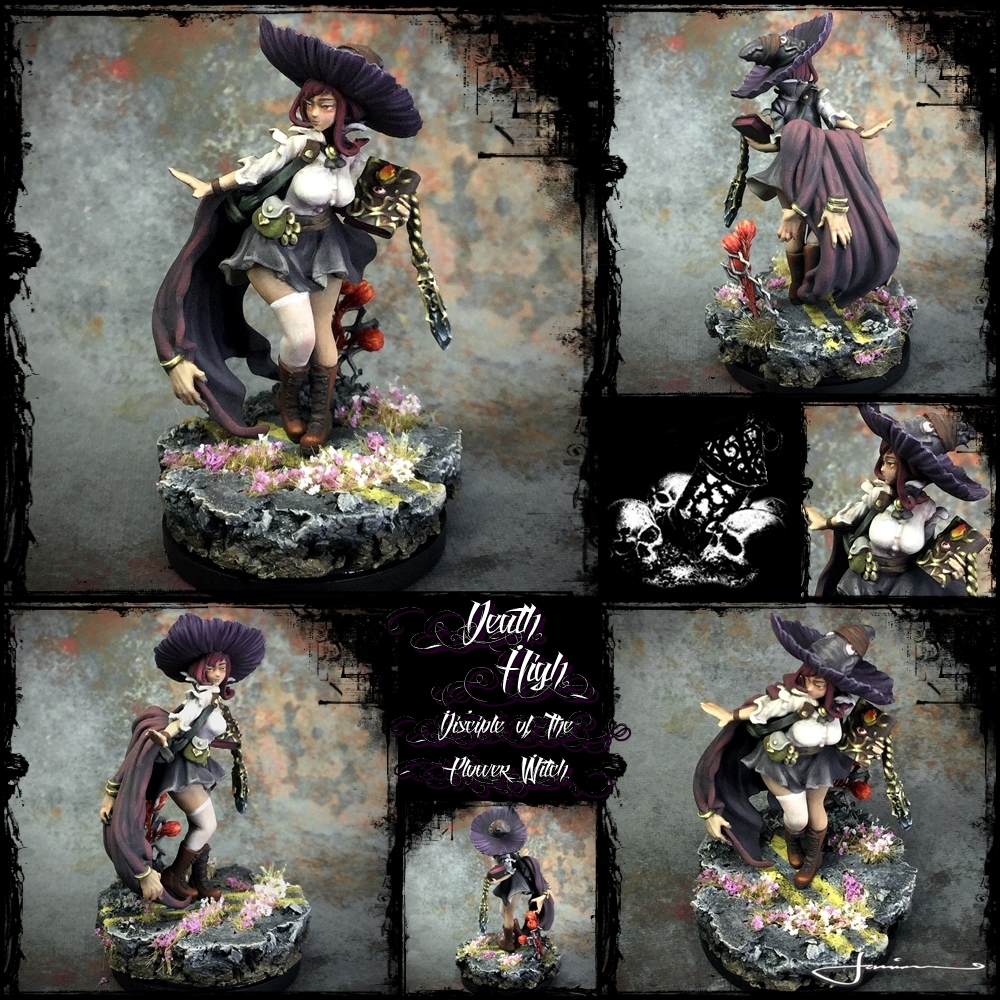 KDM - Death High Disciple of the Flower Witch One
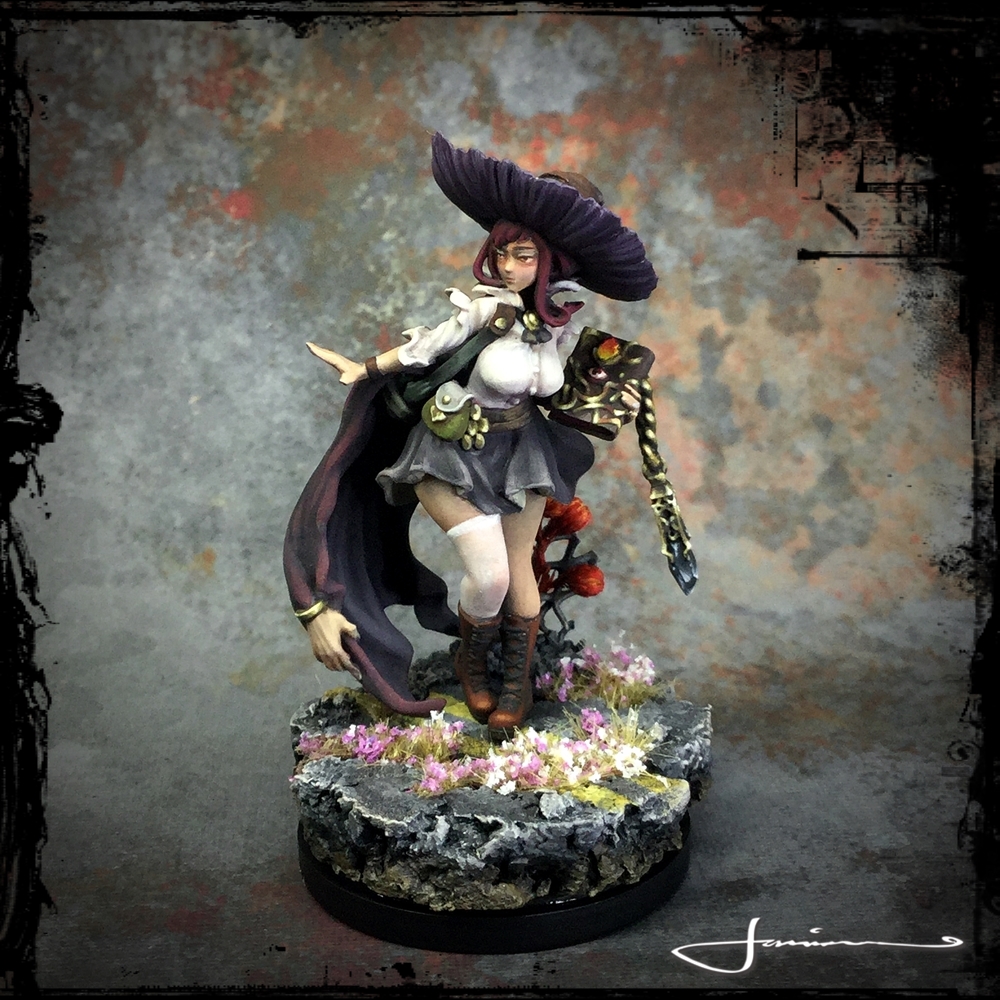
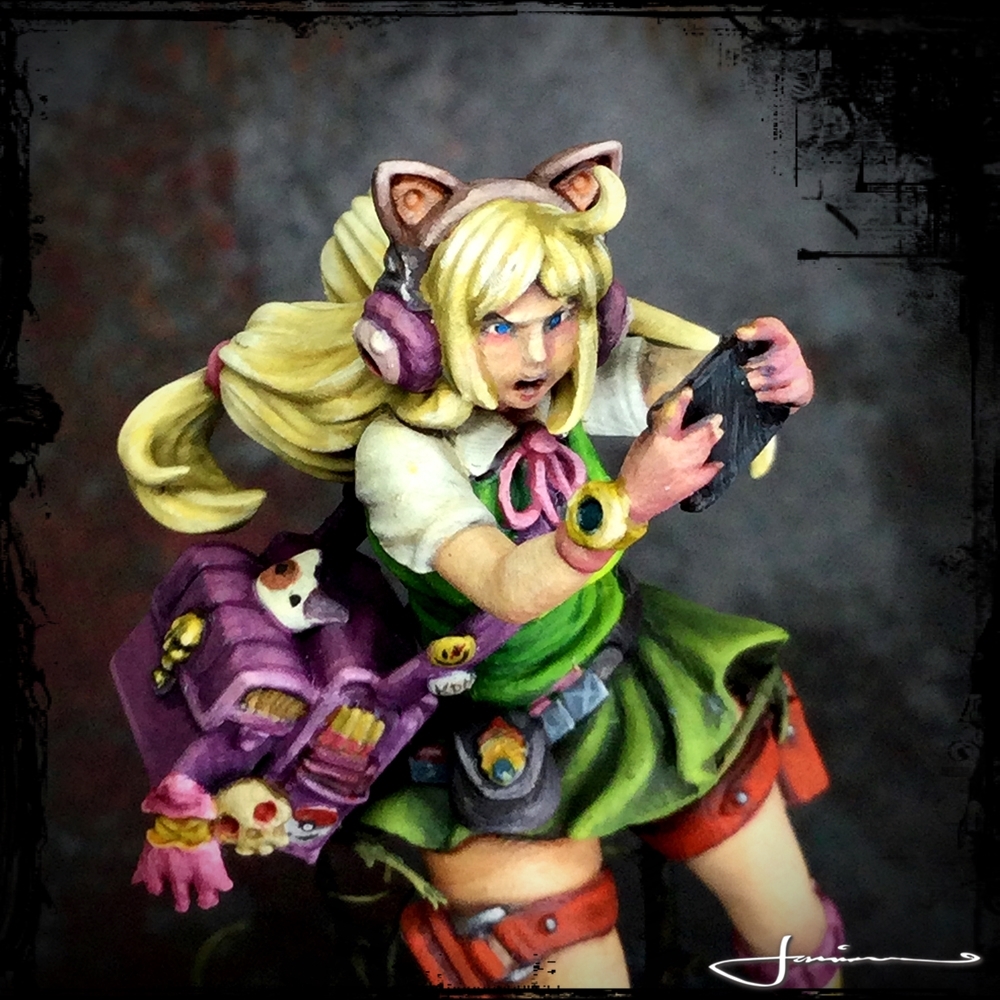
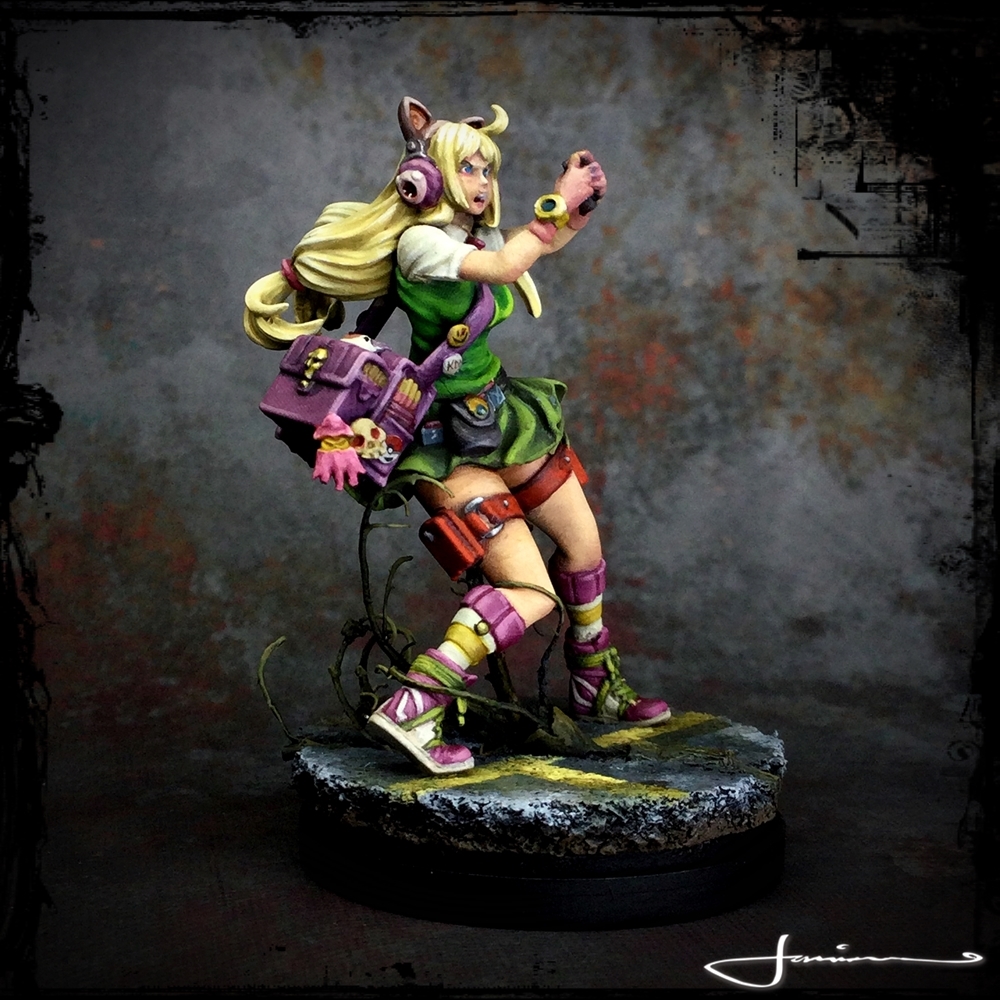
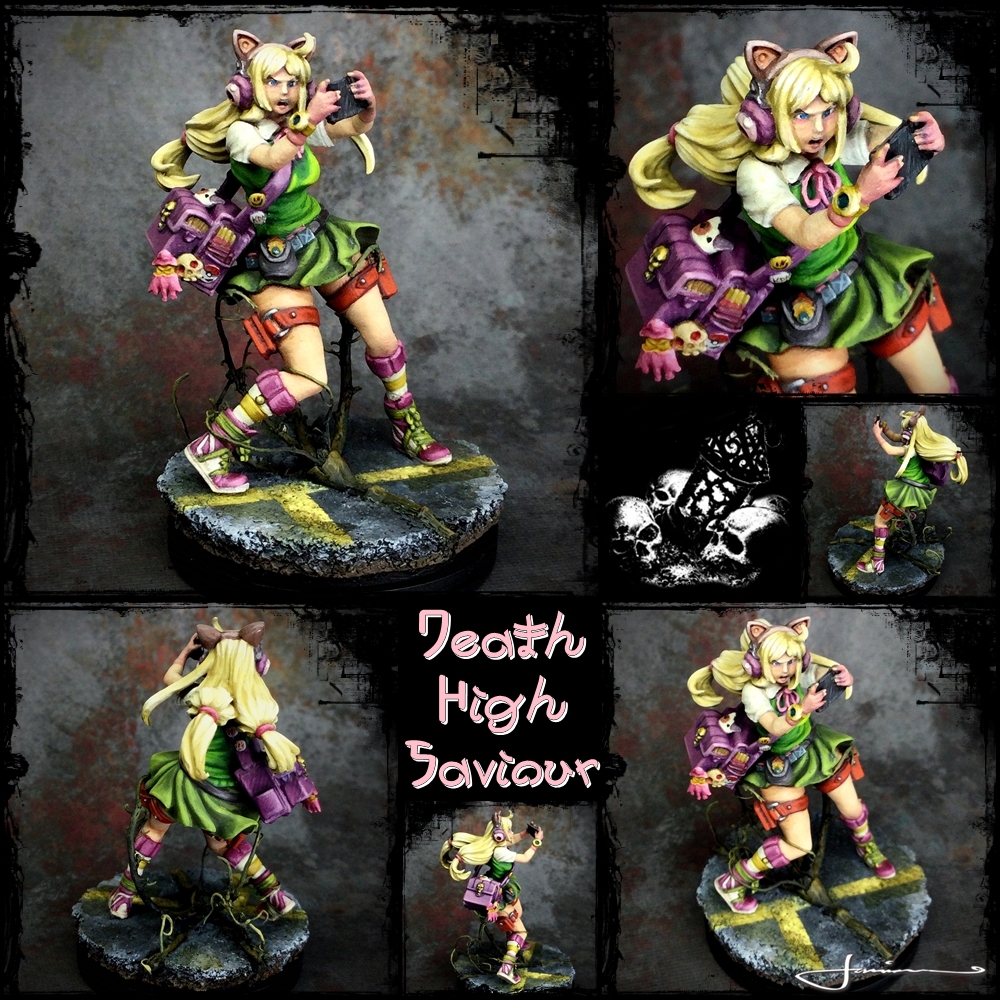 KDM - Death High Saviour Snow
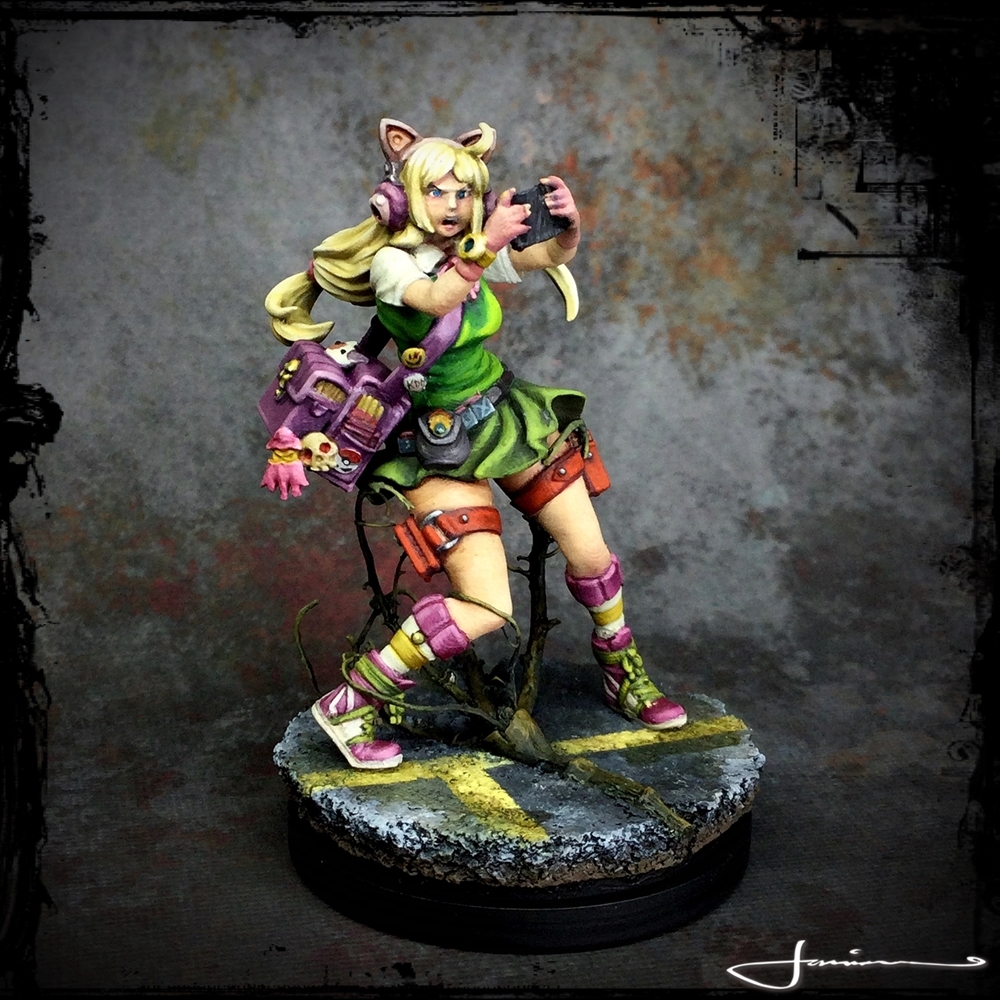

 KDM - Death High Murderer
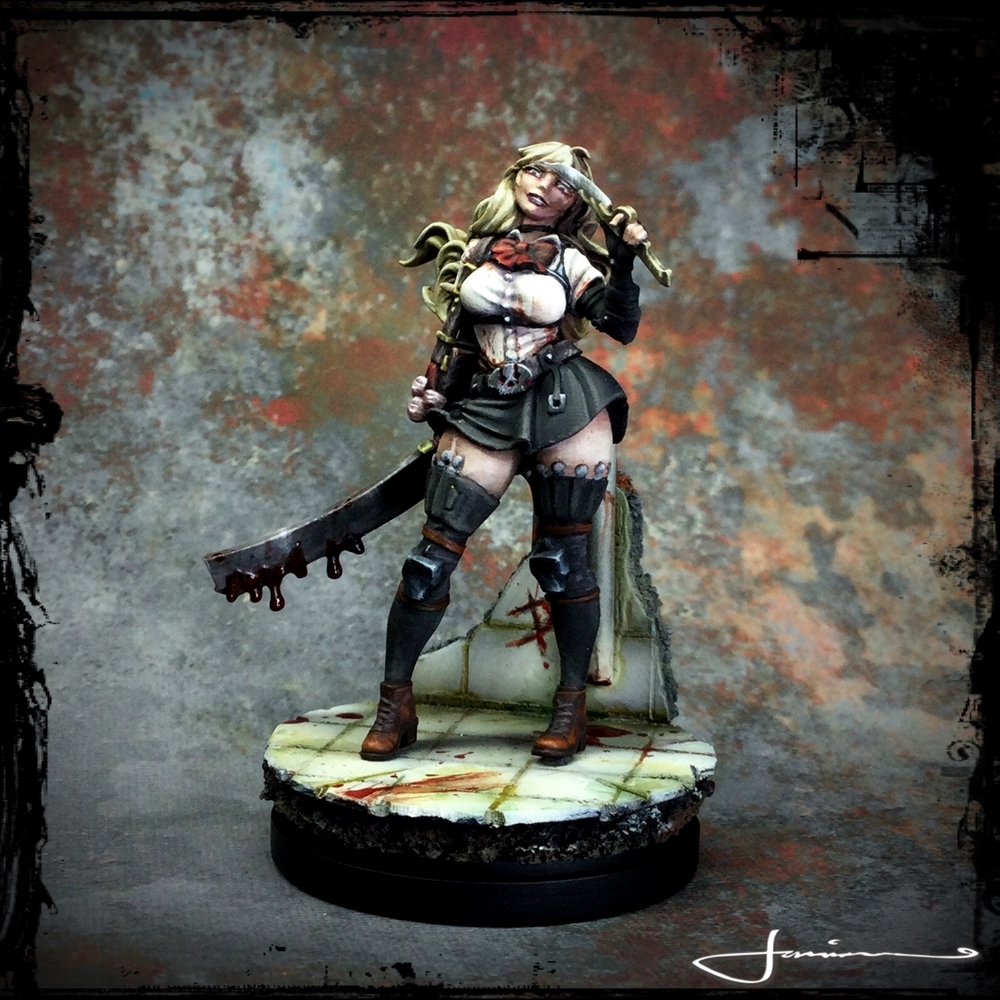
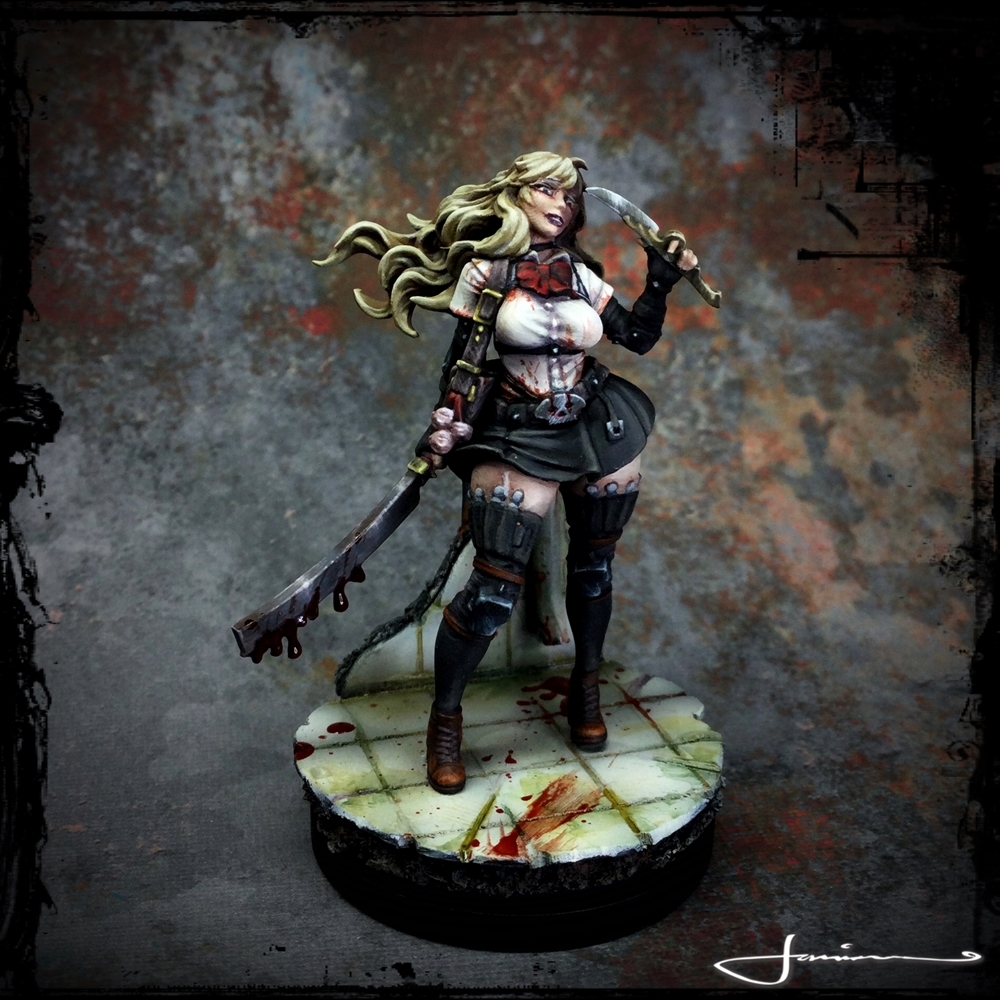
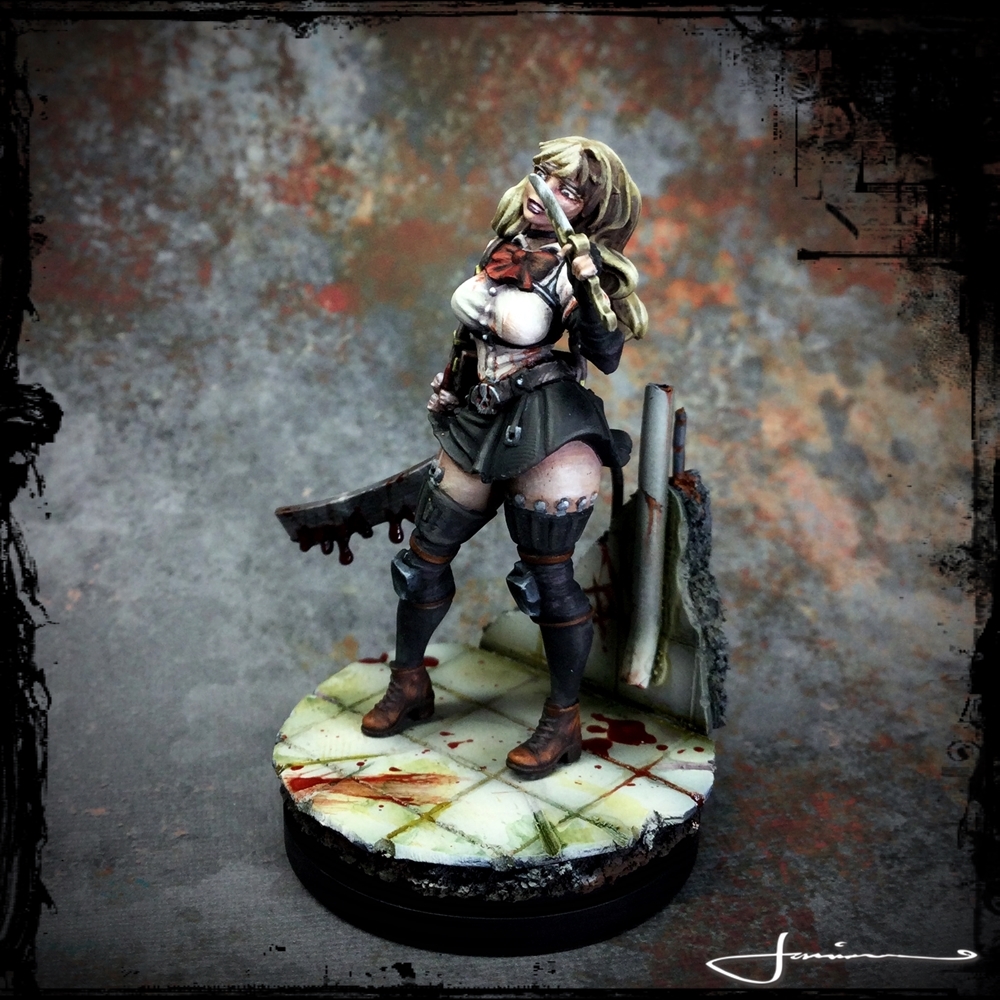
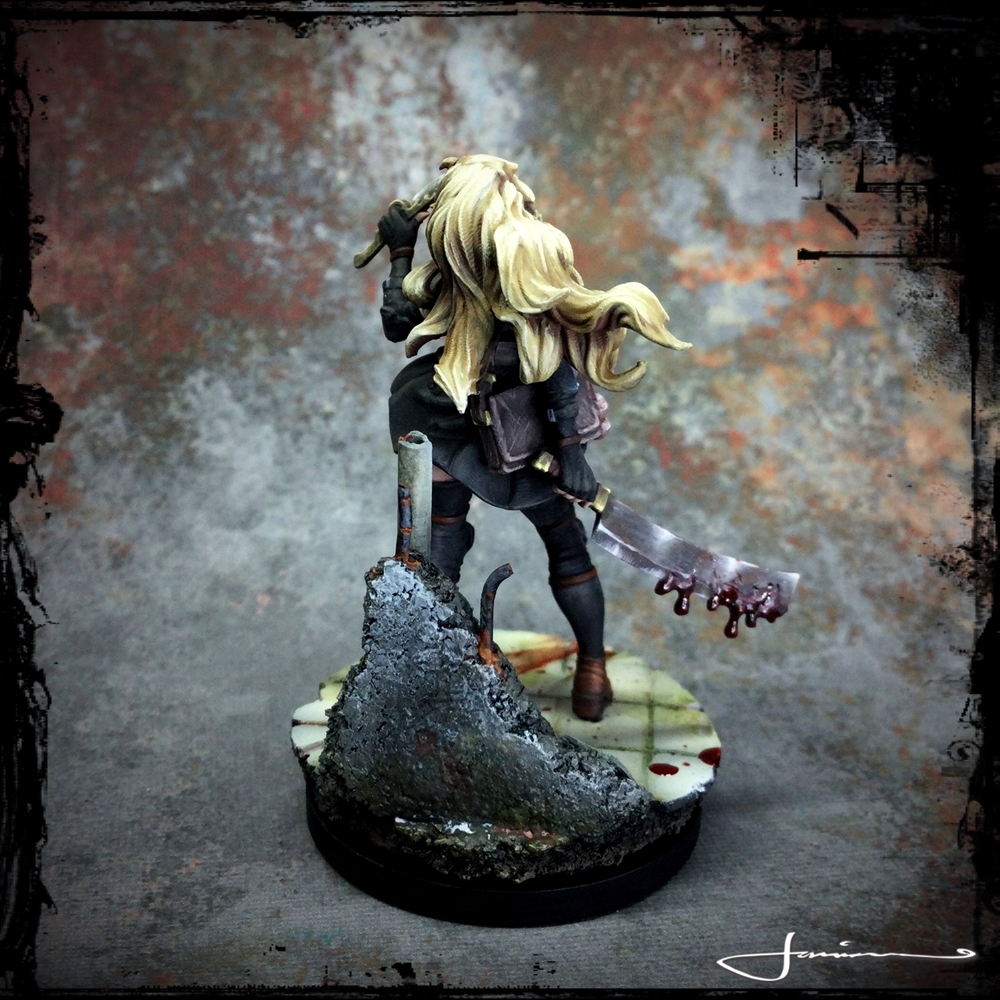
I really do like the Death High series. I know a lot of KDM fans arent so keen on them and bemoan the fact that they have no game content and would prefer if Poots would focus on fulfilling his KS obligations rather than releasing minis only really meant as collectibles buuuuuuuuut for me, as more a painter than a gamer…… they are awesome and I really enjoy each one.
Disciple of the Witch was the first DeathGrey resin version I got to work on and wow the material is soooooo far superior to the usual cruddy orange photo resin that the series are released in.
Saviour Snow as something of a departure for me as she is so much brighter and saturated than the style I usually paint in. This did push me outside of my comfort zone palette wise which was definitely a good thing growth wise.
The third one, The Murderer, which I just finished last week, is one of my favourites. Catching that psychotic look on her face and managing to portray it well was a big success and one Im really proud of. Fantastic sculpt with so much scary character to it. The damn machette though proved to be an unexpected pain in the ass to do in nmm!!
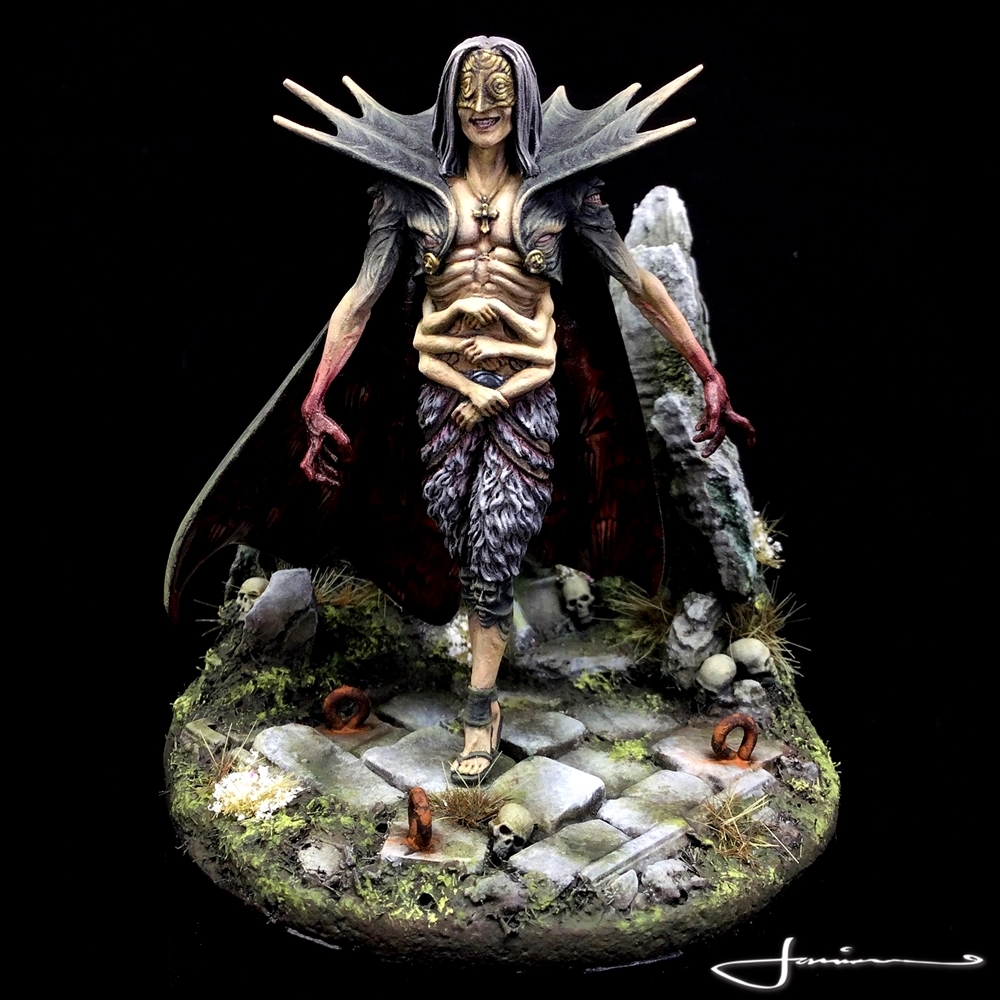
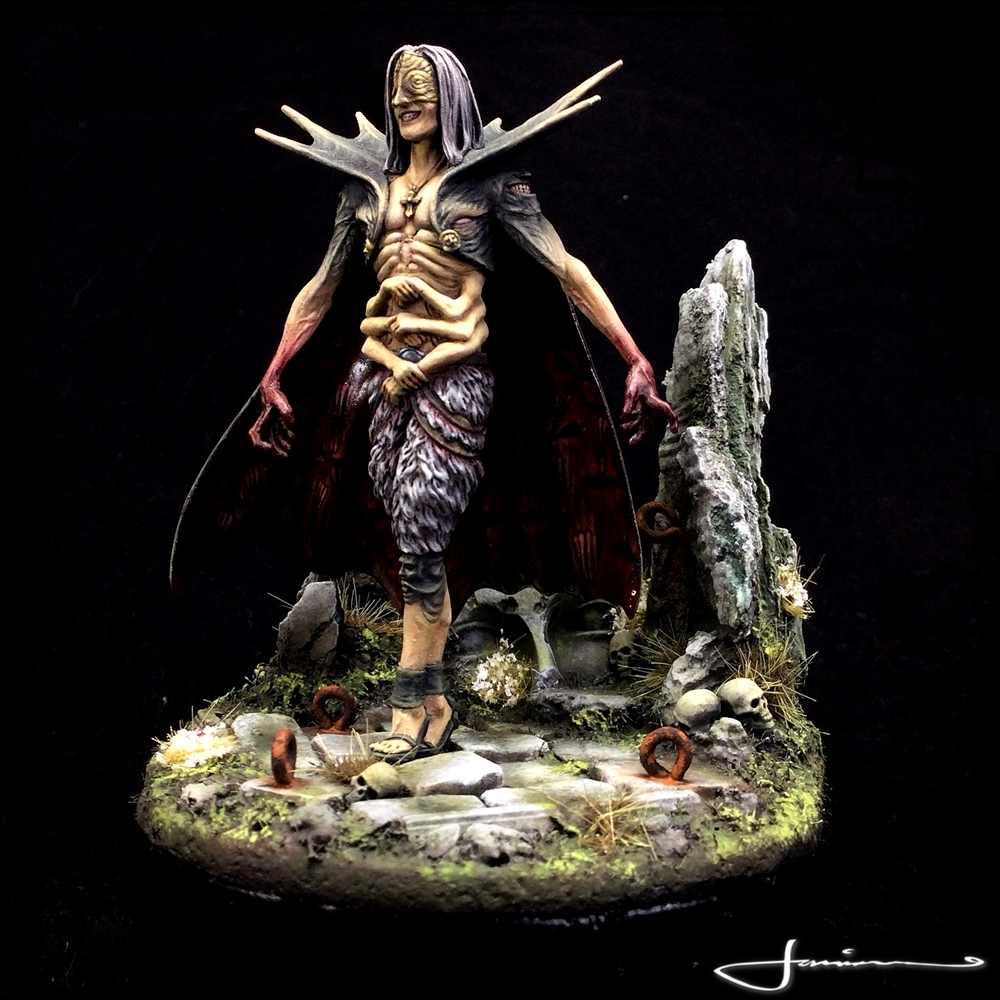
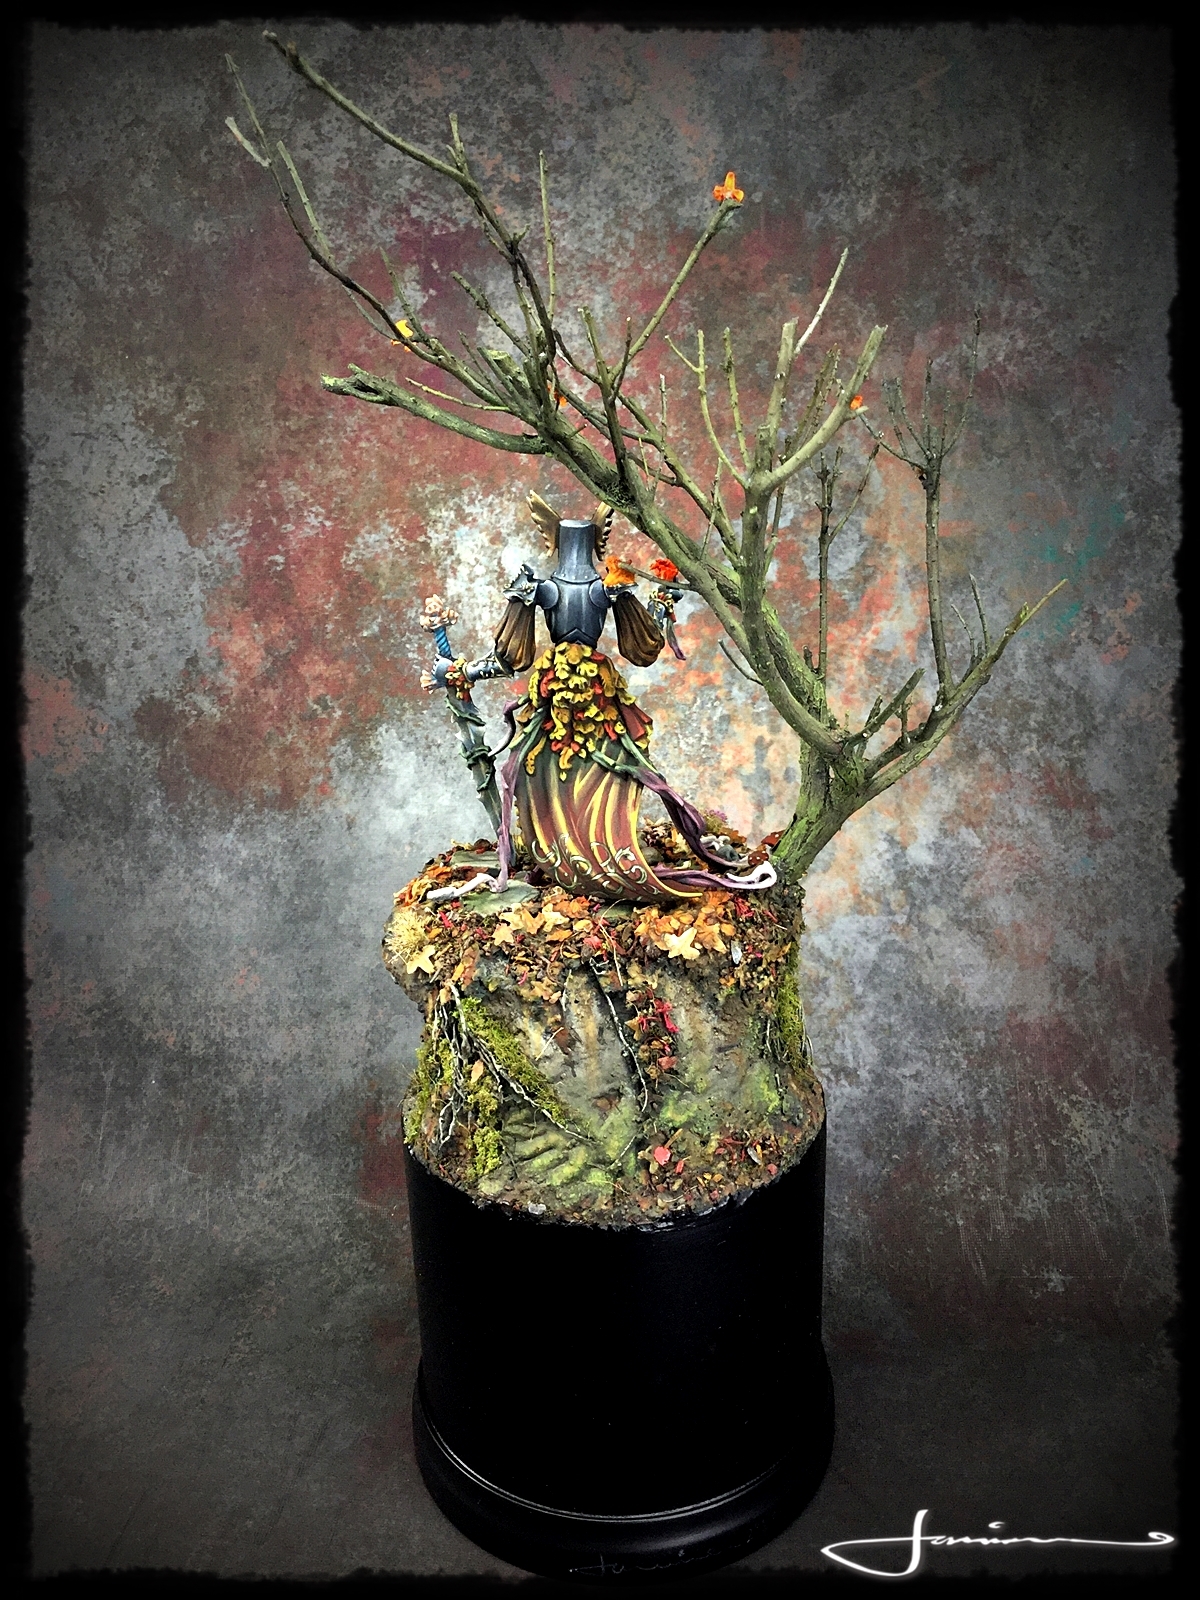
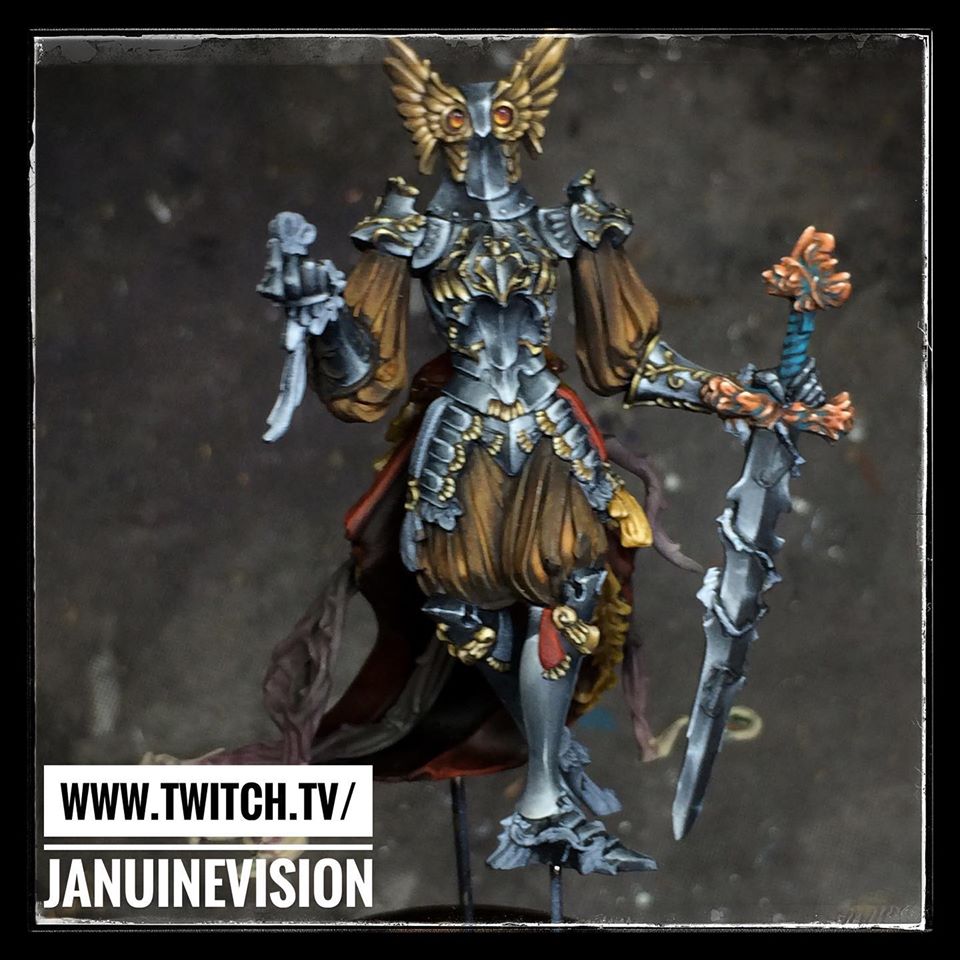
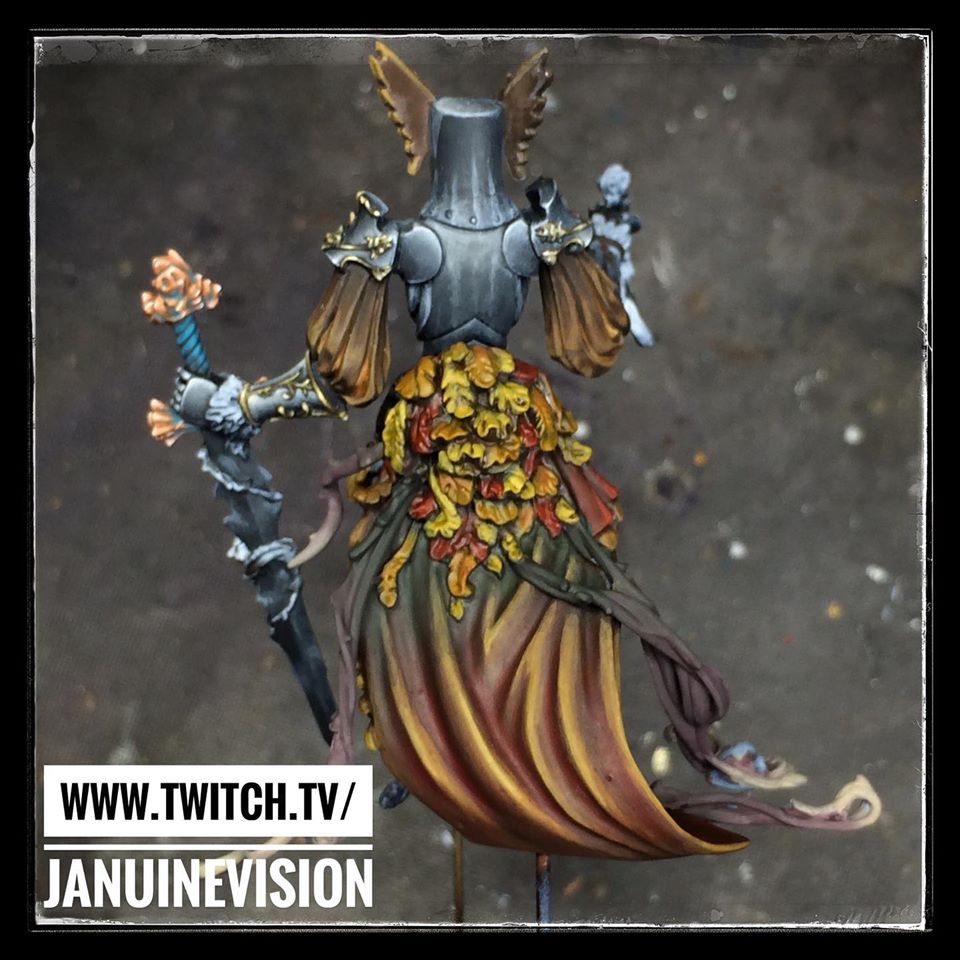
The Flower Knight Returns - The Finale Pt.5
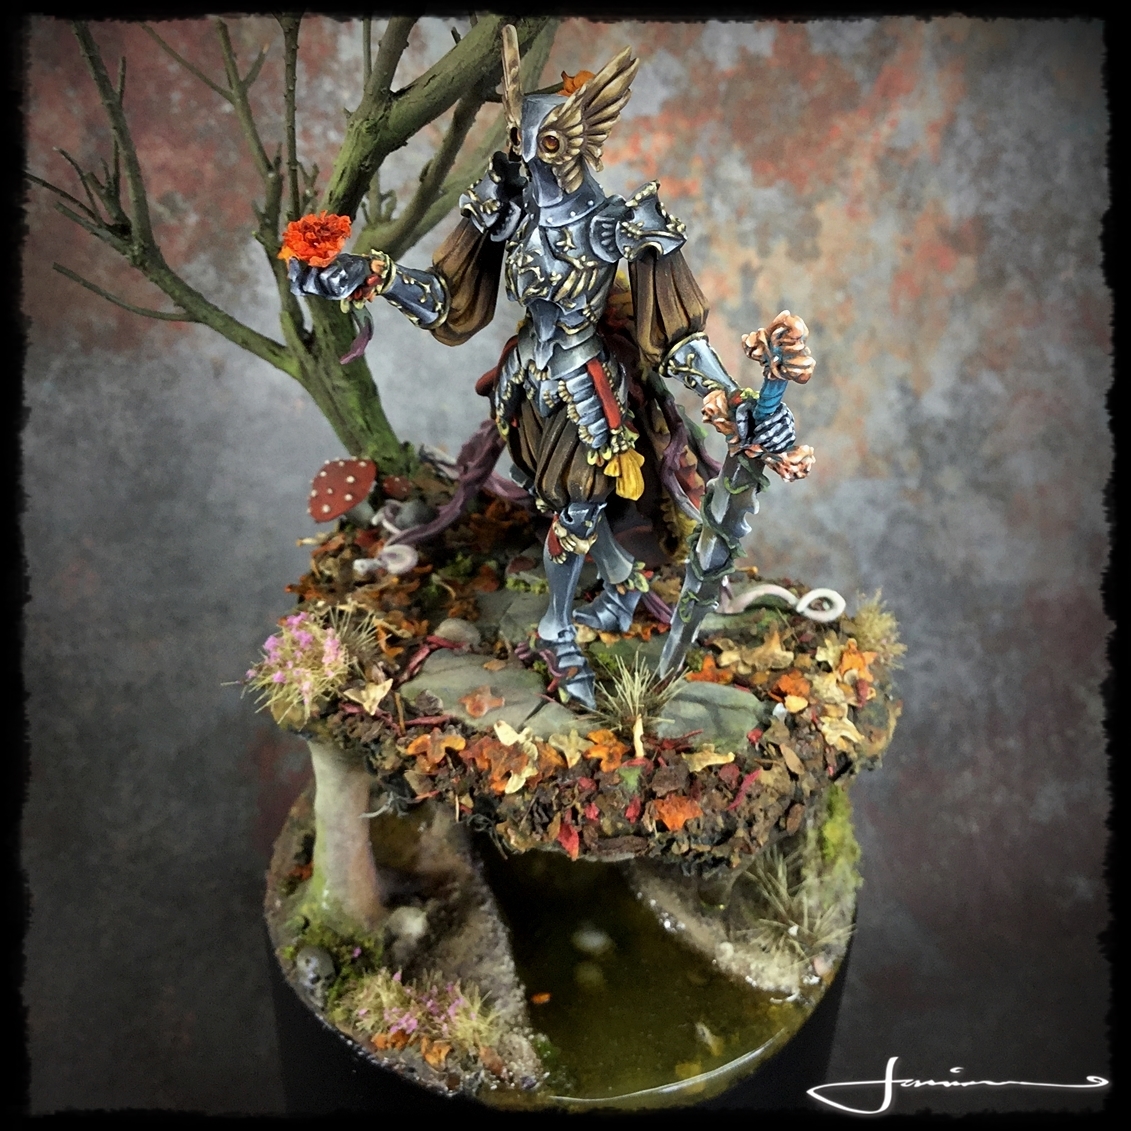
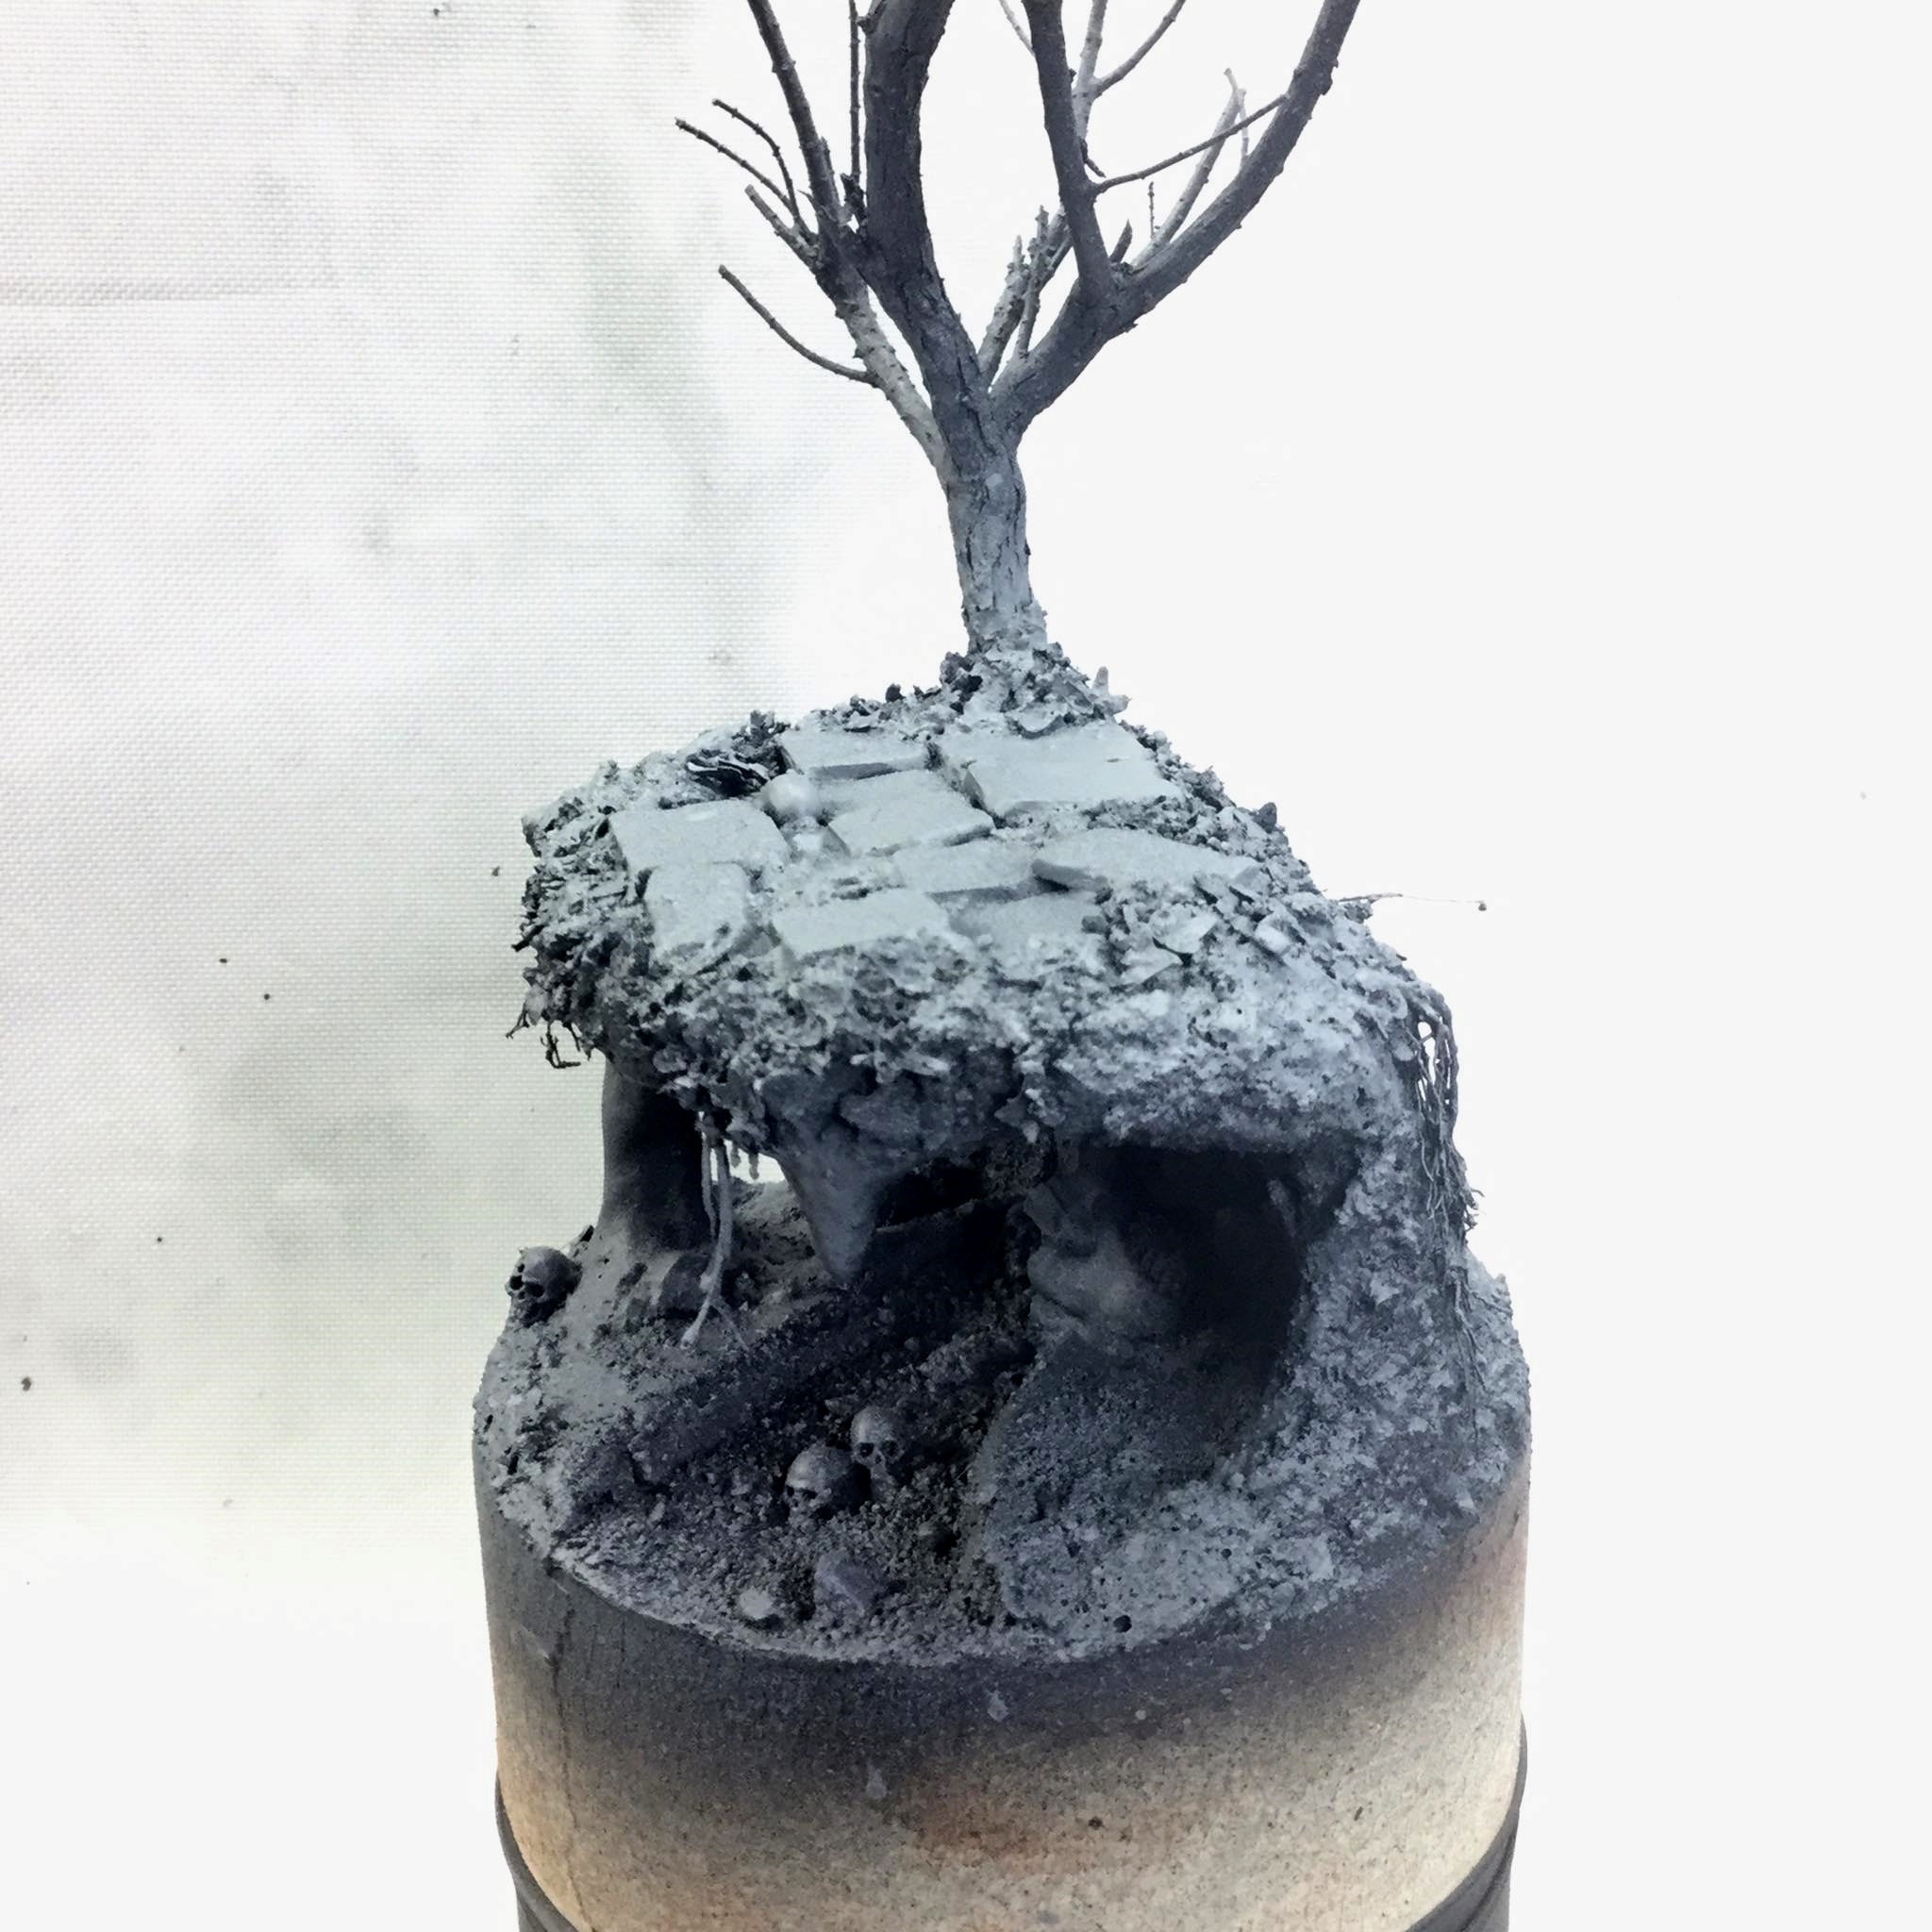
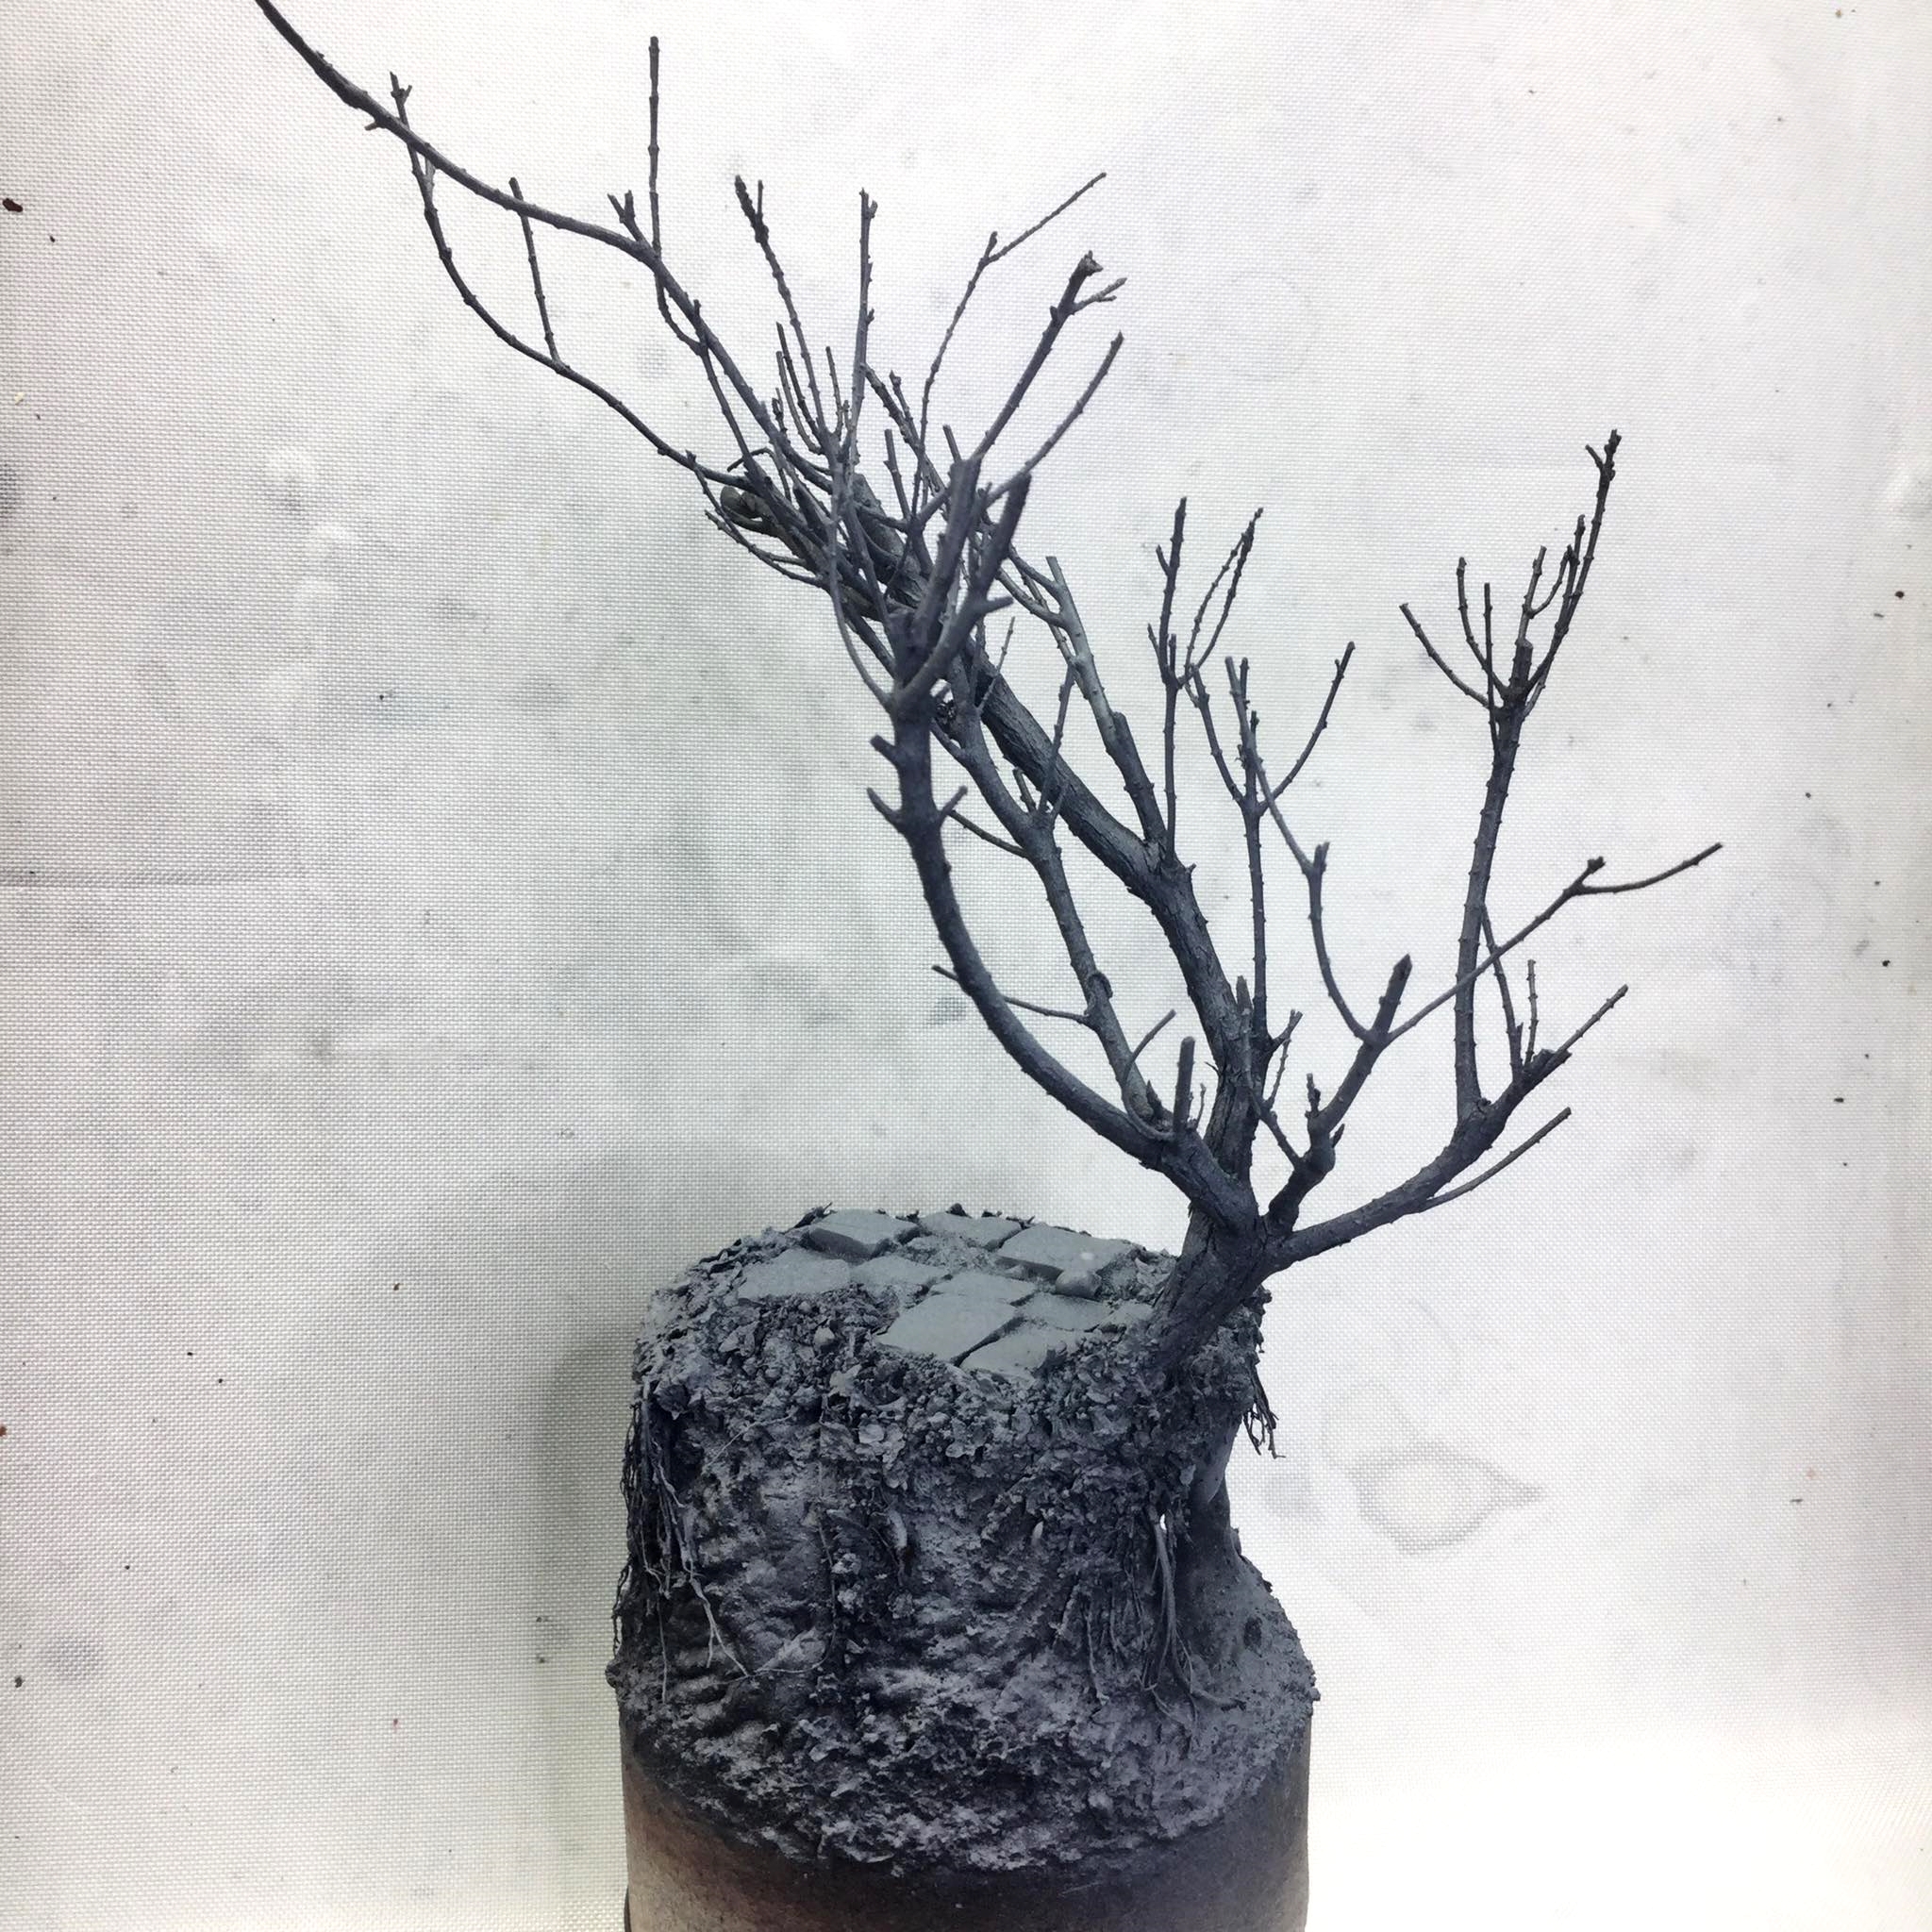
 The Flower Knight of Autumn Splendour
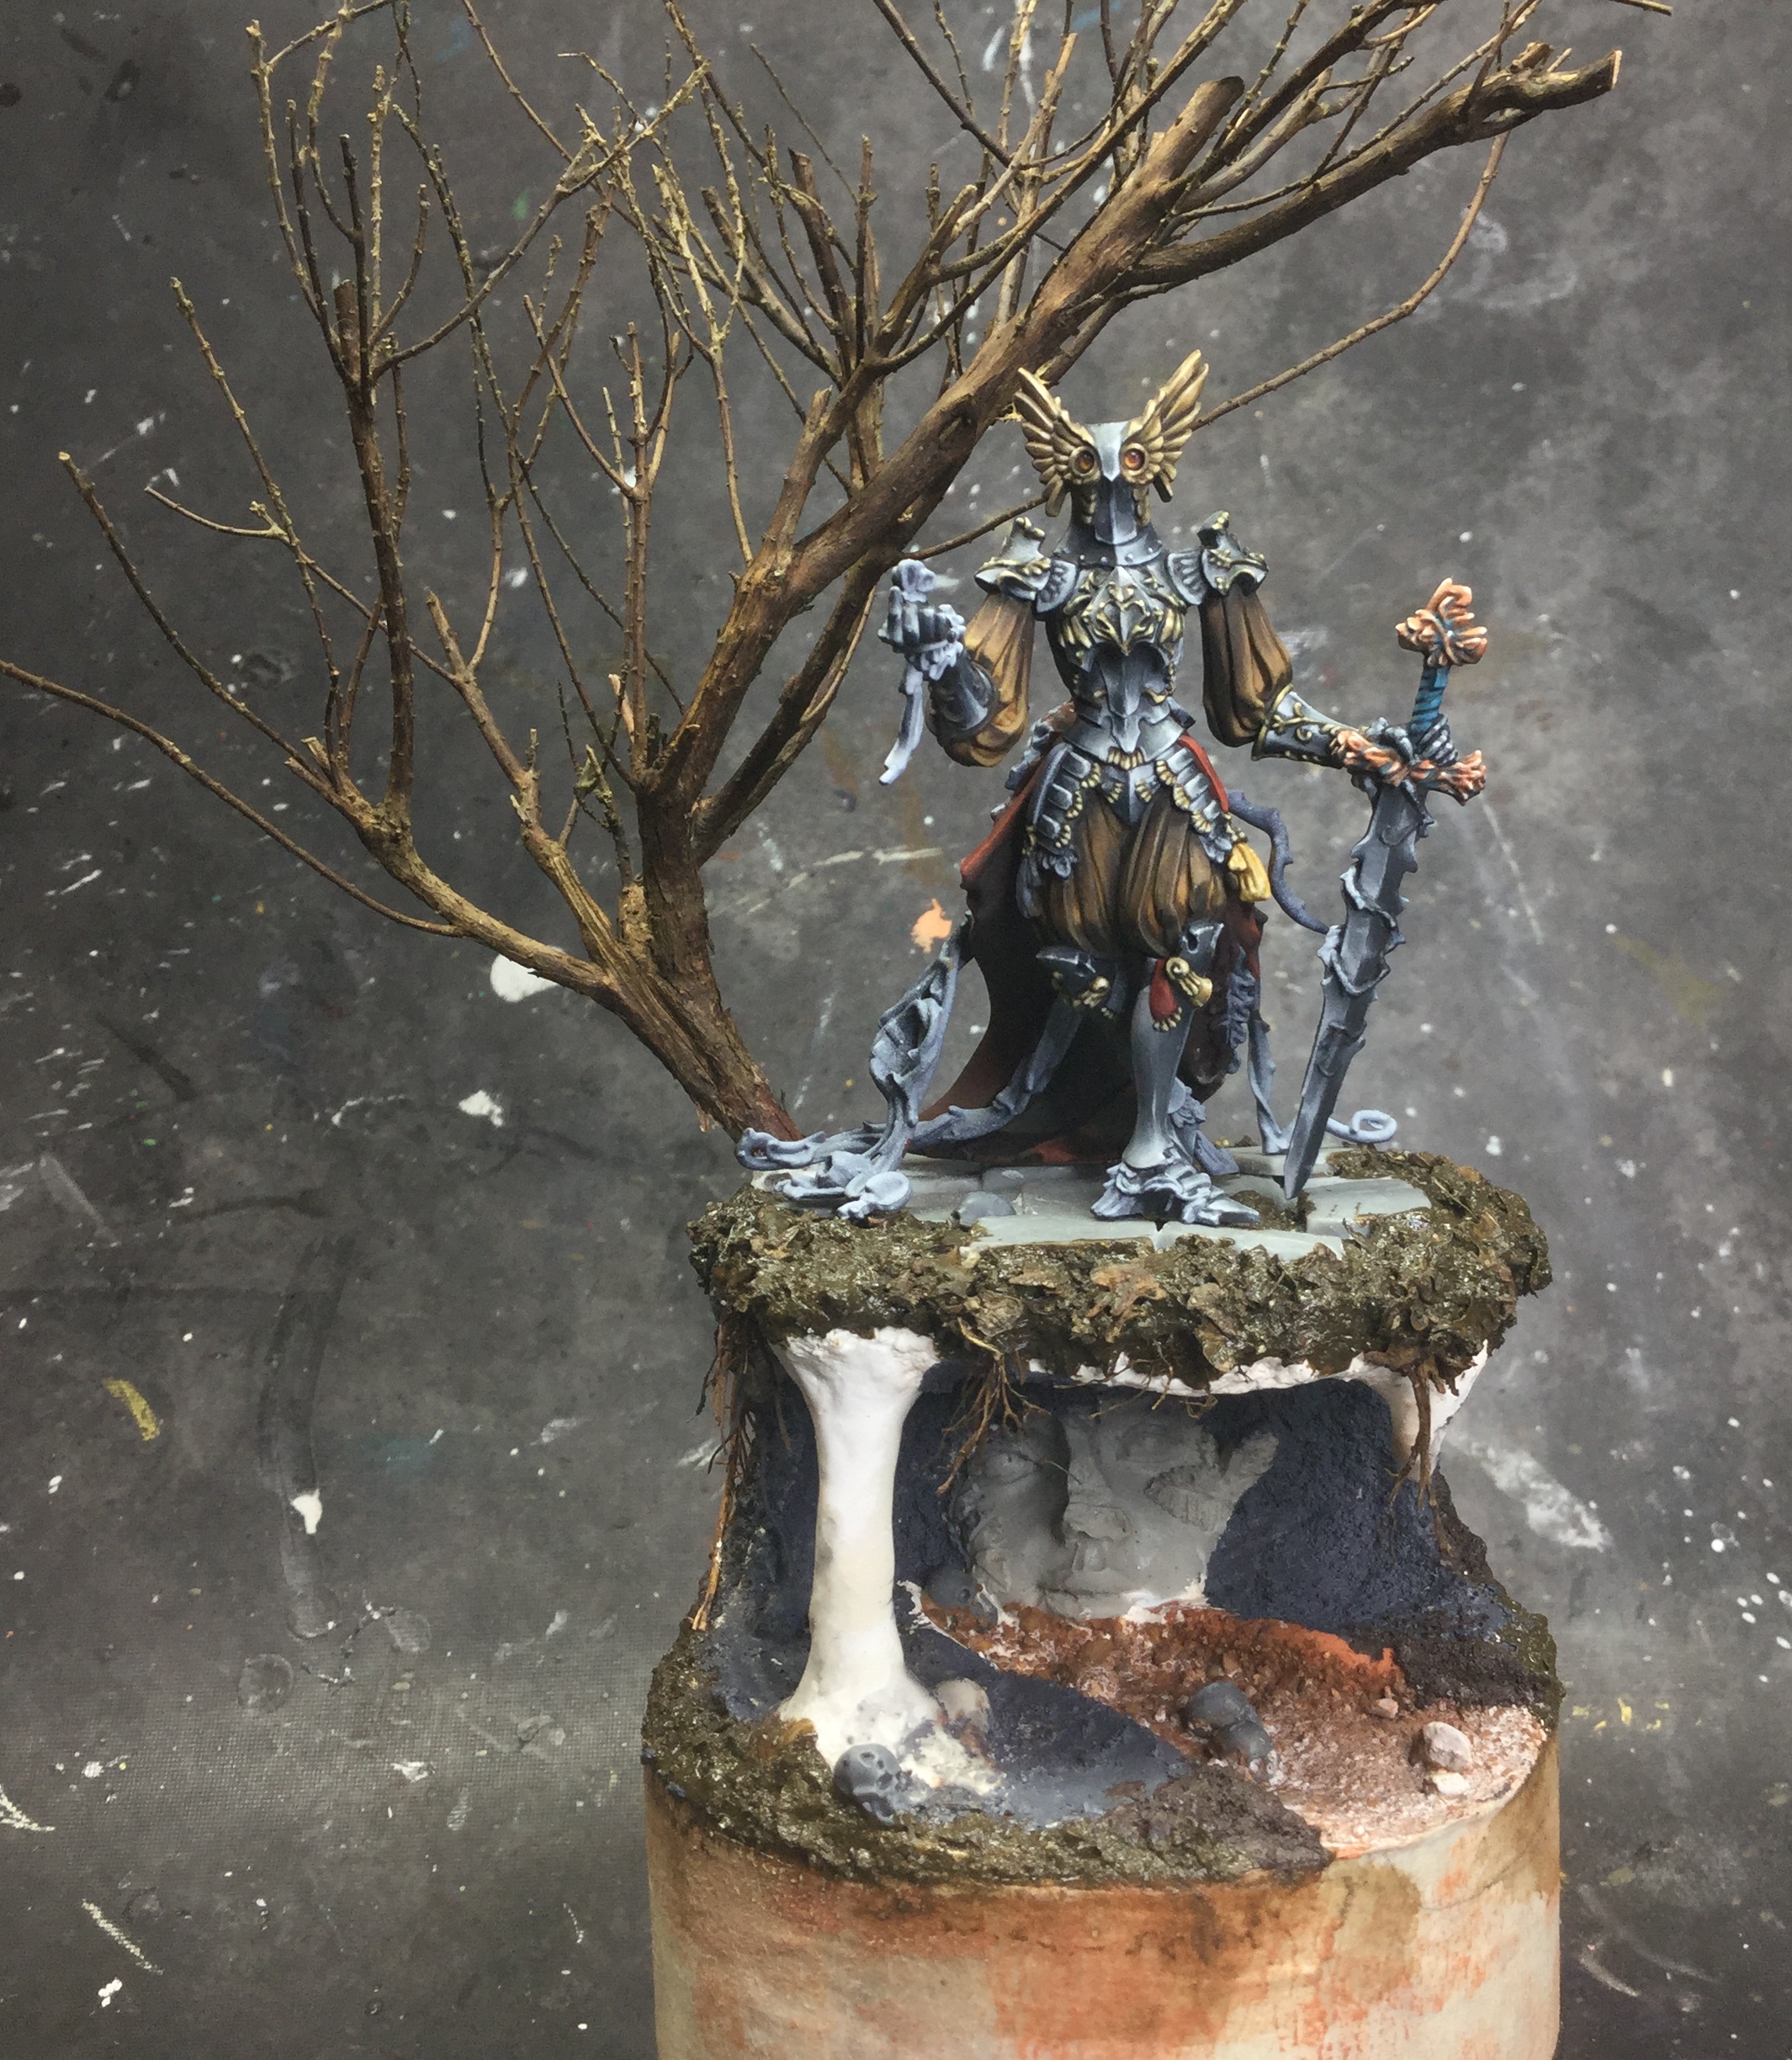
And finally……….. the base is finished and The Flower Knight takes her place on top!
This was a very long project as I paced myself out and did it in little spurts and shots. I was lucky enough to have an incredibly understanding and supportive client for this piece who wanted me not to finish quickly and have it done but rather to take my time and enjoy the whole process.
The original brief for this commission was simply to do what I felt was right and would be representative of my style and work. These type of commissions are what I call halo commissions as they are sent from heaven on the wings of angels!
The base design/build that I sold the client on (as narrative bases are usually an add-on when it comes to quoting a commission) was much much simpler than how it turned out!!
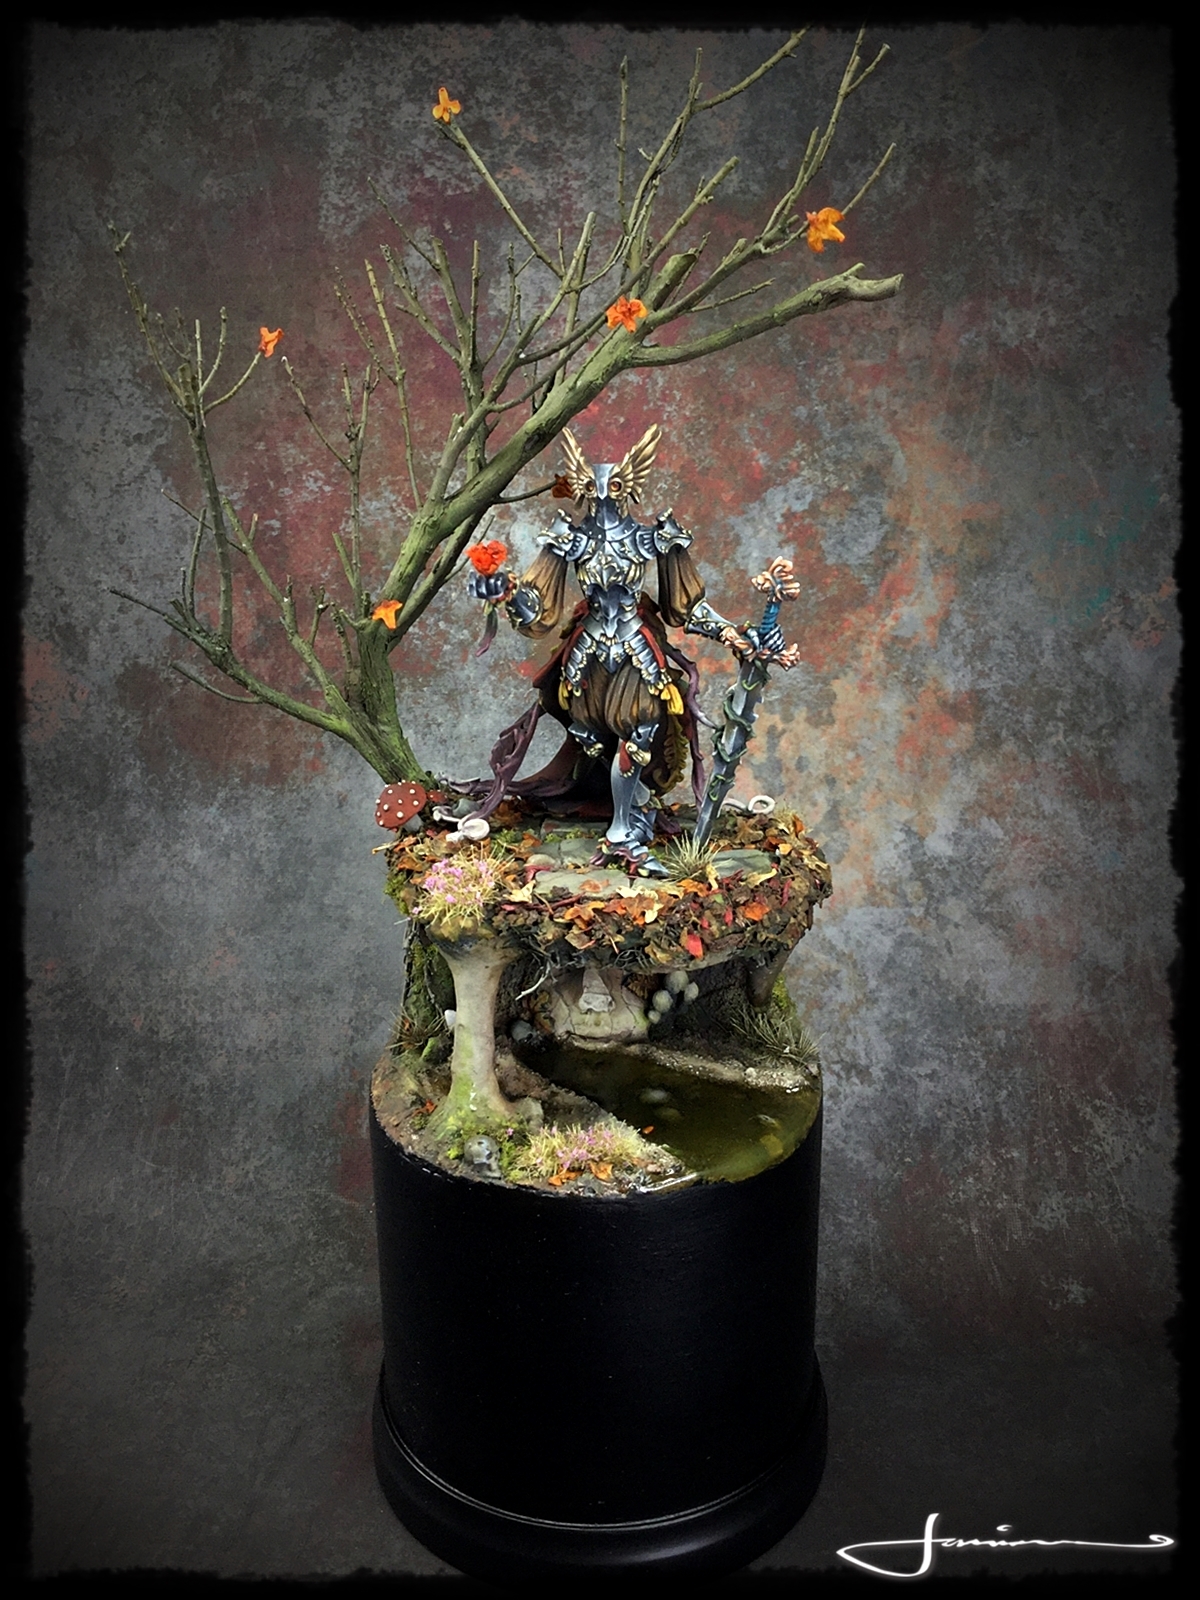
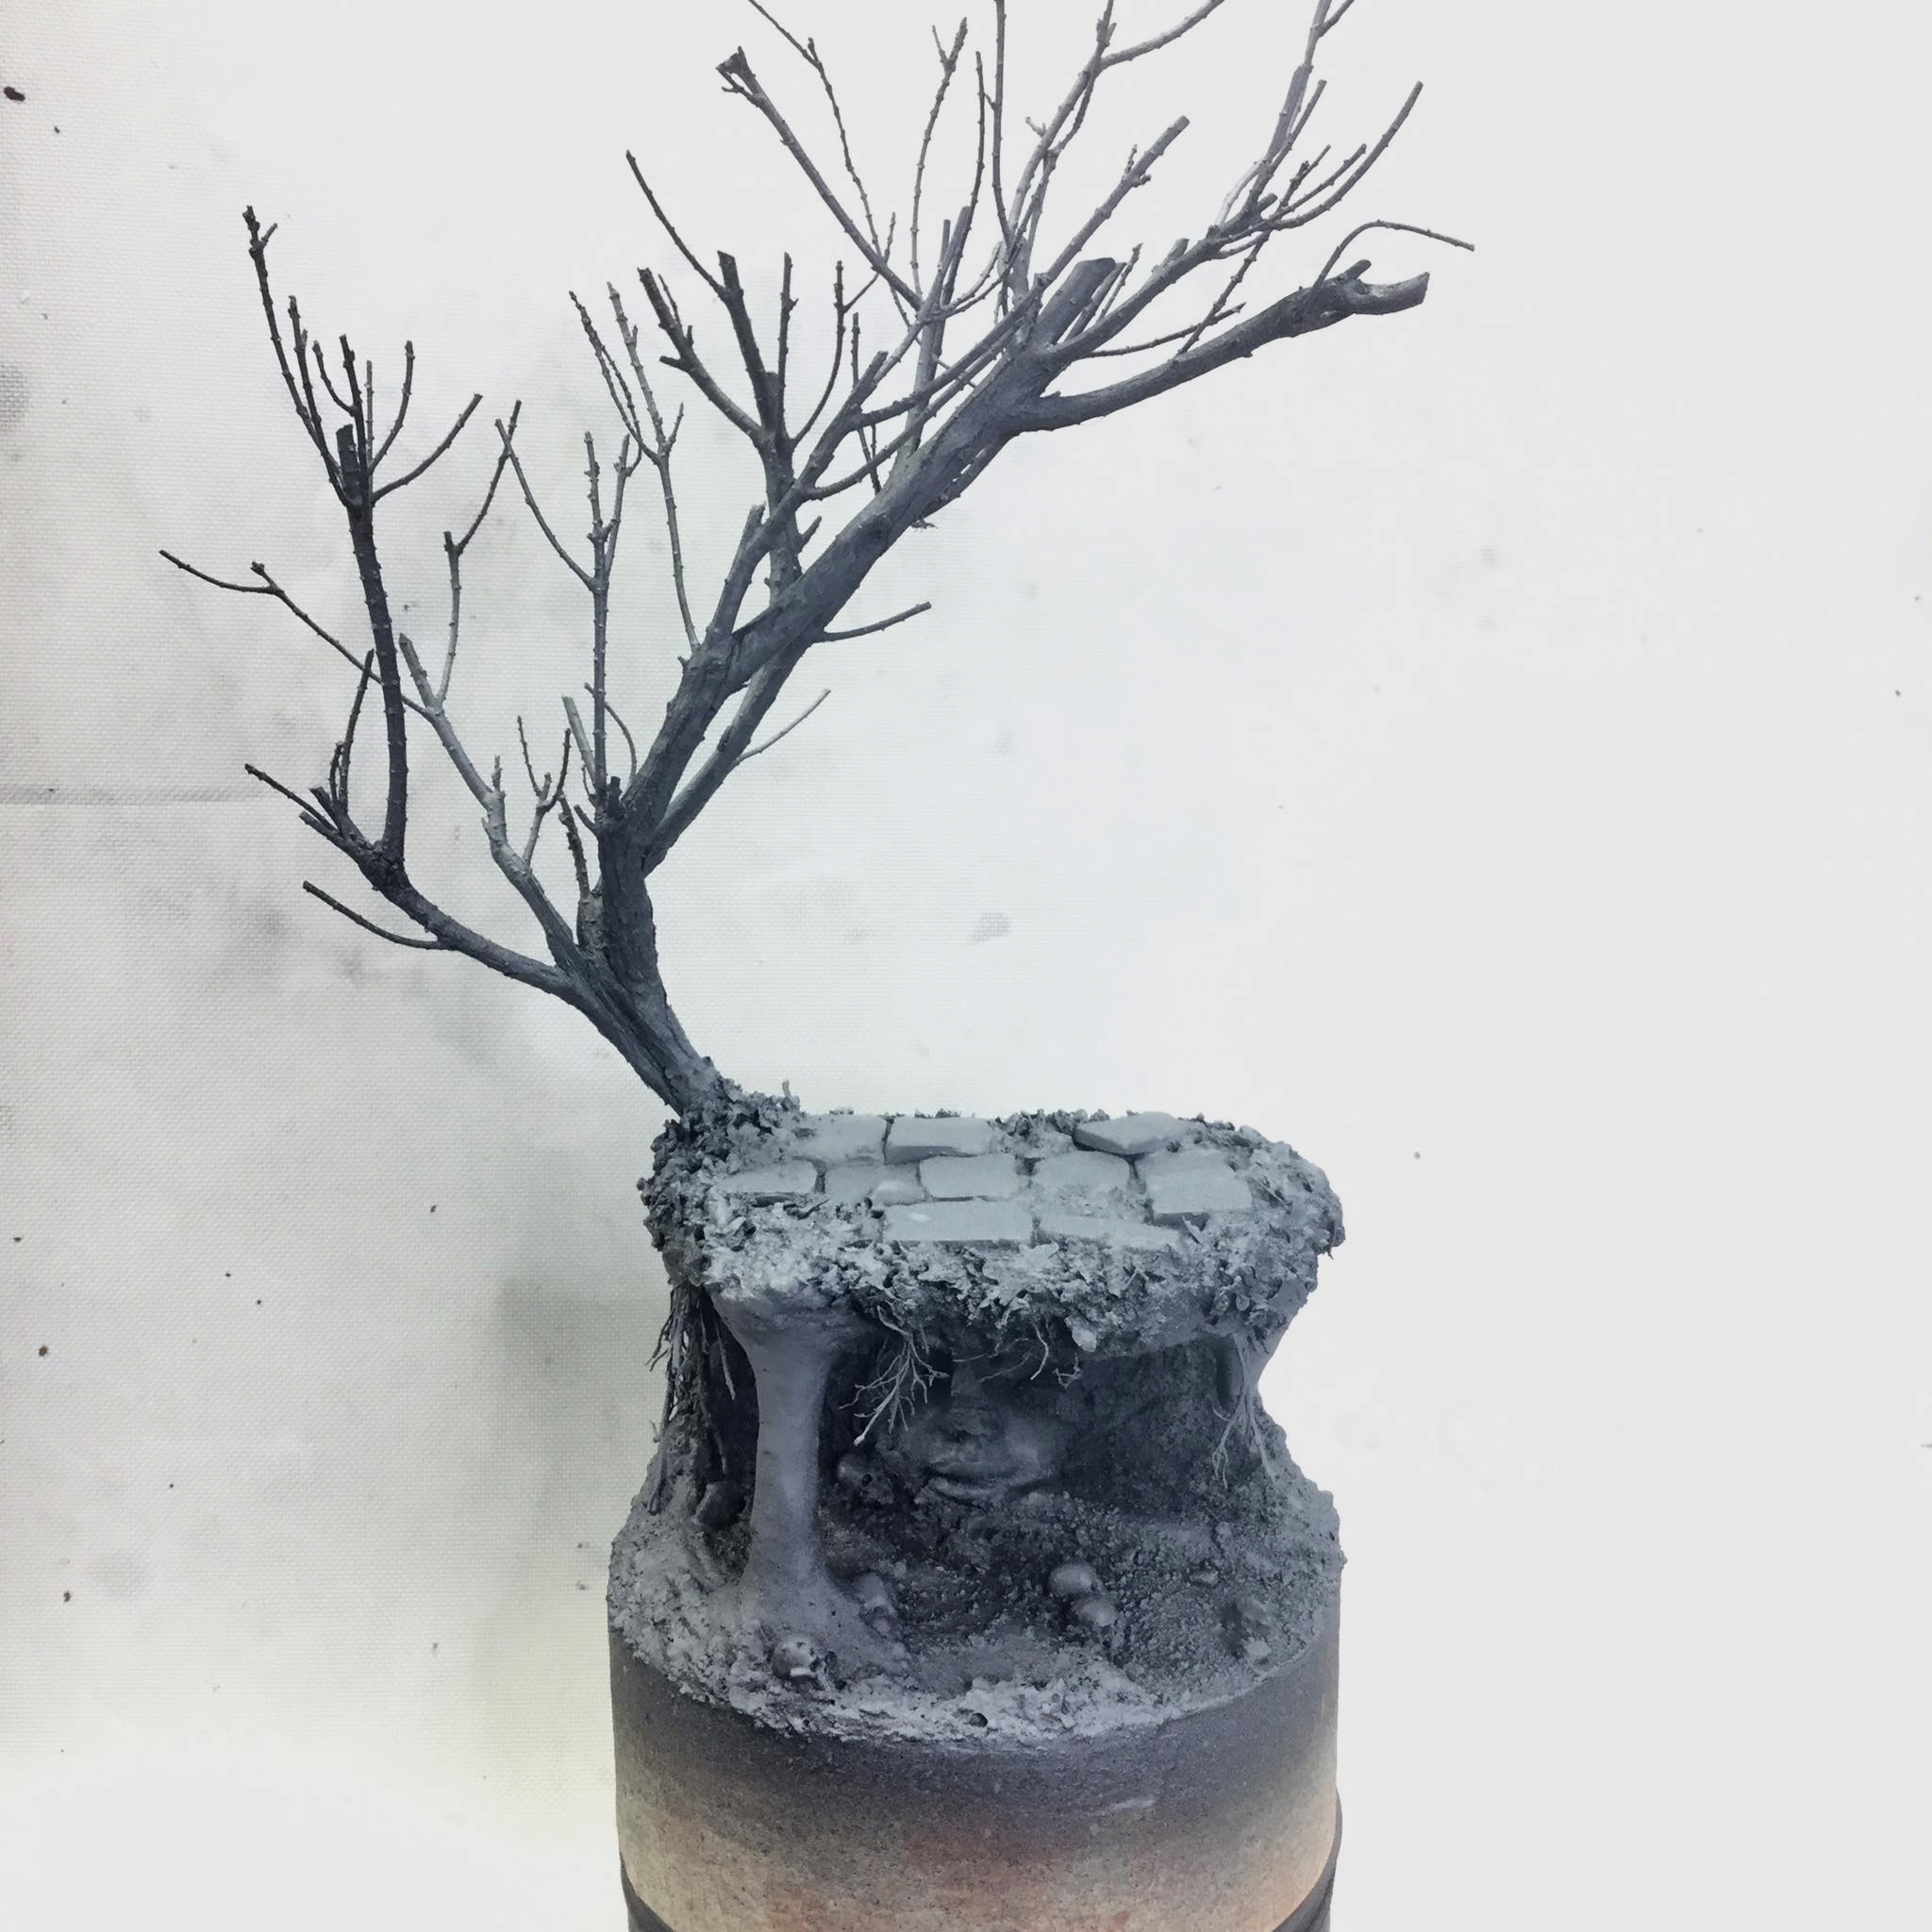
The original base was, I had planned, to be a plinth with an Autumnal forest floor, a small pool and a fallen moss covered tree for the Flower Knight to be standing atop.
The base has other plans it seemed as it grew and grew and became something quite more as you can see from previous entries in this project.
First a cave was born, then a face grew in the cave, then a stream, next a tree. Then some old ruined flagstones and so on.
Painting the base was a lot of fun and really helped me to look more critically at my own work as well as research and reference real life examples to a much higher degree than I usually do.
I learned so much from this piece. It’s the most nmm I’ve done on a single model as I usually am more well known for my tmm work than nmm but I’ve always felt that non metallic metal workups just suit KDM aesthetic better.
I tried out a lot of different techniques and materials and really pushed myself beyond what I usually do.
I could really feel myself growing as an artist by the end and when I eventually did finish last week I was exhausted, worn thin but very very proud and definitely felt that great feeling of having grown.


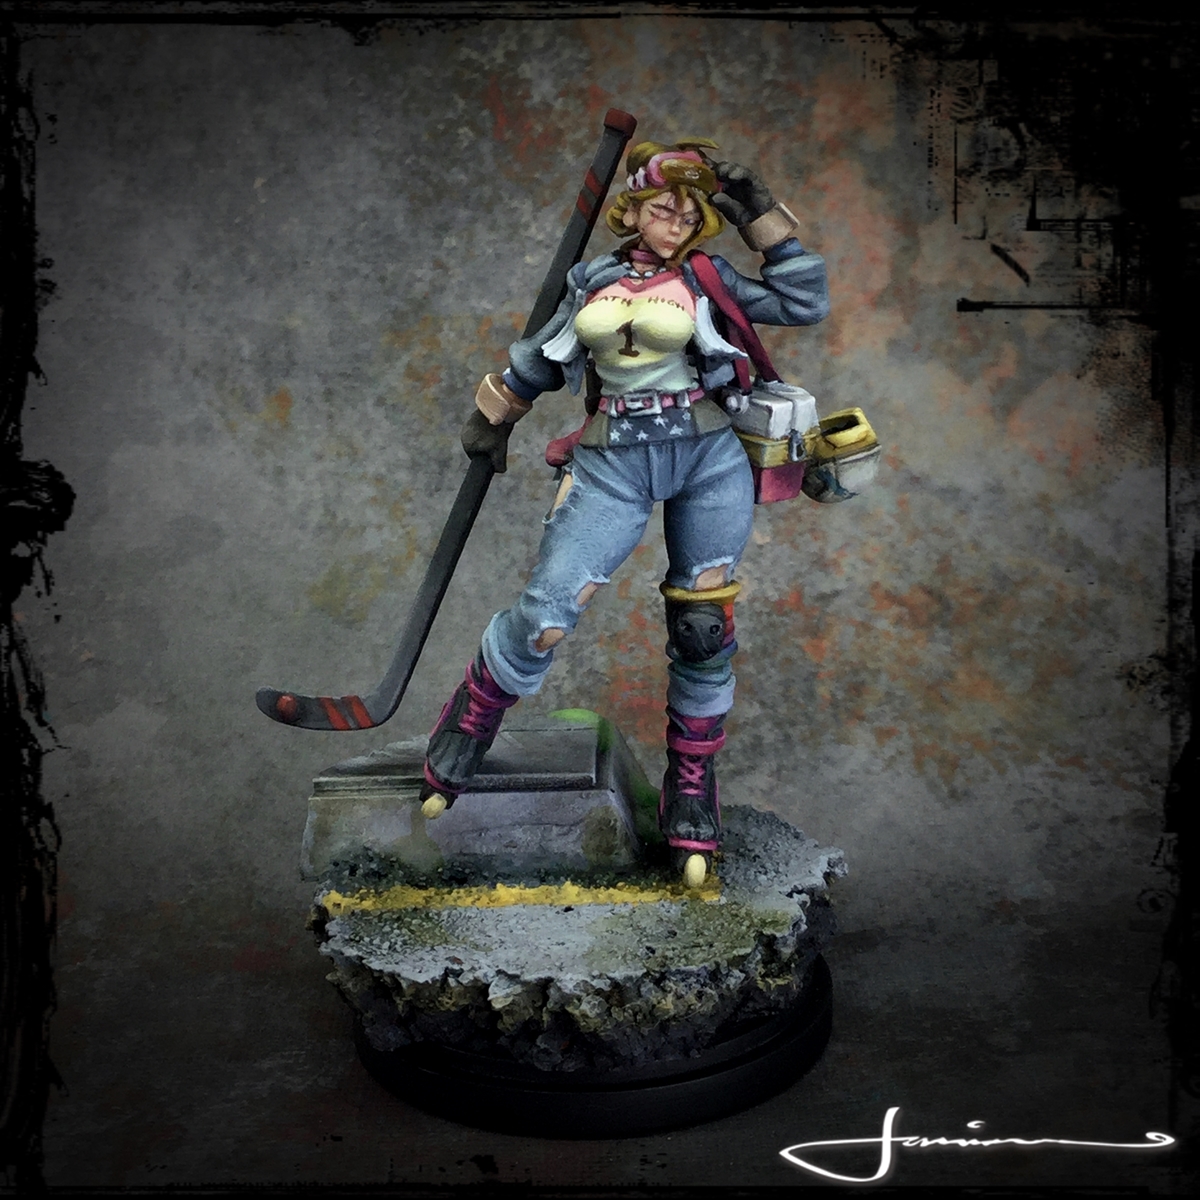
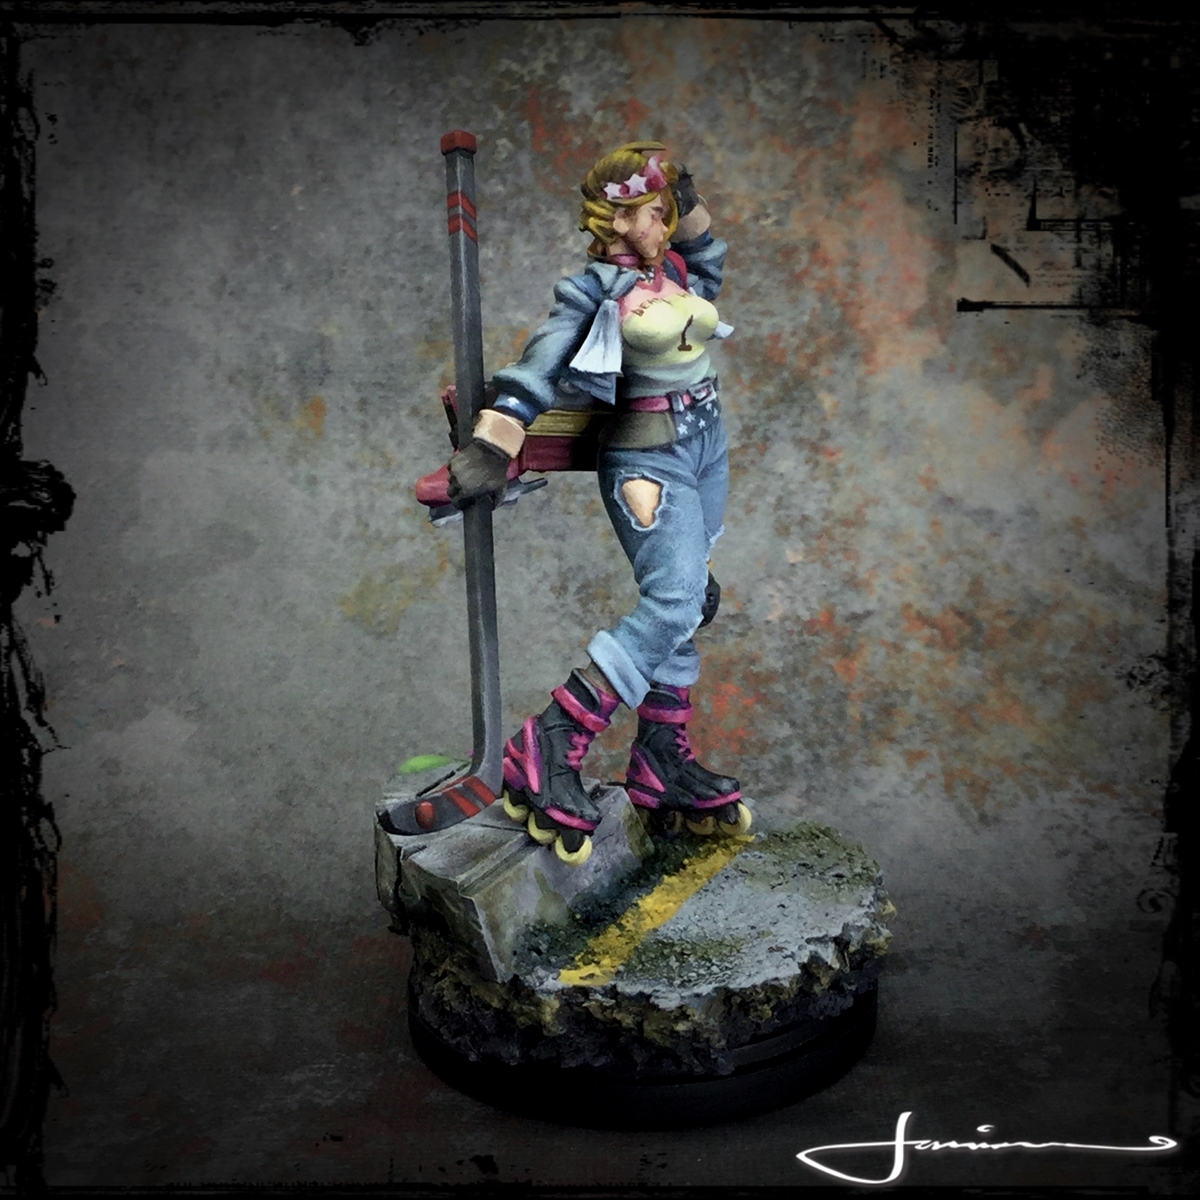
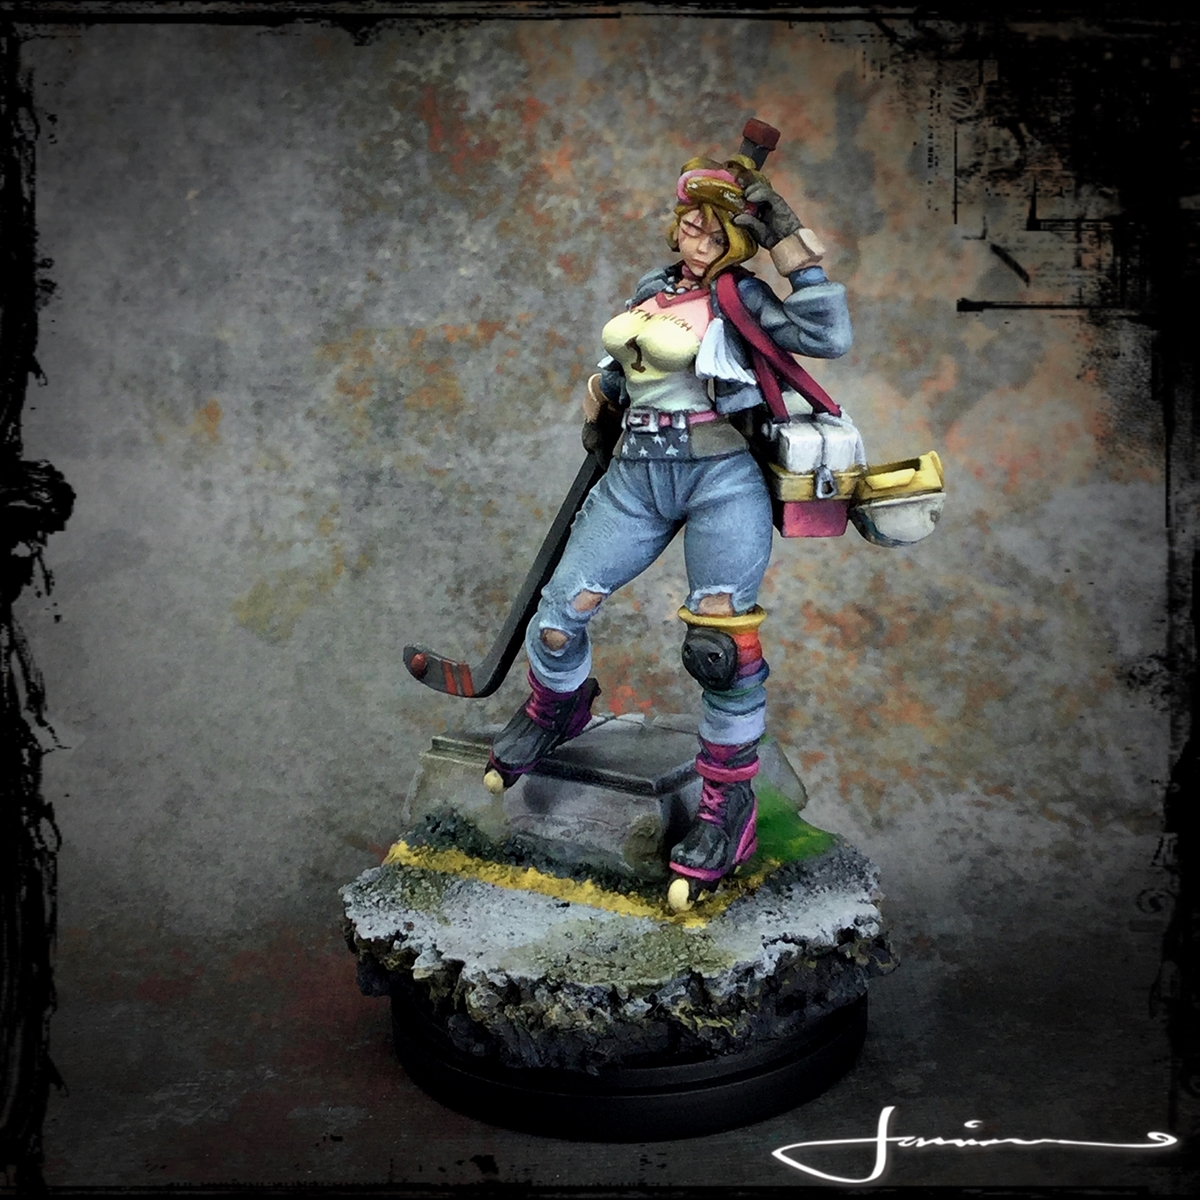
Death High #7 The Enforcer
The Death High Enforcer from Kingdom Death is finished and based! Such an awesome mini to paint and am seriously happy how she turned out!!! Adore this Death High series. C&c always welcome.


The Flower Knight Returns - Autumnal Gown n Foliage Pt 4
Just a very quick wee update.
The Base has some base sketching down but no photos yet!!
However, made some good progress on yesterday’s Twitch stream on his gown.
Worked the green, red and ochres of the fabric and started on the leaves, much fun and the vines, pain in the arse!!
He’s getting closer to finshed. Still have a bit of the nmm to finish up, more vines (grrrr) work and some more foliage on the knight himself.
The Flower Knight Returns - Building a Base Pt 3
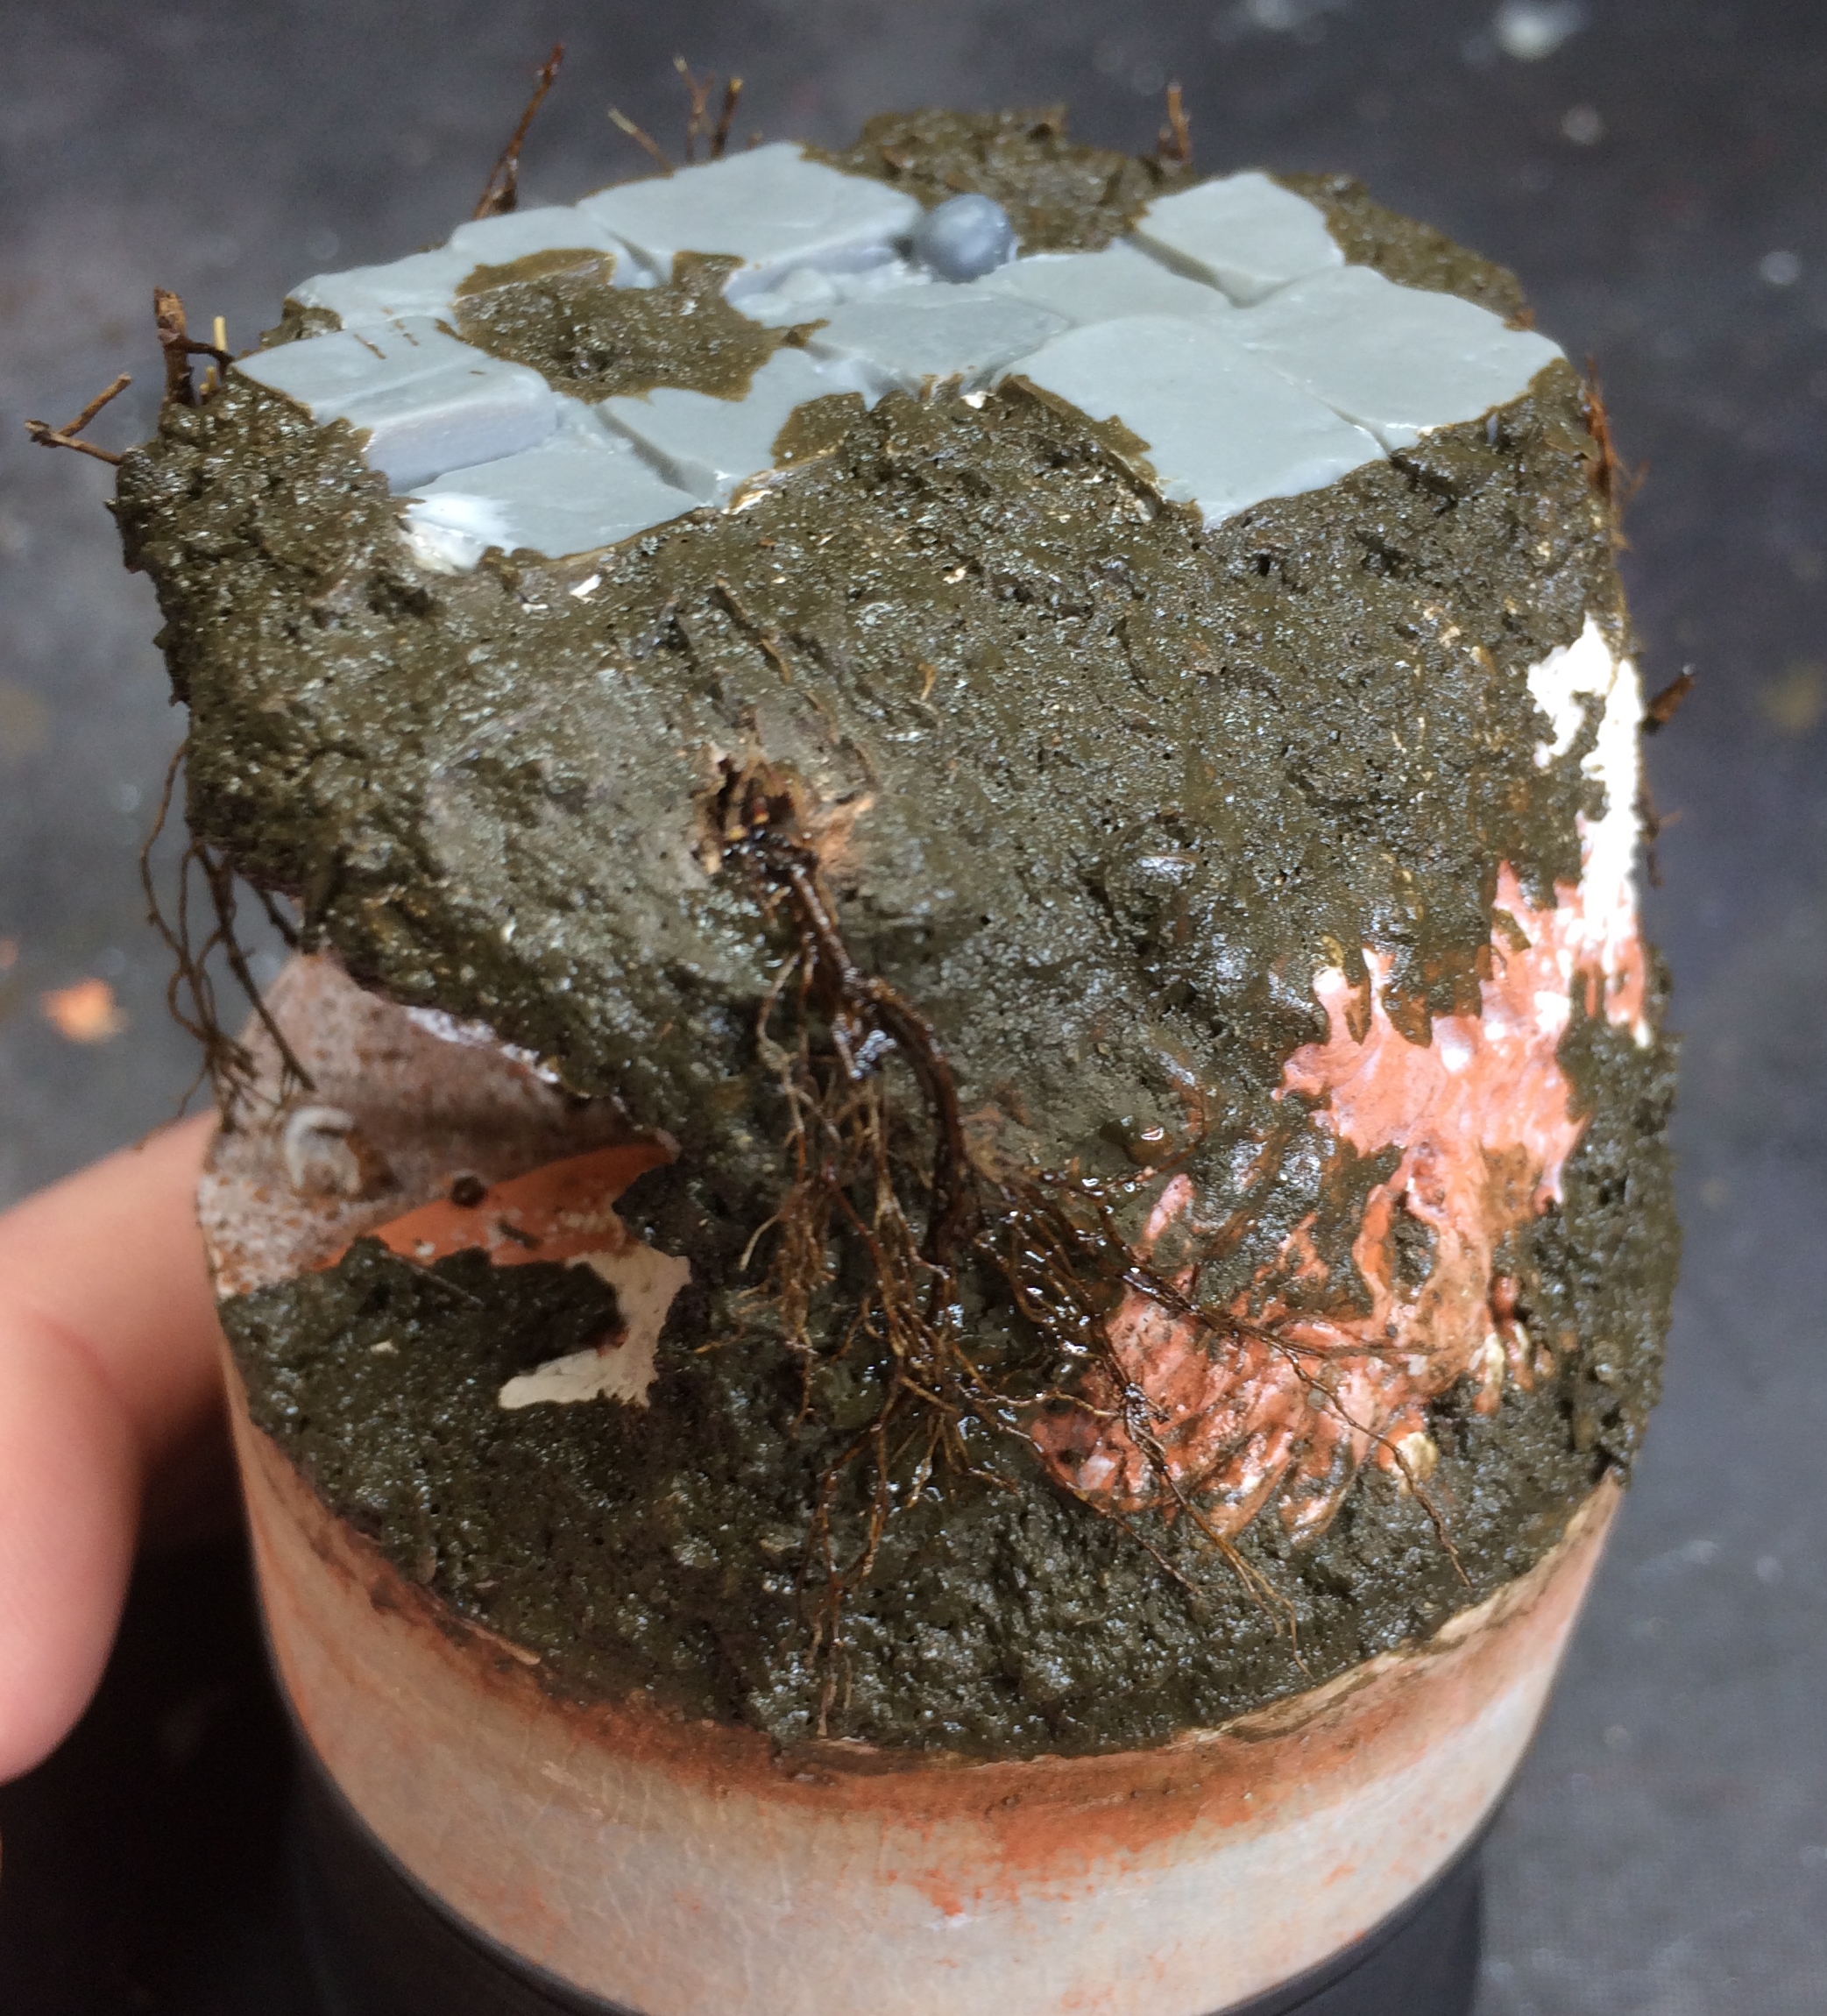
With the base fully built it’s time to prime!!
I start with an overall two light coat black prime using the best airbrush primer on the market imho – Stynylrez by Badger. Pain in the arse to get in Ireland but there are one or two places in the UK that it can be ordered from. I got mine from BarwellBodyworks, a UK airbrush supplier that ships.
Once the two layers of black are totally dry, I go back in with a lateral prime of Stynylrez grey primer. With the grey I spray 45 degree angle around the base paying attention to areas where light will fall and leaving out any dark recesses areas. Most of this is bring out detail and make it more visible for when I paint the base.
And that is the base pretty much ready to go!


The Flower Knight Returns - Building a Base Pt 2
Gooooooooood morning Beasts and happy….. Tuesday, aye, Tuesday…… or so the computer tells me!
And on with Part 2.
With the main core build down, made of paperclips, plasticard, air dry clay and epoxy putty – it’s time to start refining and texturing our build.
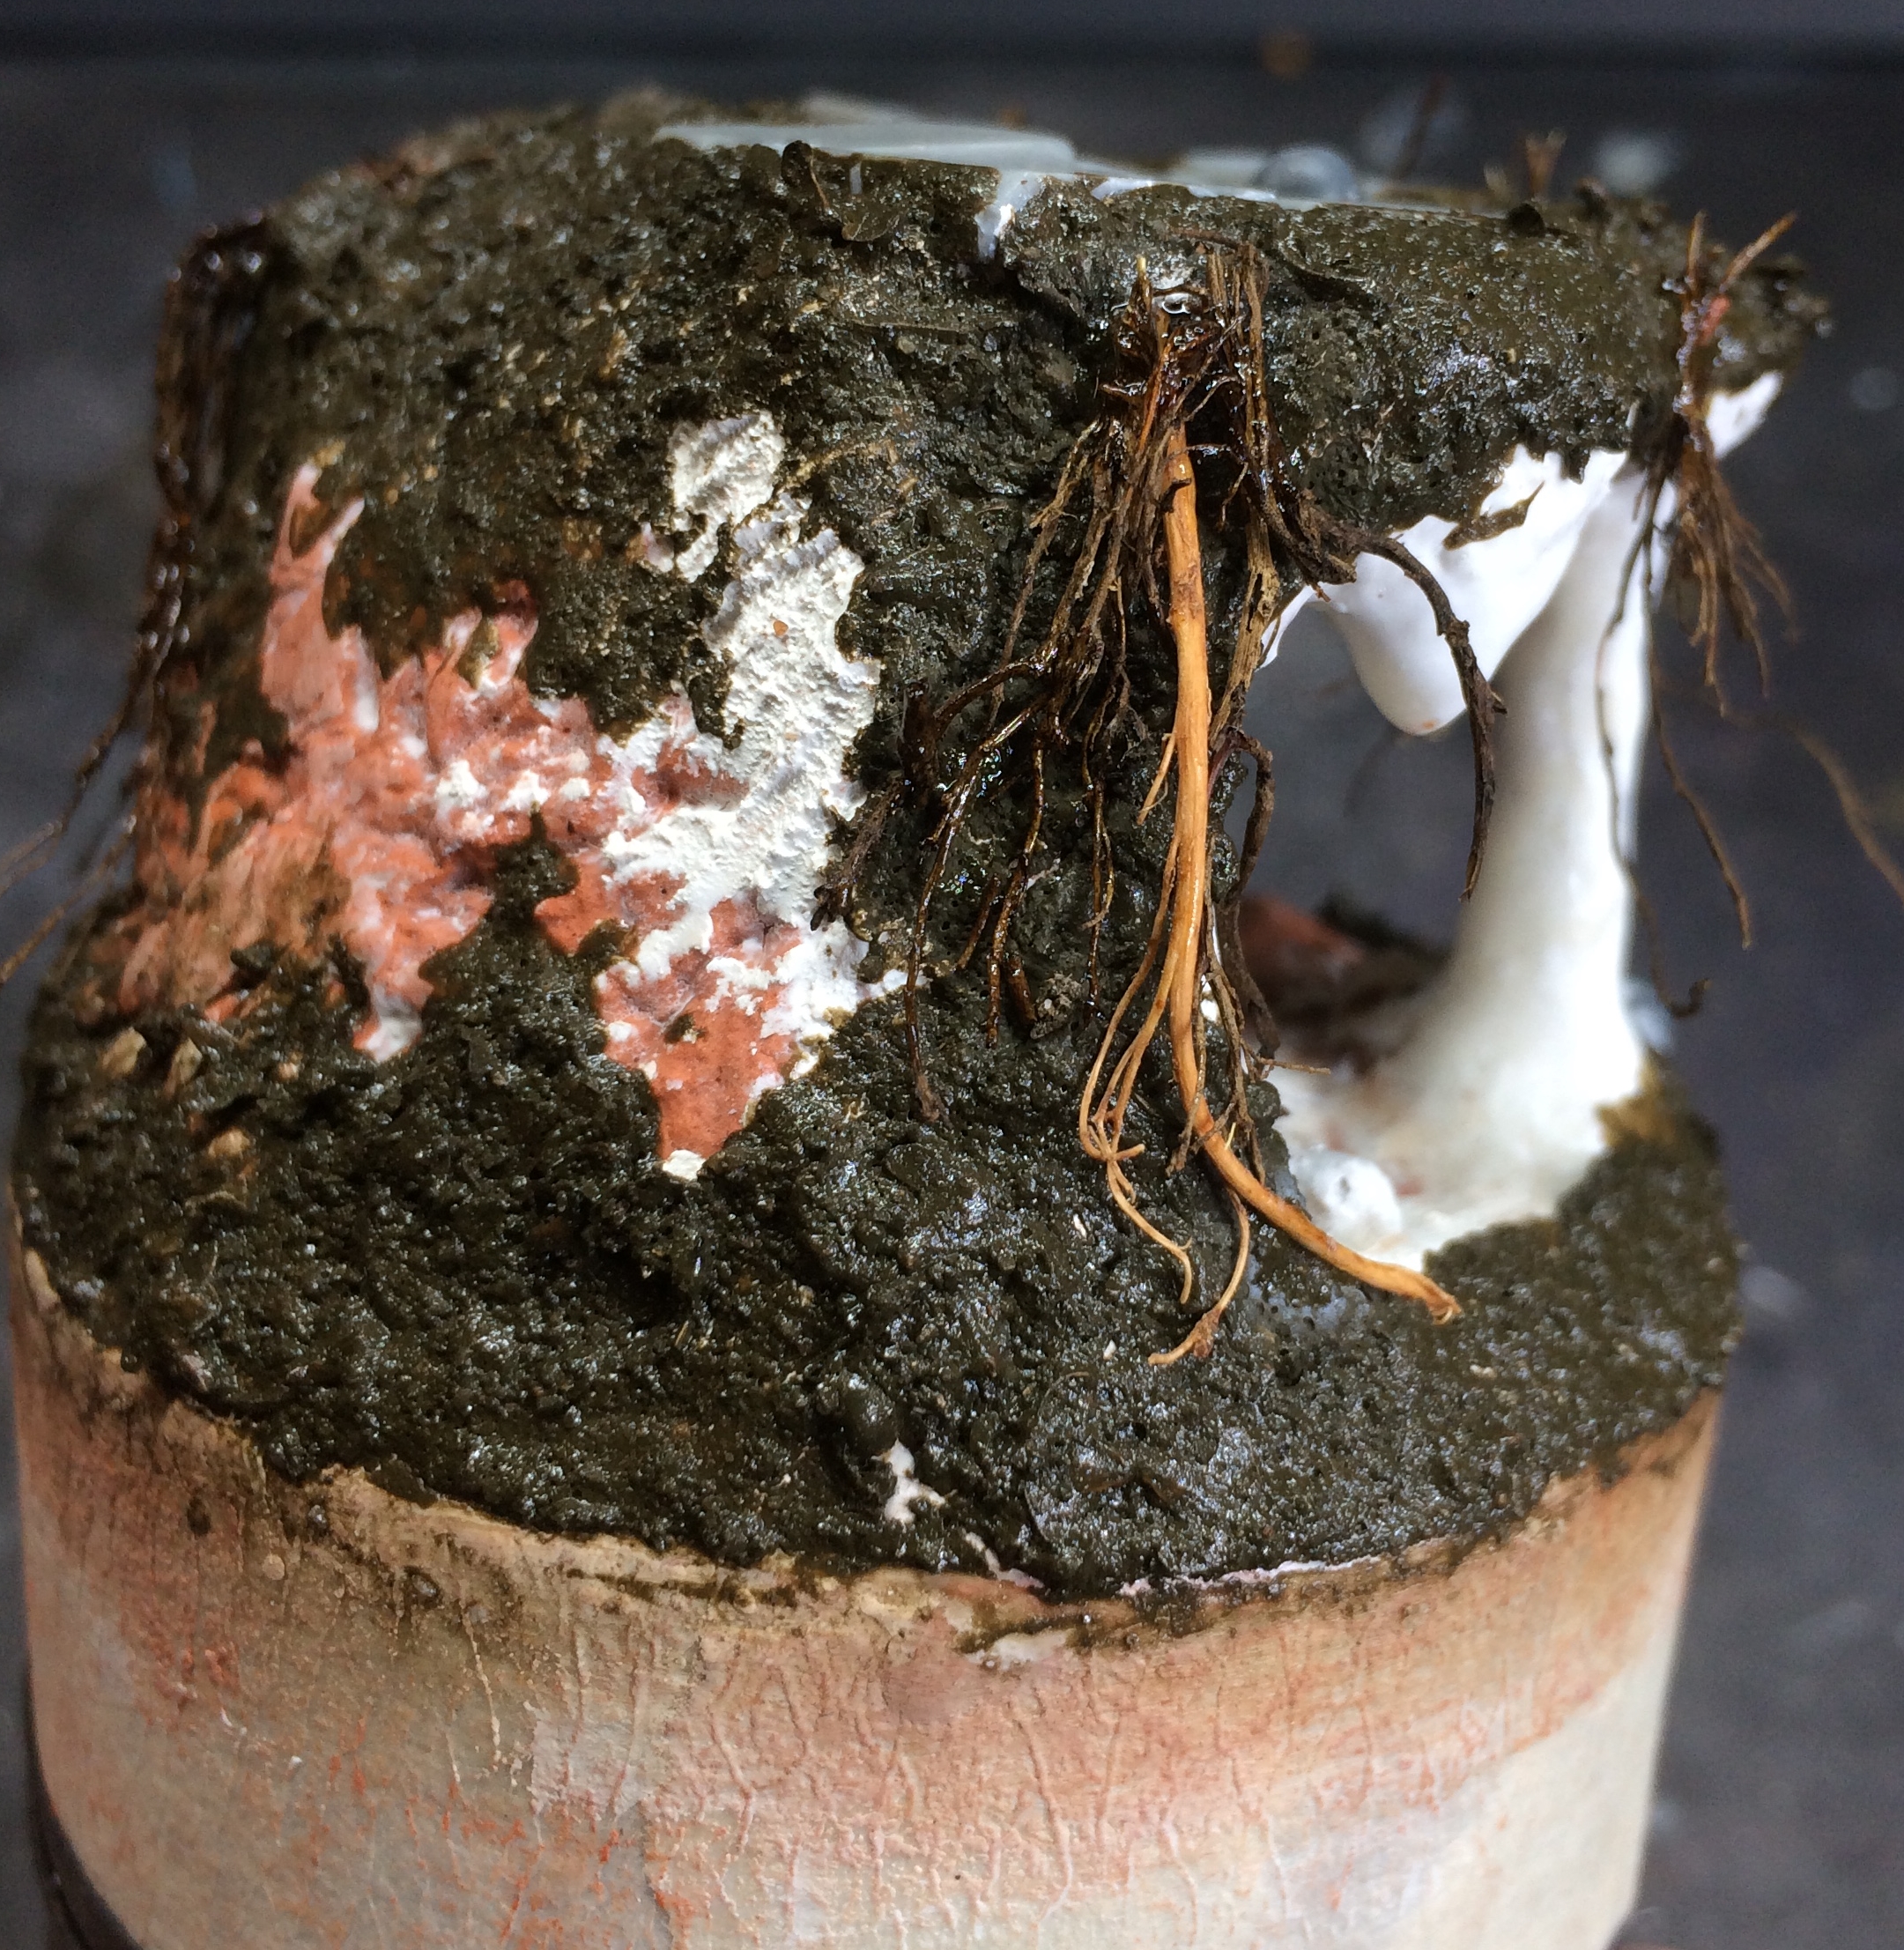
So we have a wee cave, cave stream, an overhang platform and some stalligtites that all need their own texturing.
I want an over earthen texture to start with so time to head out into the garden and get some stuffs!
First thing is some mulch!! Well I call it mulch. basically small scale garden detritus! dirt, birch seeds, bits of root and the like. easy to find in an irish garden! I get a box of this stuff and then bake it on a baking tray for an hour. Anything you get out of your garden, woods, parks etc – bake that shit in an oven for an hour – this will a) dry it out nicely and b) kill off any bacteria, bugs, whatever.
For the initial texturing I used some of AK Interatives wet ground acrylic diorama texture paint. This stuff is awesome and comes in a dirty great big 250ml tub. Like GW texture paints except waaaaaaay more cost effective.
I add a few skulls for the GW skull box as well before texturing time.
I mixed some of the mulch into the AK texture and applied that onto the base. First layer to get a base texture and then when that had dried – I drilled some holes in and glued in some roots, again from the garden and then added on some more of the mulch/texture paint to add further texture and bio mass. This second layer had a higher amount of the mulch in it so bits of the organics would be visible.
The cave stream got a thin layer of sand and grit (red canyon grit from Rival Crafts) and the roof of the cave a layer of GW astrogranite debris to give it a rough stoney texture.
Next up comes sealing. All this needs to be sealed in and down. Now a lot of folk will use thinned down PVA (white glue, Elmer;s glue whatever you want to call it) – DONT! PVA glue is a pain in the arse as even when dried it can reactivate with water which is a paint in the arse especially if you are planning to pour resin for a water feature.
So, instead of using PVA to thin down and use as a sealant, I use wood glue. very similar to PVA with the added bonus of NOT reactivating later on.
I use the wood glue neat and thick on the cave column and the stalligtites to smooth out the texture and give them that more smooth drippy texture they get from being built up of minerals dripping over a long time.
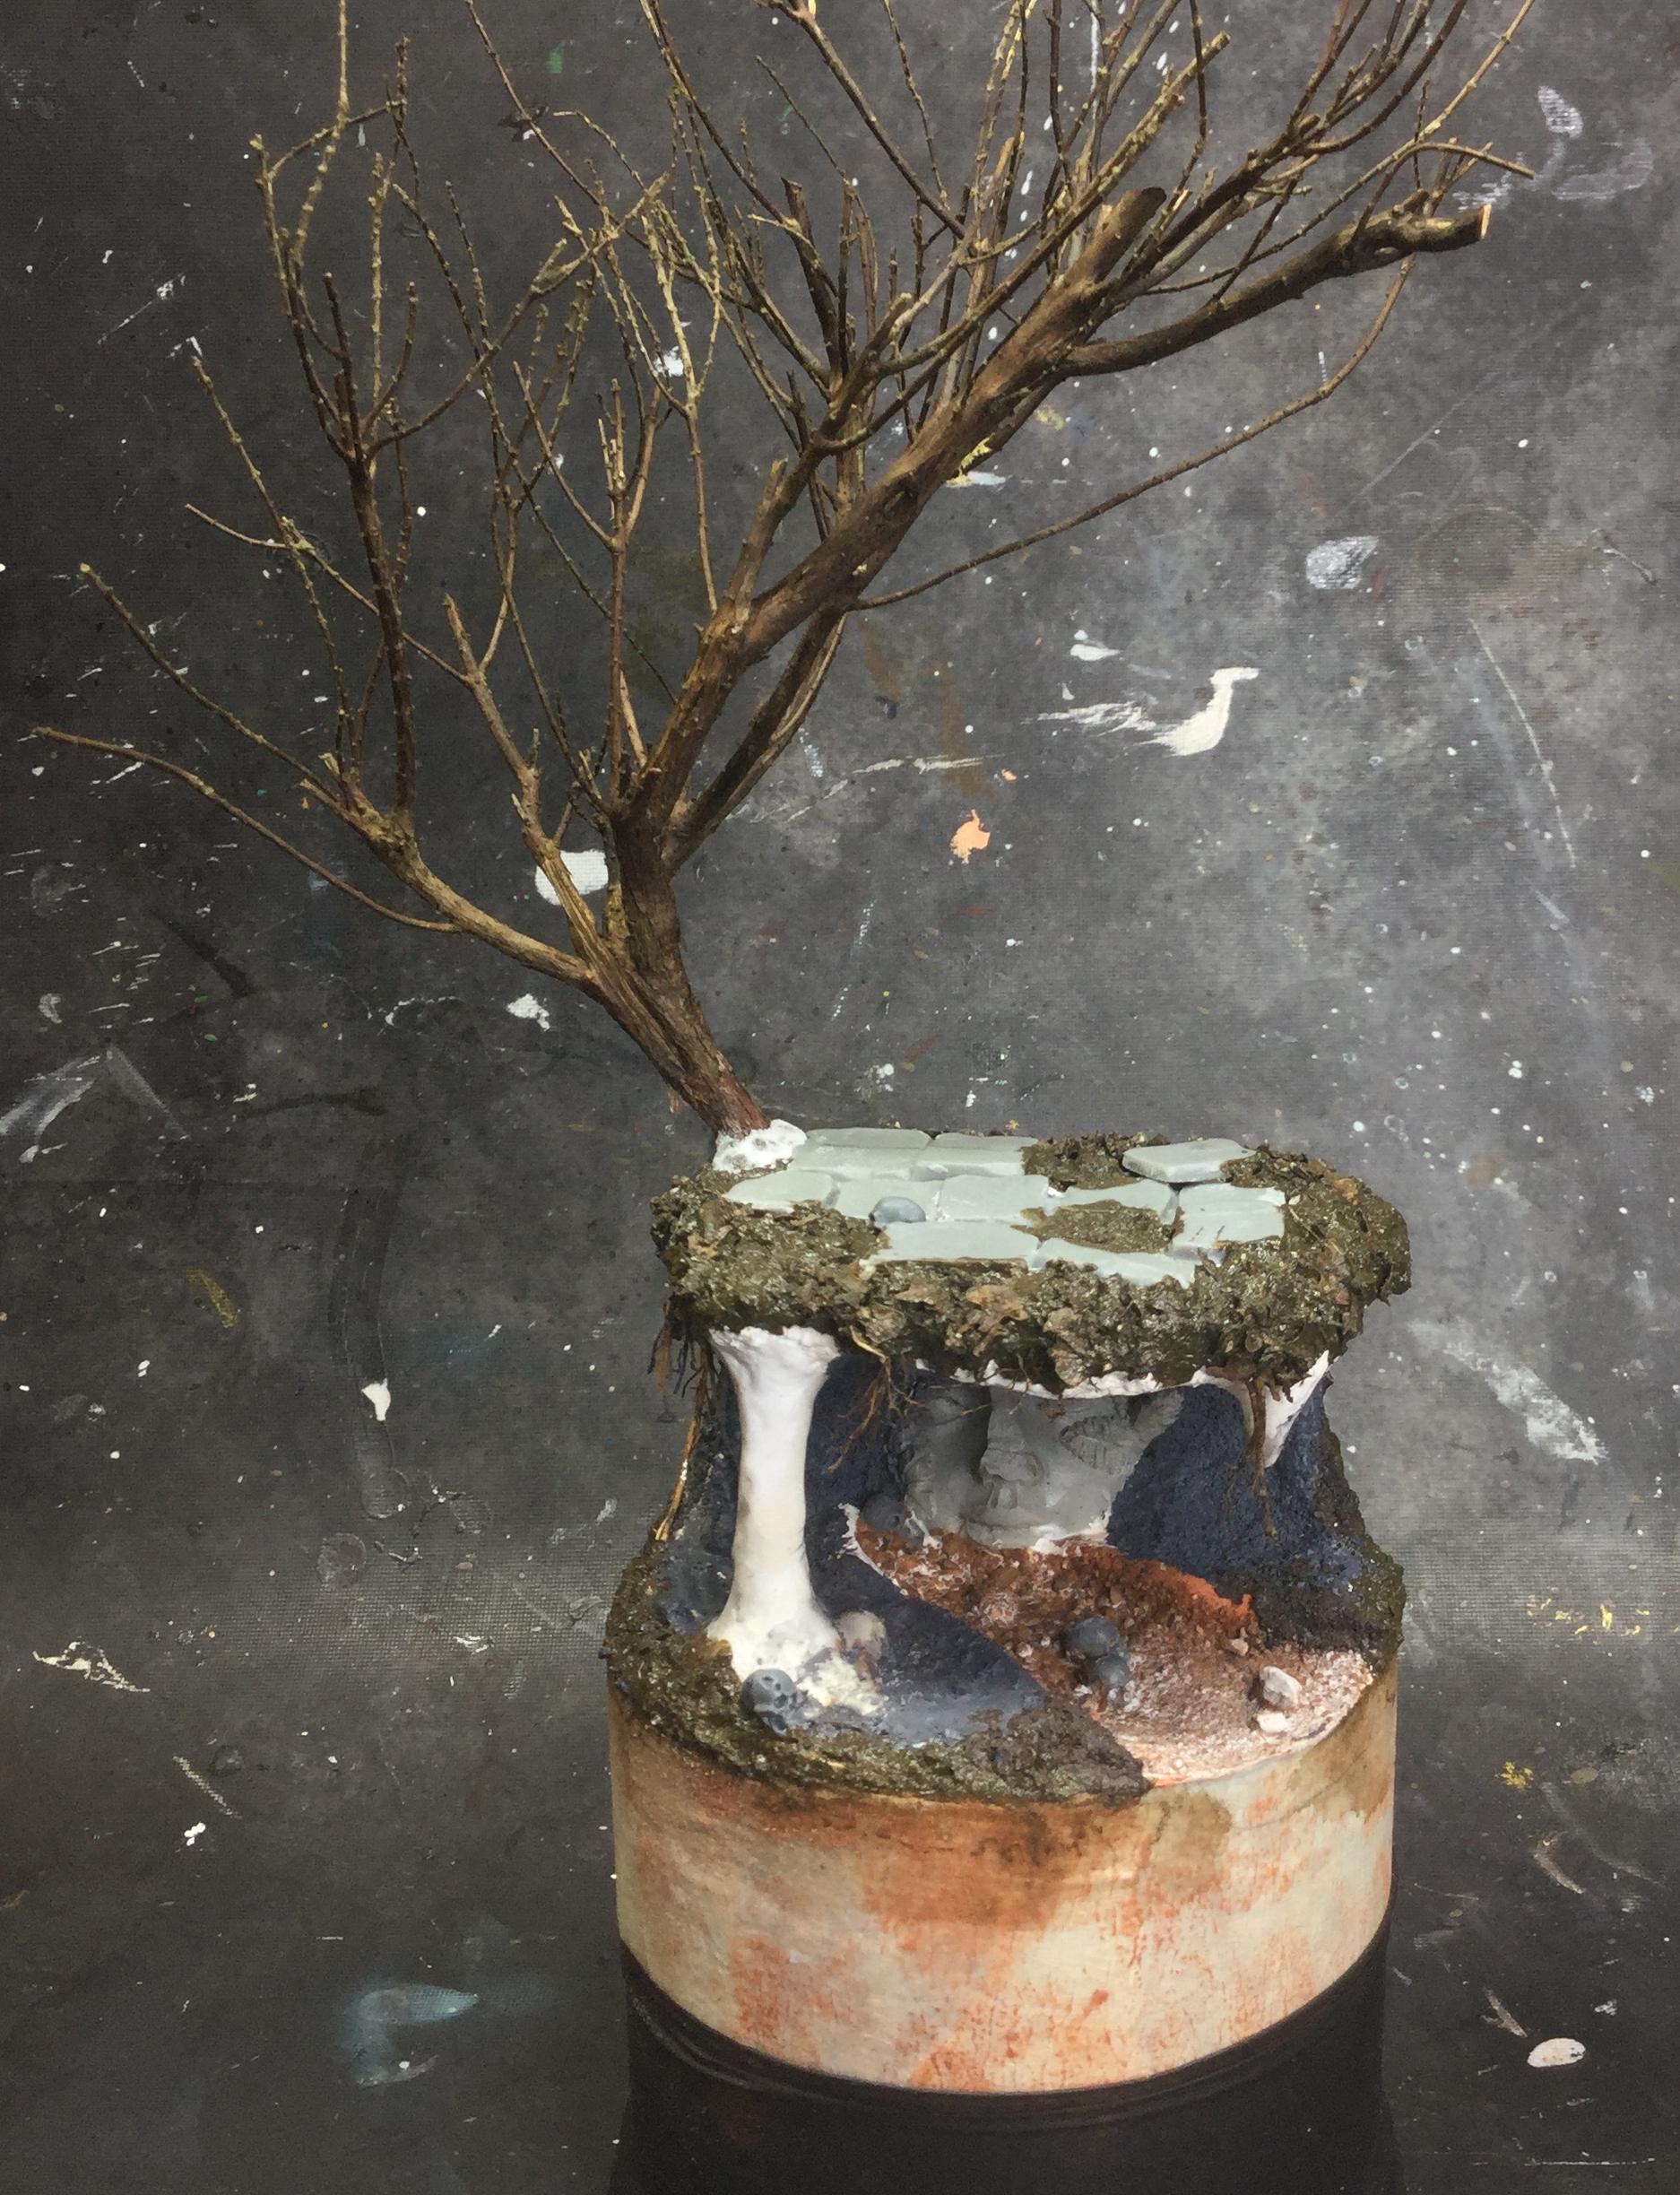
Thought I was all done but felt there was still something missing from the composition…………. need a tree!!!!
Back to the garden!!!
Heather. Heather bushes are bloody amazing and we have tonnes of the buggers in our garden. Look for the parts of the heather bushes that have died back. The scale, size and structure of heather bushes are perfect for making trees and there is no mucking about with wire aramtures, tapes, paper mache etc.
Once again, bake your new trees in a hot oven for an hour or so. The died back parts of the bush are already pretty dried out and seasoned but the oven will finsih that and kill any wee filthy feckers that might be living on it.
I drilled an inch hole up into the ‘truck’ of the tree and another inch hole down into the base. Heavy gauge paperclip to pin the tree to the base and then Gorilla Superglue gel + baking soda to cememt the tree down.


Once the ‘cement’ is dry, another layer of AK Interactive wet grounds and then with the wet brush I picked up some more mulch and pushed it into the wet texture paint to make a base of the tree look more natural and growing out of the base.
That is essentially now the build for the base complete. There will be more scenic elements still to be attached but they will come after the painting phase – mushrooms from spellcrow, UV resin from greenstuff world and moss from woodland scenics and so on.
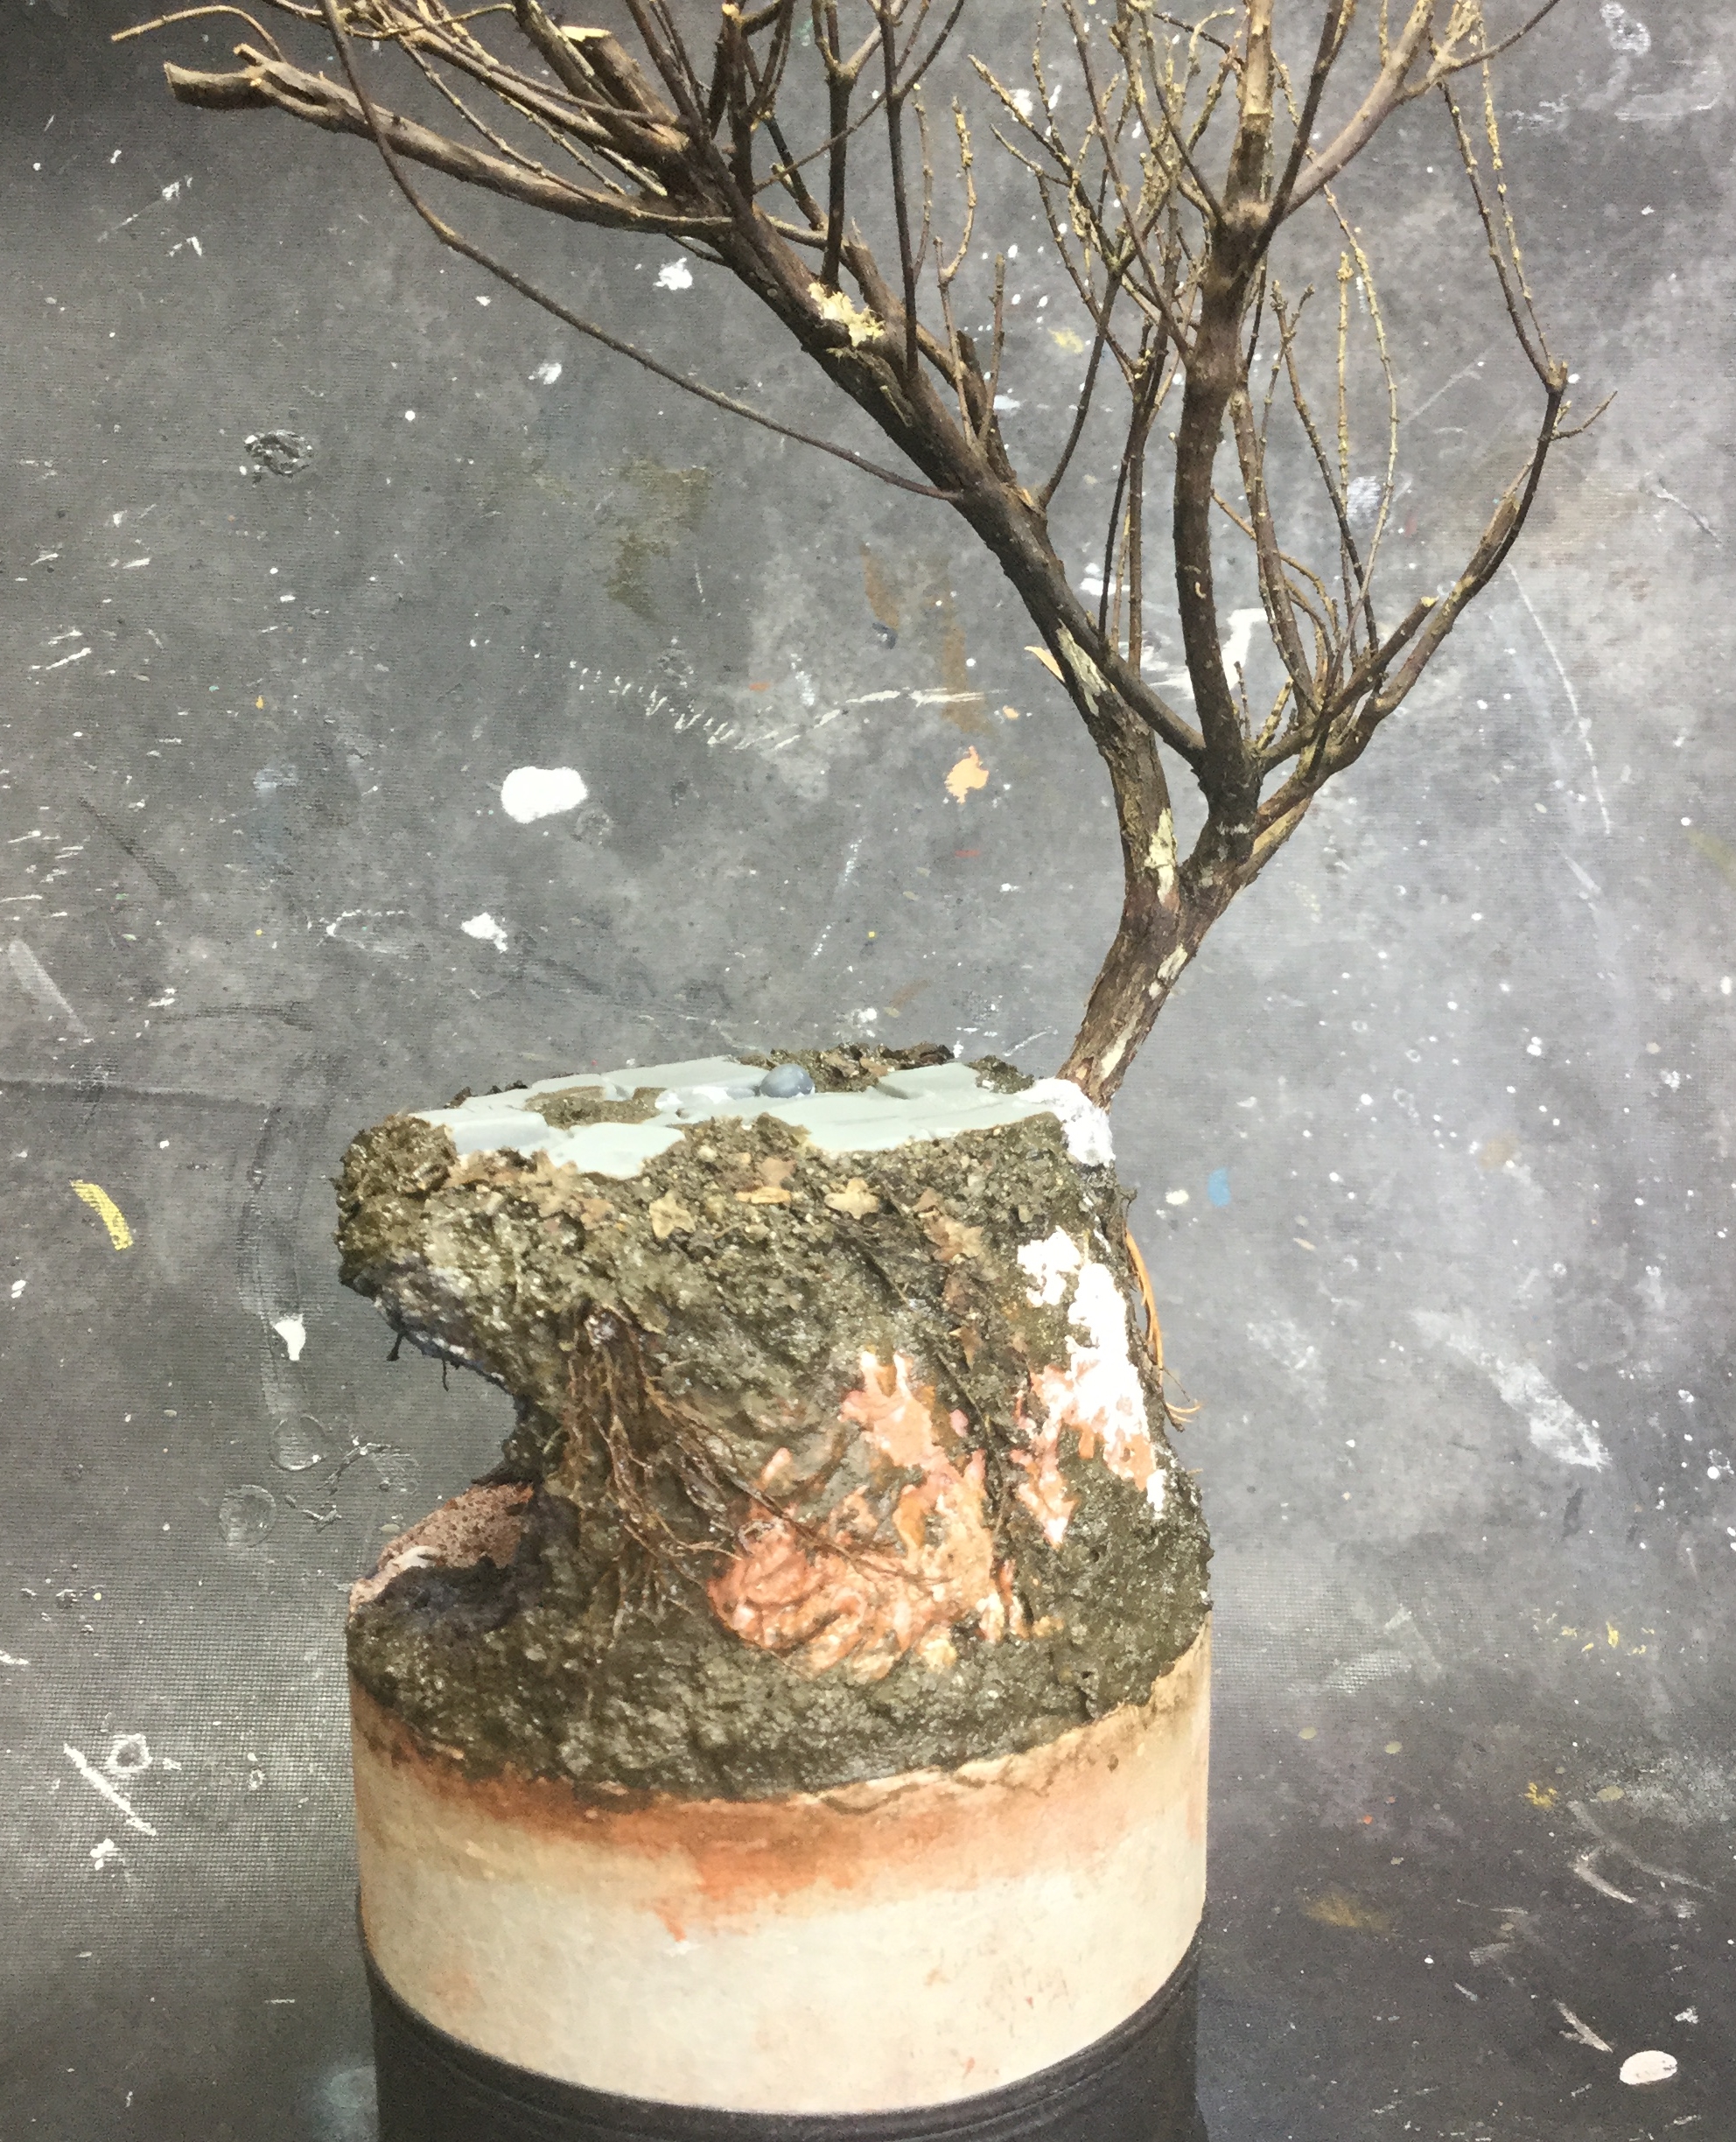
So, with the base built its time to prime and thankfully (and finally ) my Stynylrez black primer arrived in the post this morning 😀
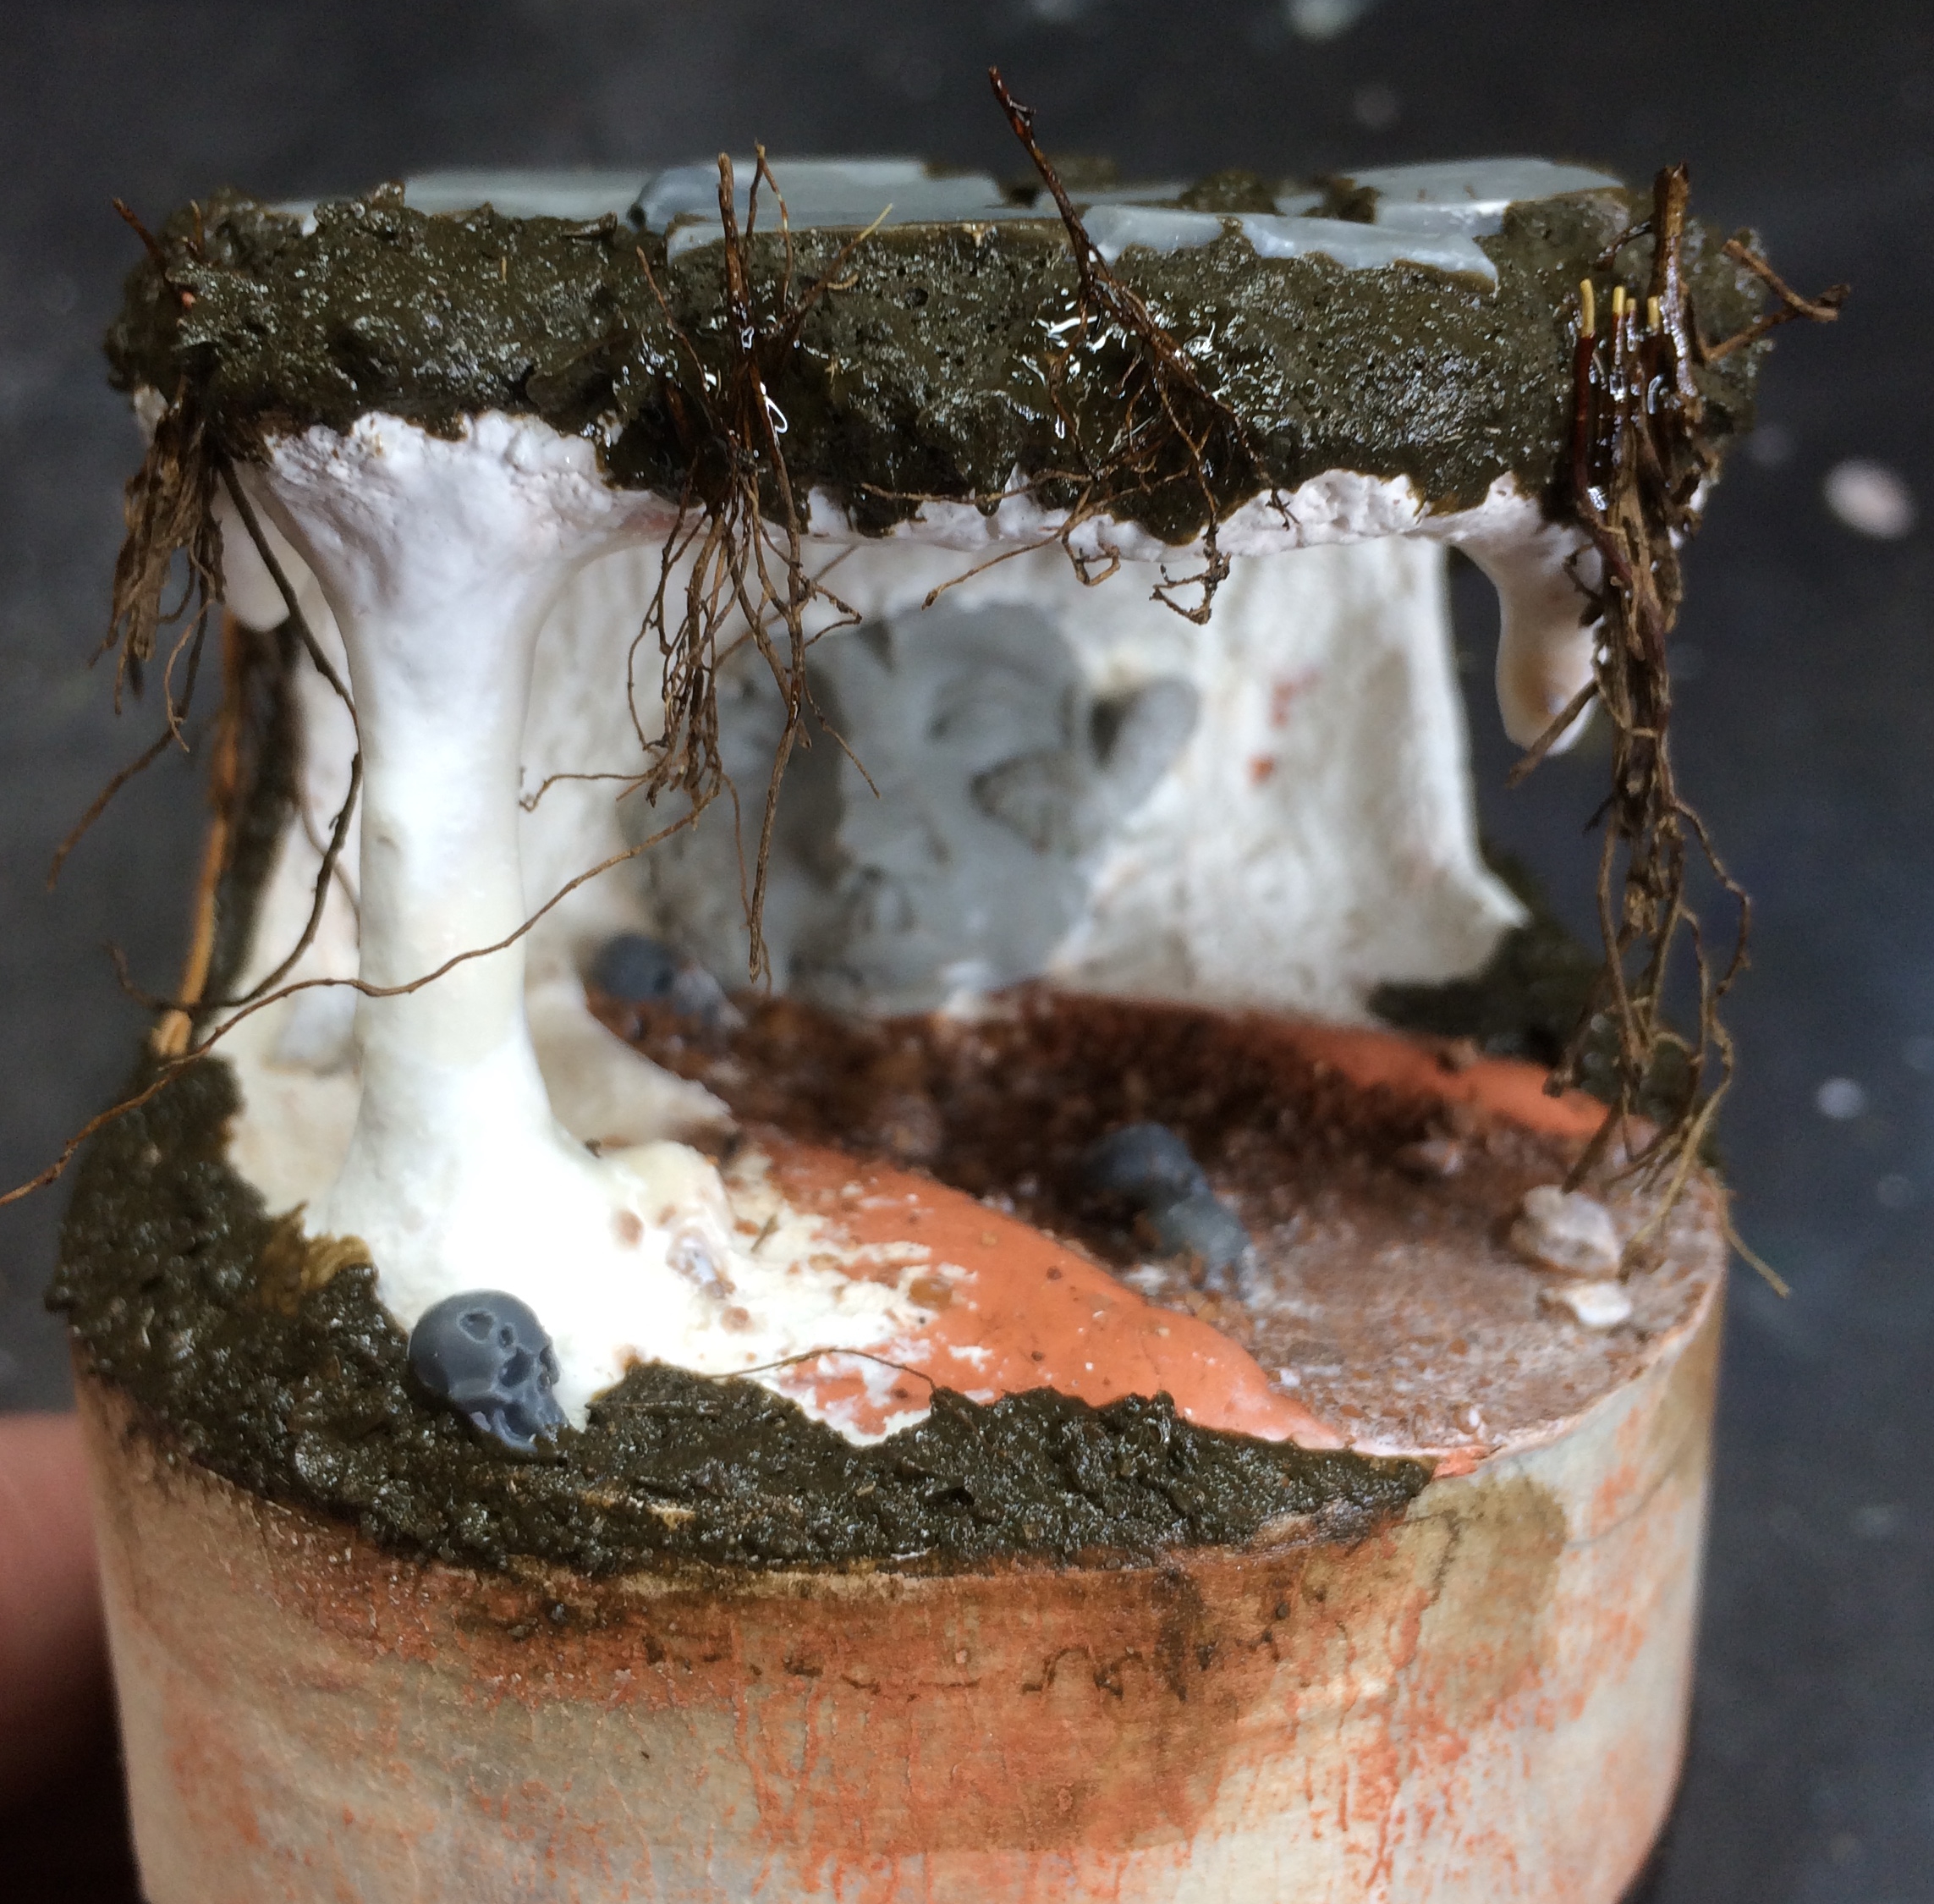
 Final compostion check with the miniature in place before priming starts
The Flower Knight Returns - Building a Base Pt 1

So the work on the Flower Knight commission continues and she’s coming along rather nicely buuuuuuut It’s about time to make a base for her. A big old smexy vignette scenic plinth base!! Due to the limitations of how many entries per post, this is gonna take a few posts but stick with me and I’ll walk you through how I build the base for The Flower Knight from KDM 🙂
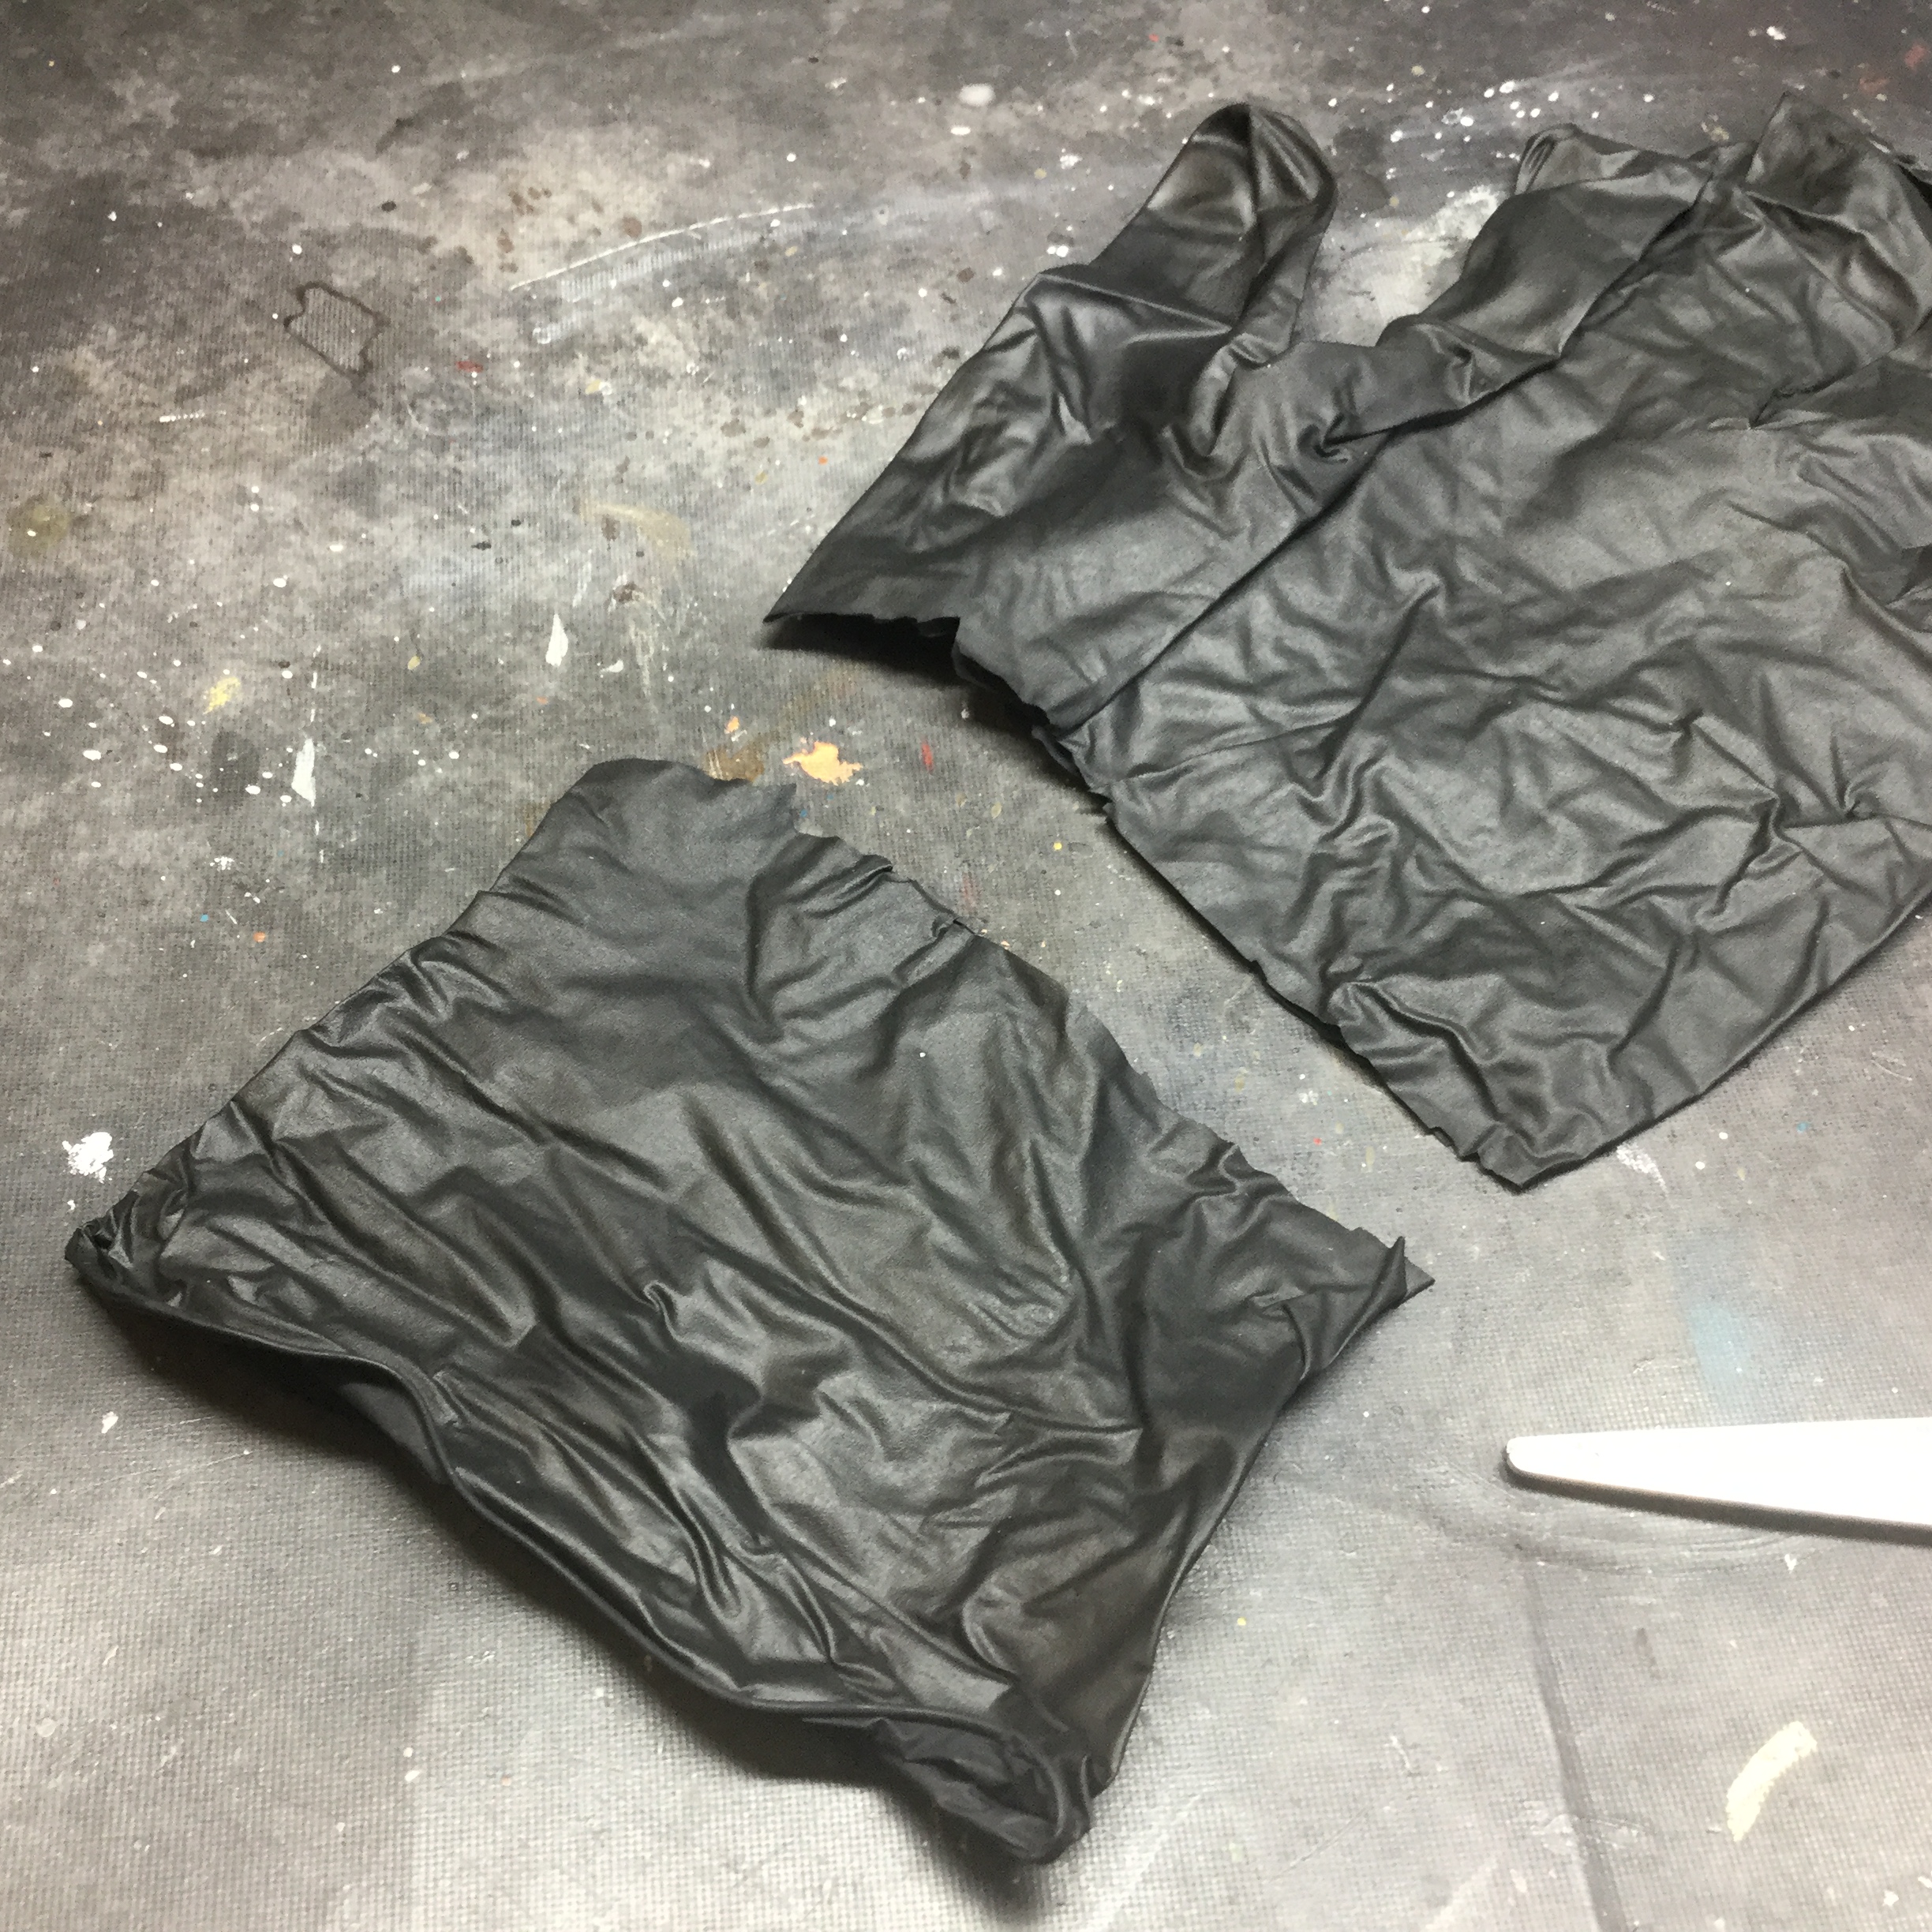
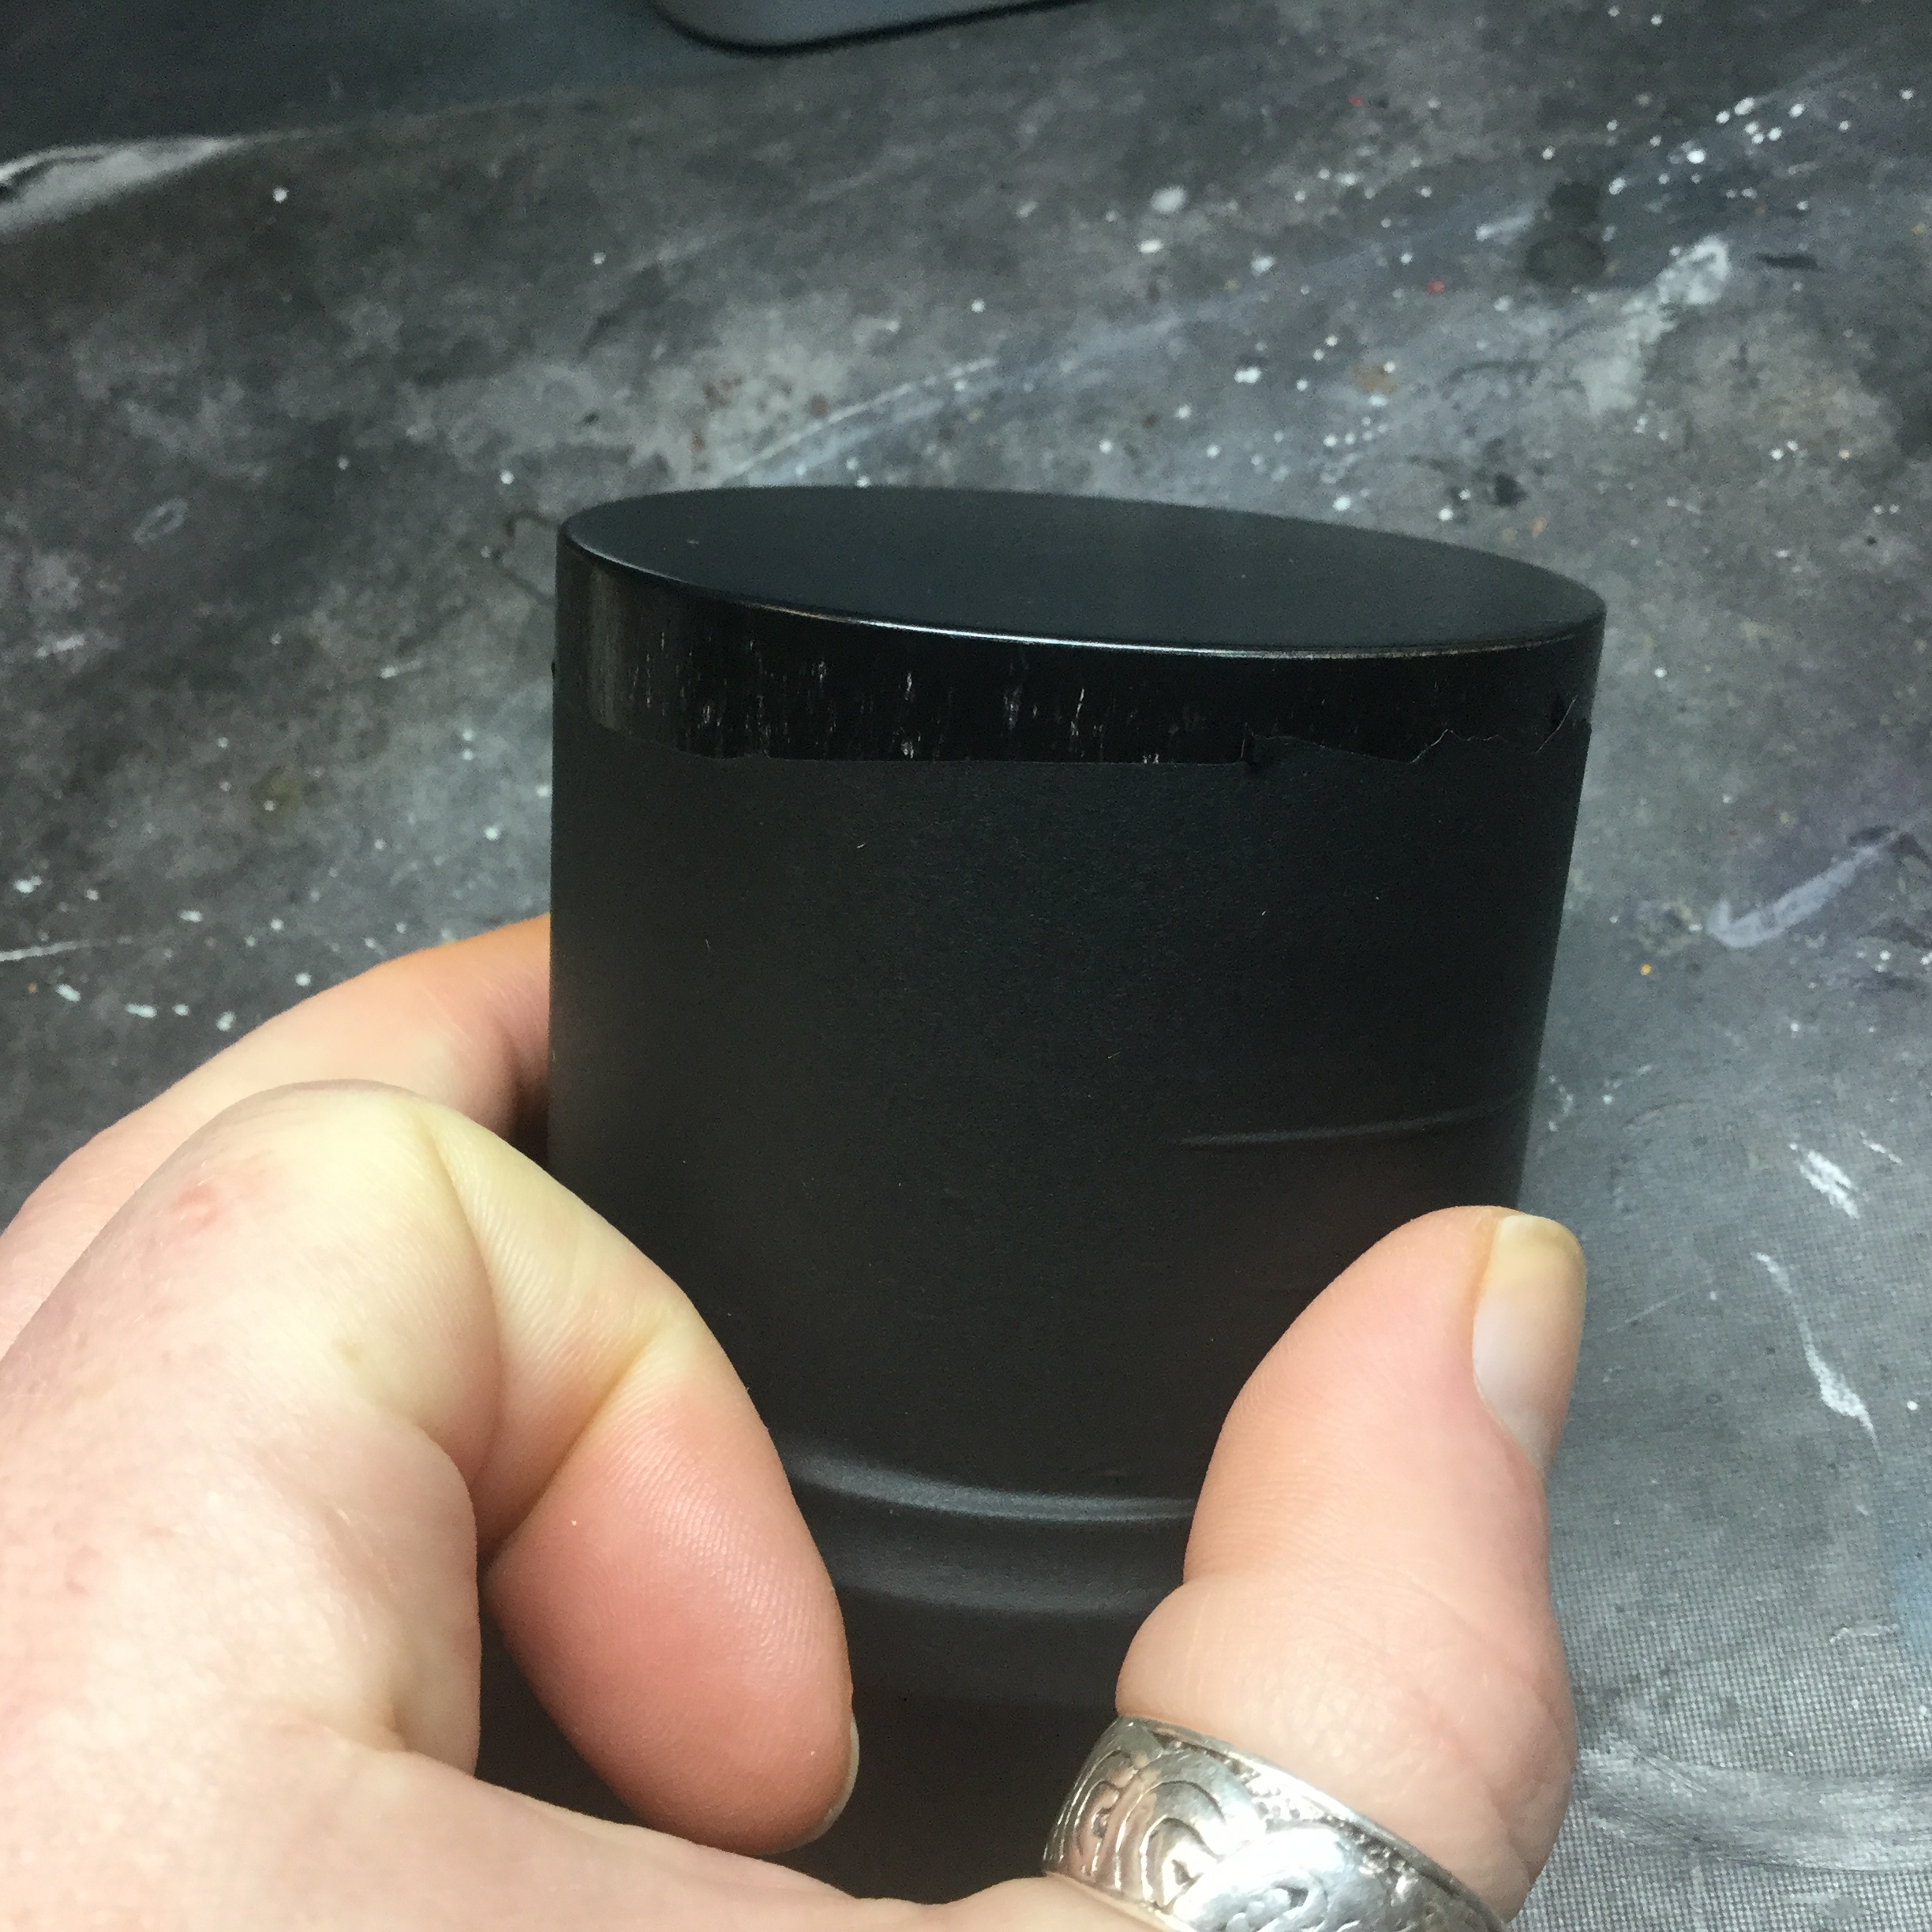
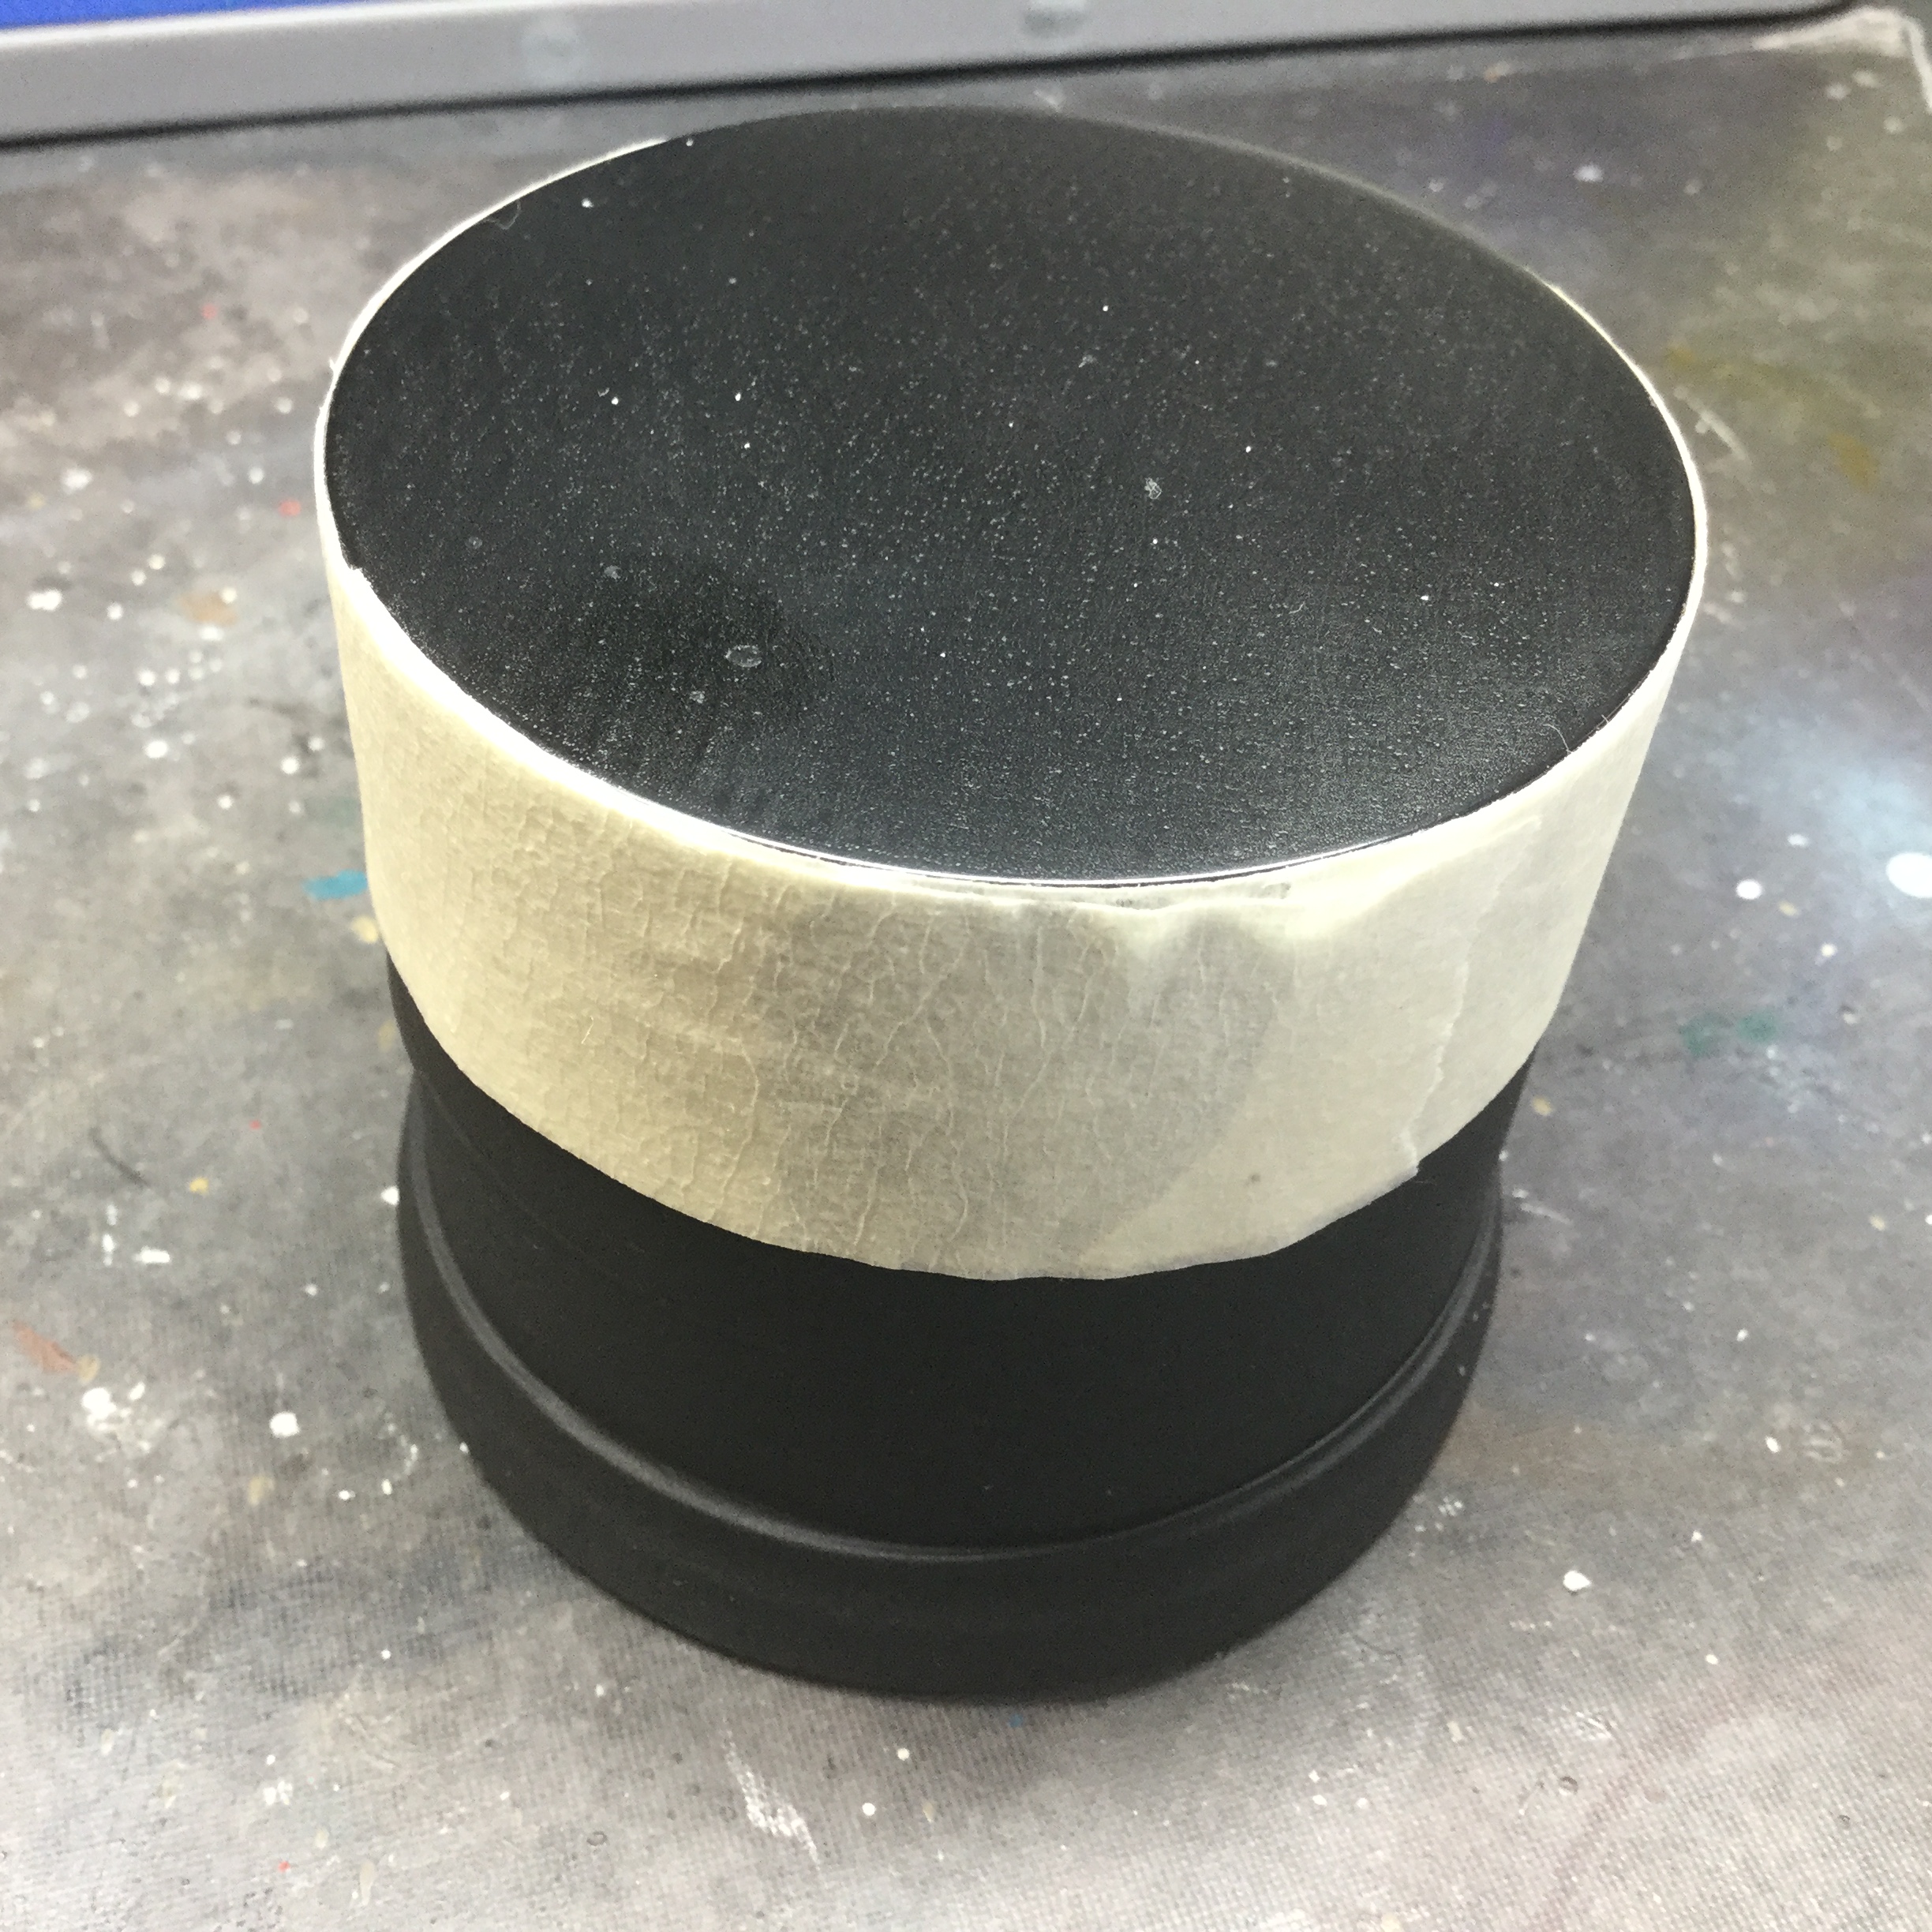
So first things first, let’s get the plinth ready. I chopped the arse….. ahem…. wrist part off of a nitrile medical glove and sleeved it up the shaft of a black lacquered wooden plinth I am using, then fixed it on with masking tape up to the top edge of the plinth. This protects the plinth while I’m working, building and later painting it and gives it a good grip to hold.
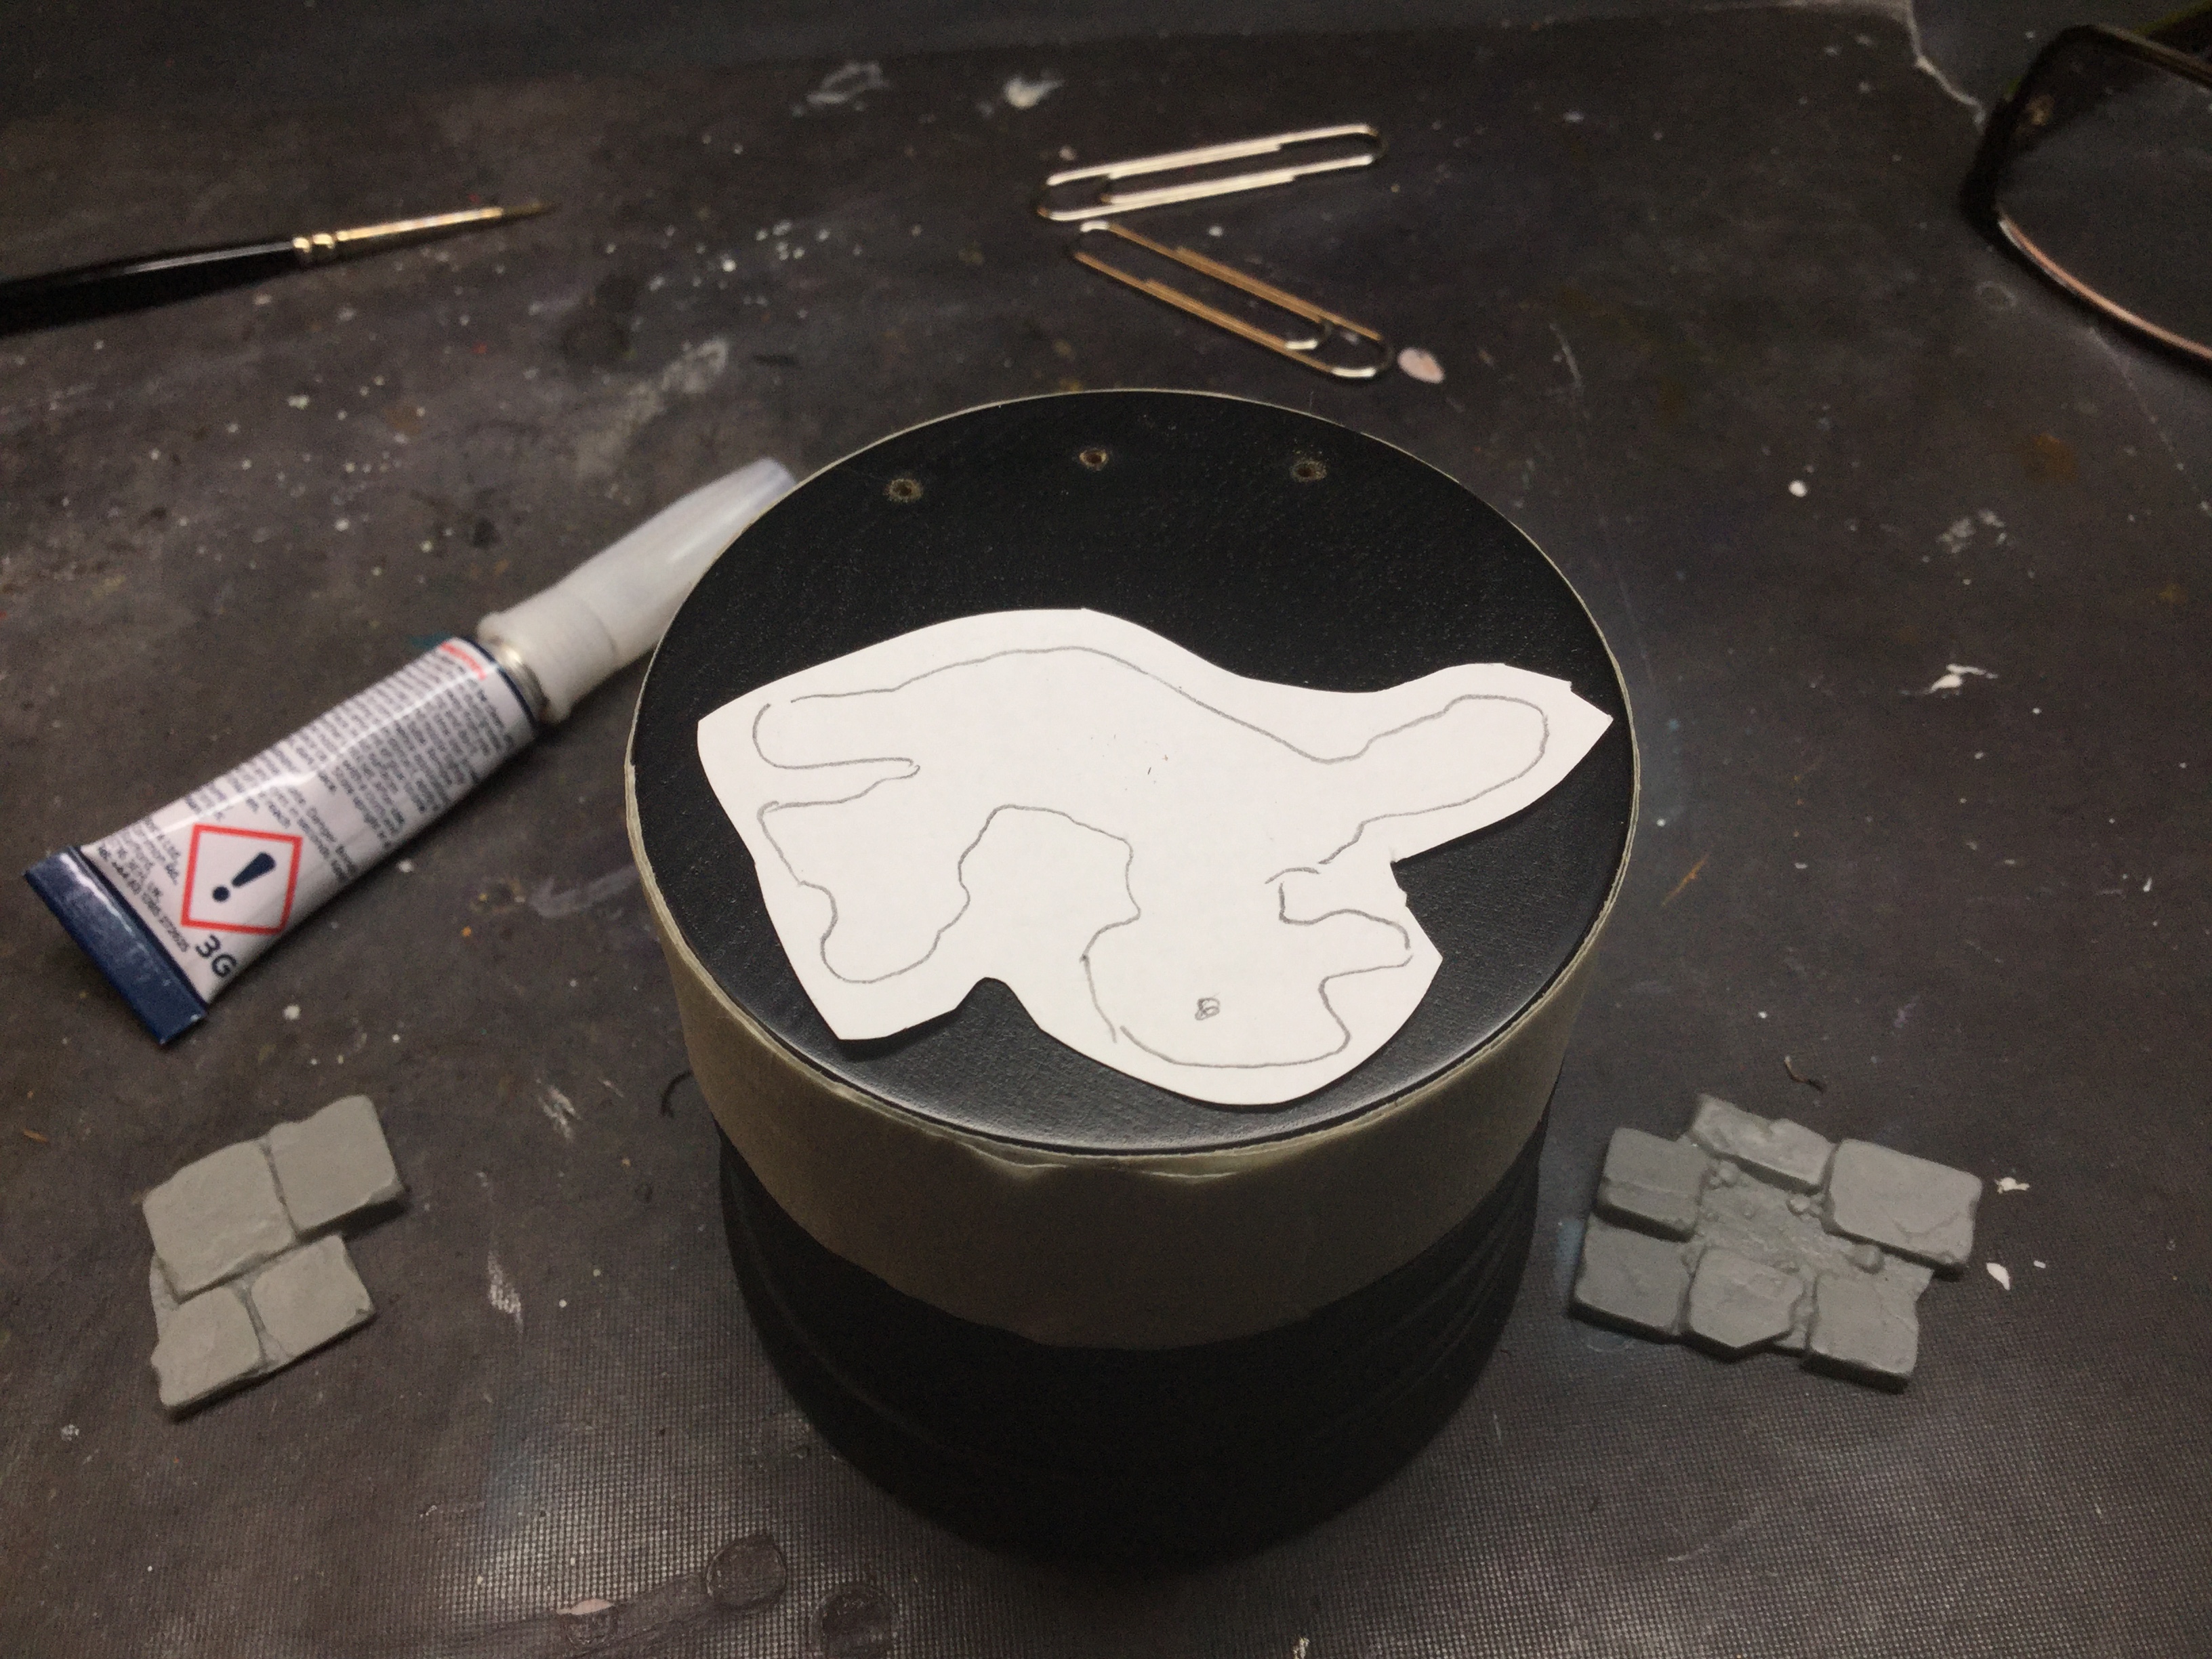
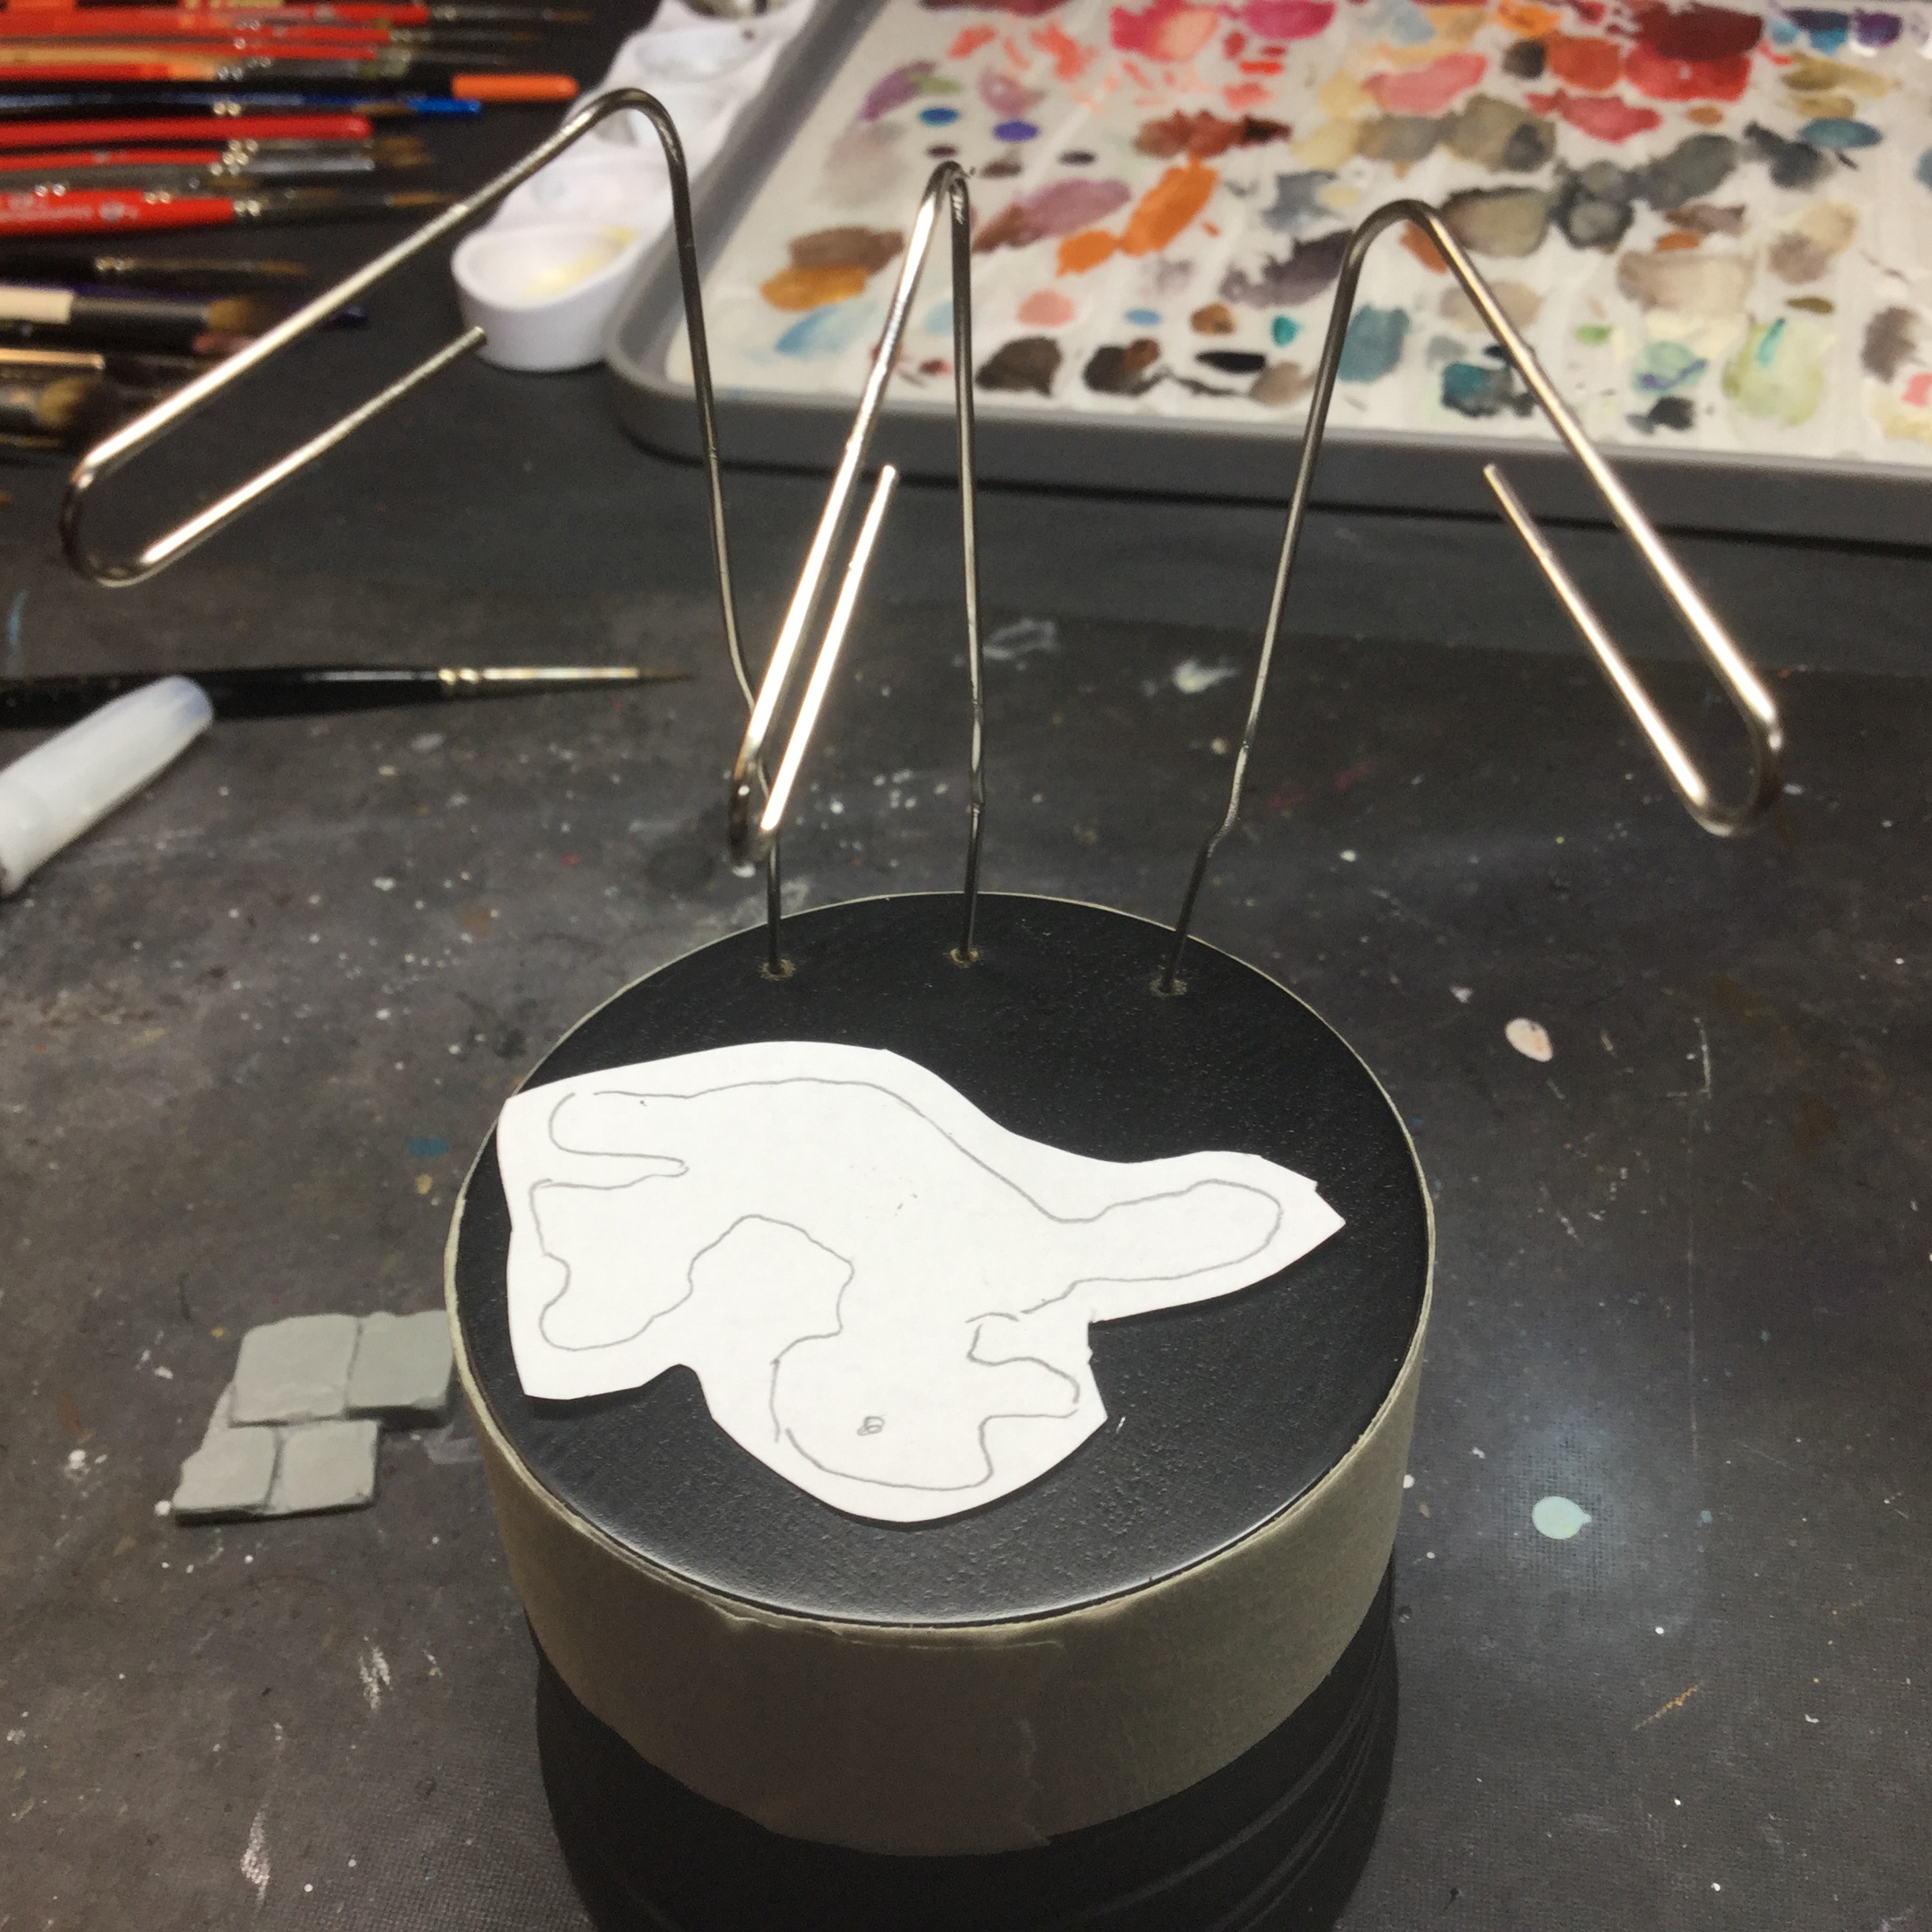
next I traced the ‘footprint’ of the model (that’s the odd little scrap of paper) so I could check easily as I built that the model would fit properly onto the scenic element I was planning to sculpt/build on top of the plinth.
Then, I drilled three holes into the top of the plinth and fitted and glued three large paperclips into the holes as the start of the armature.
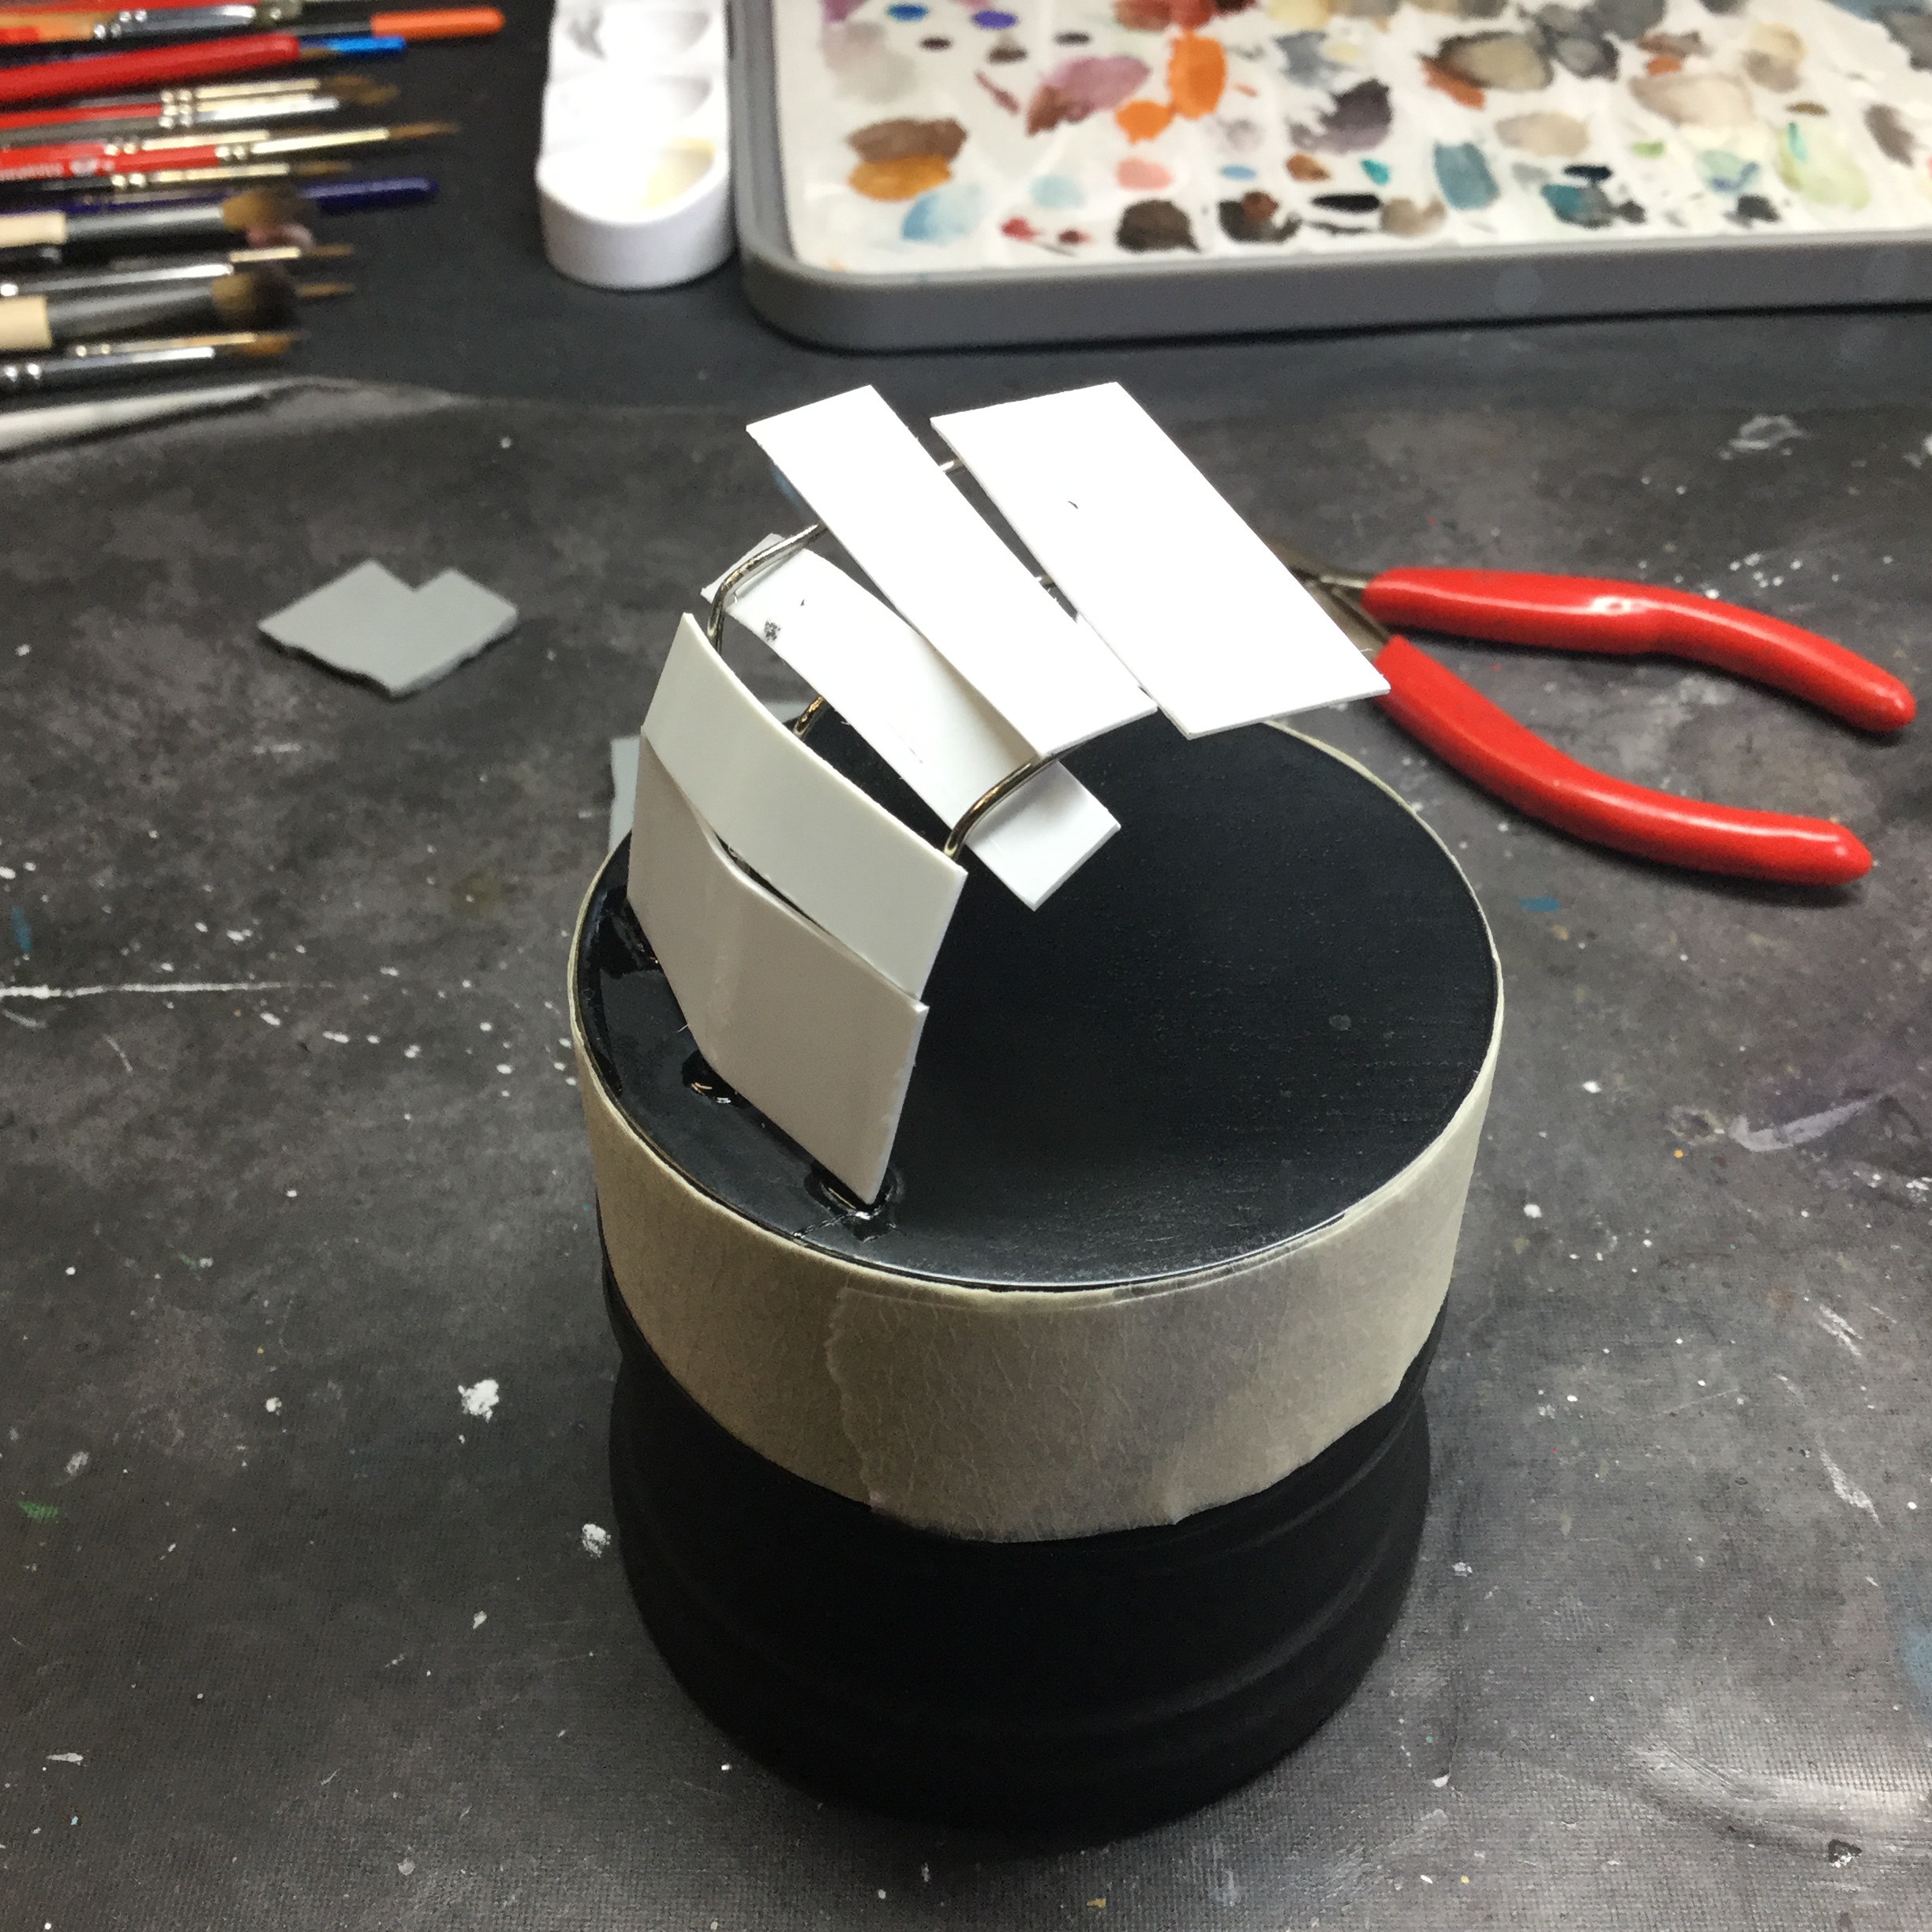
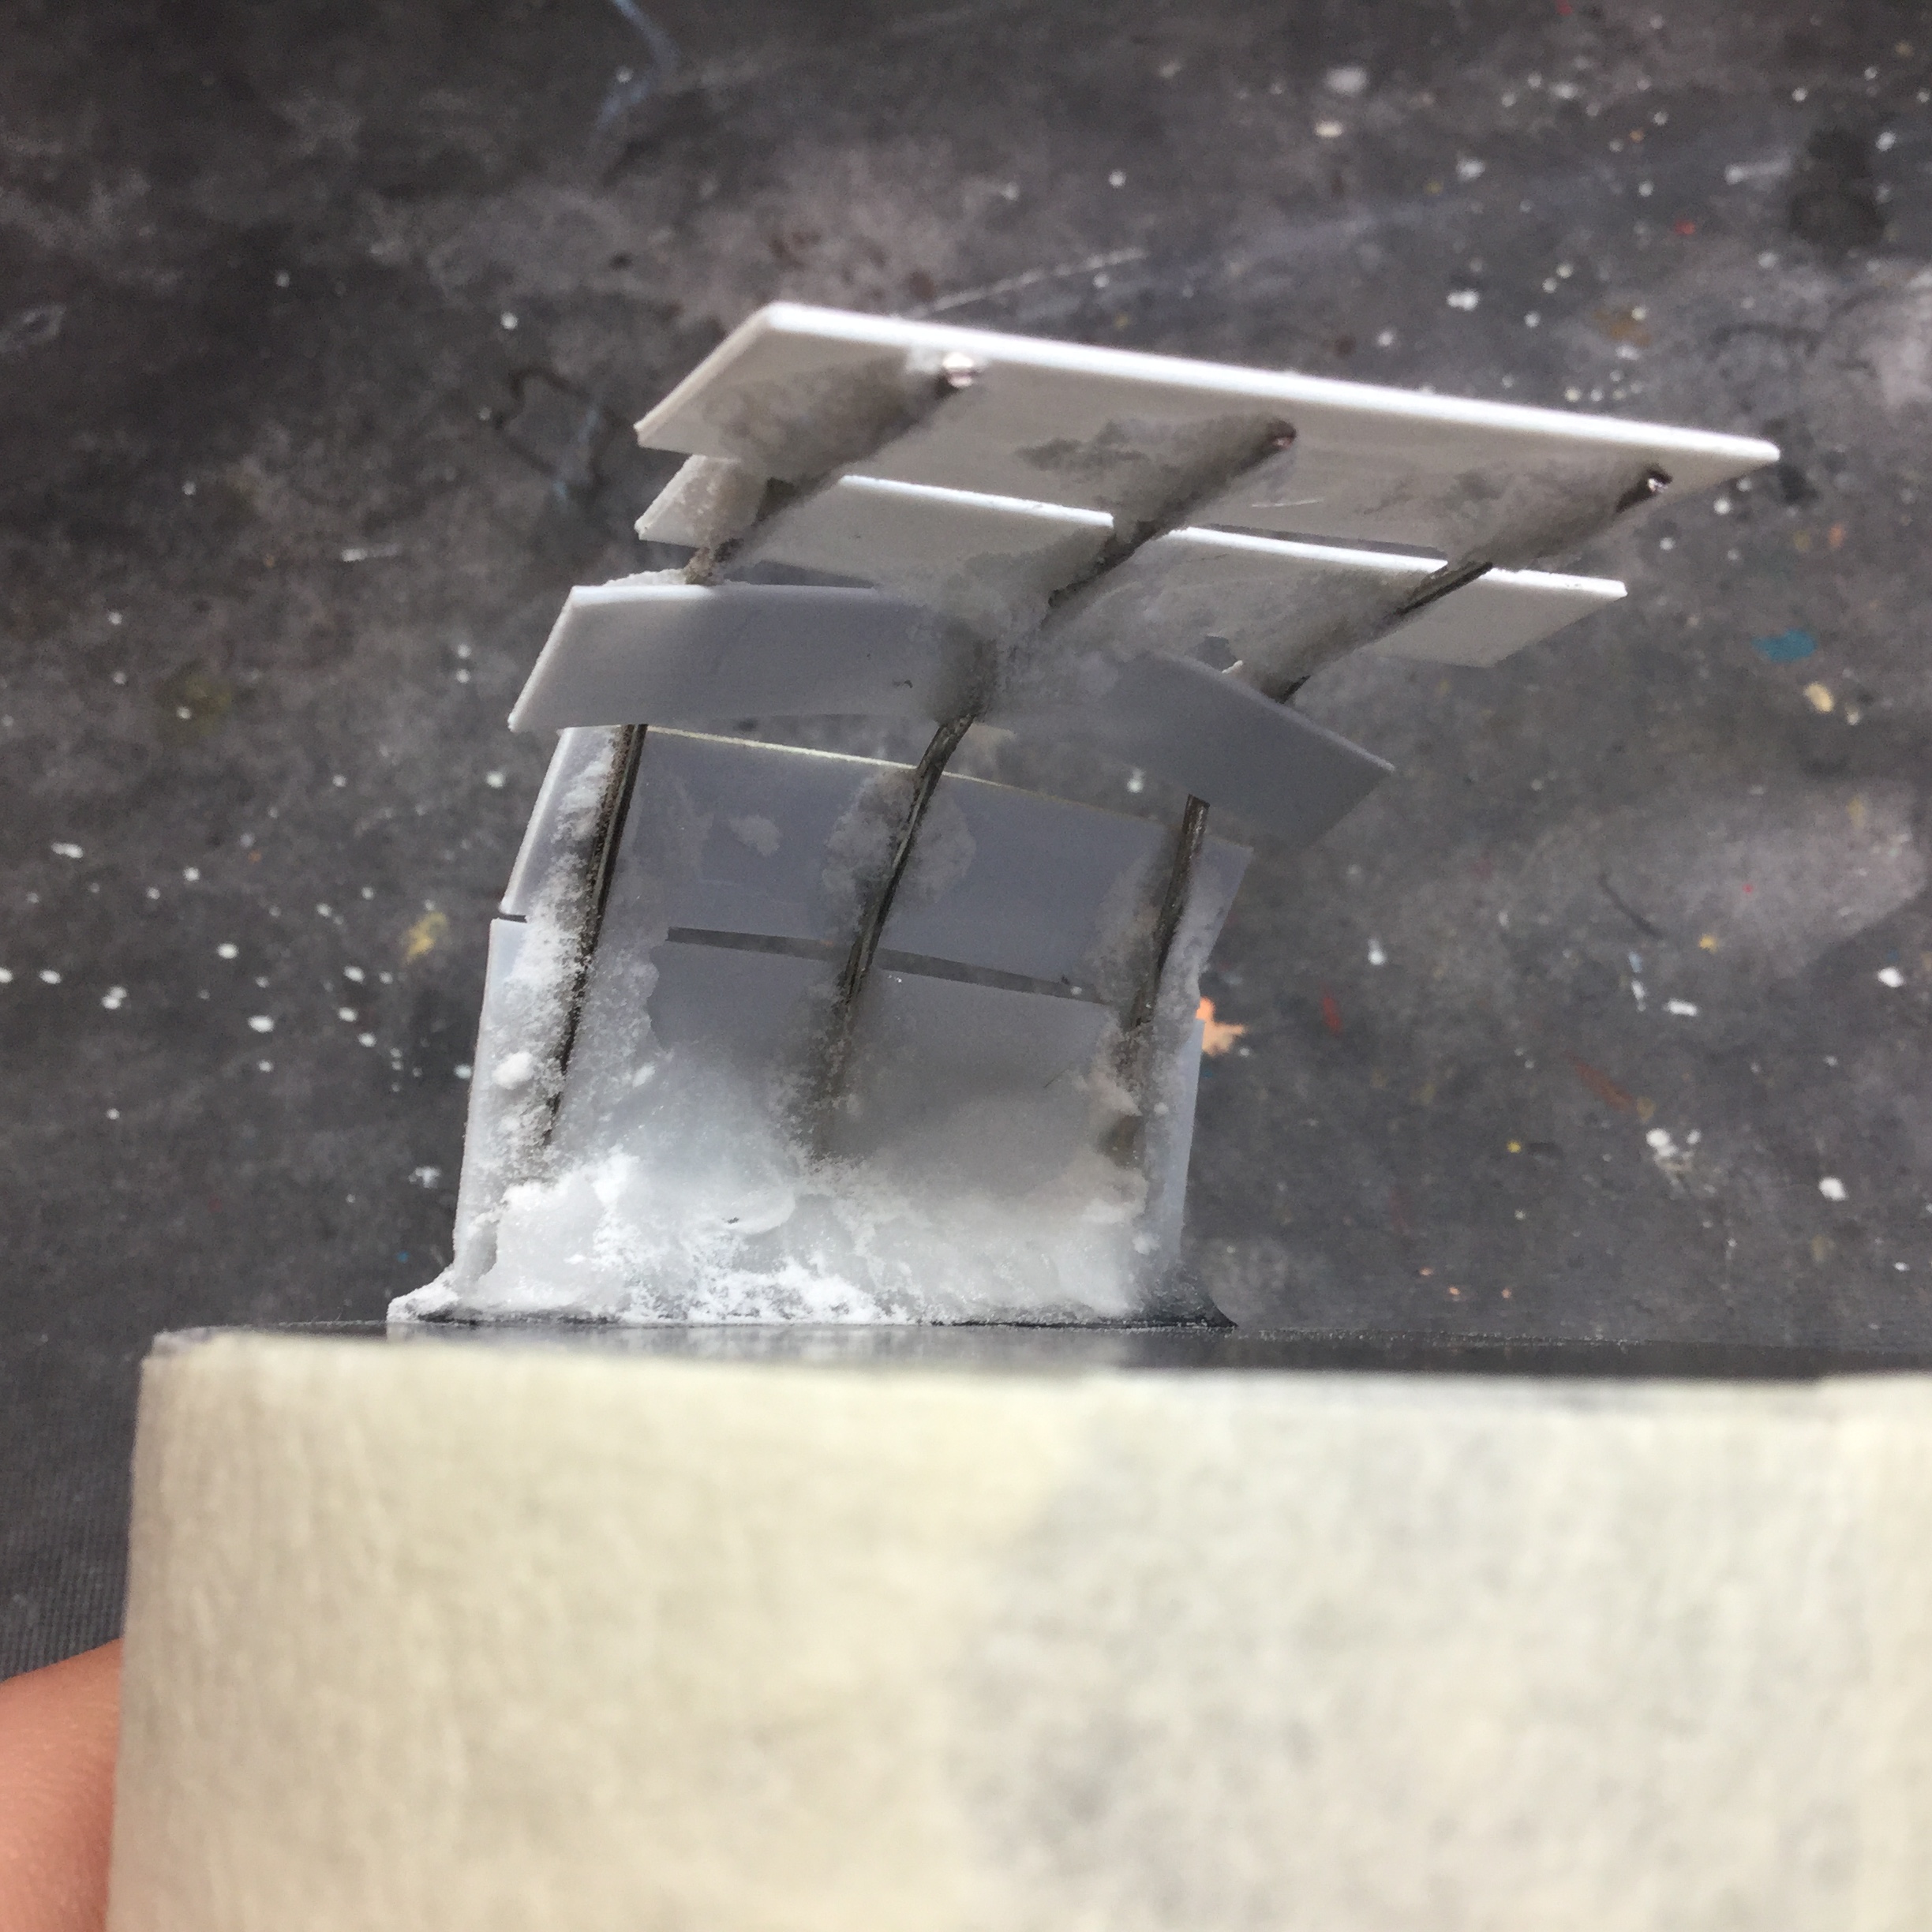
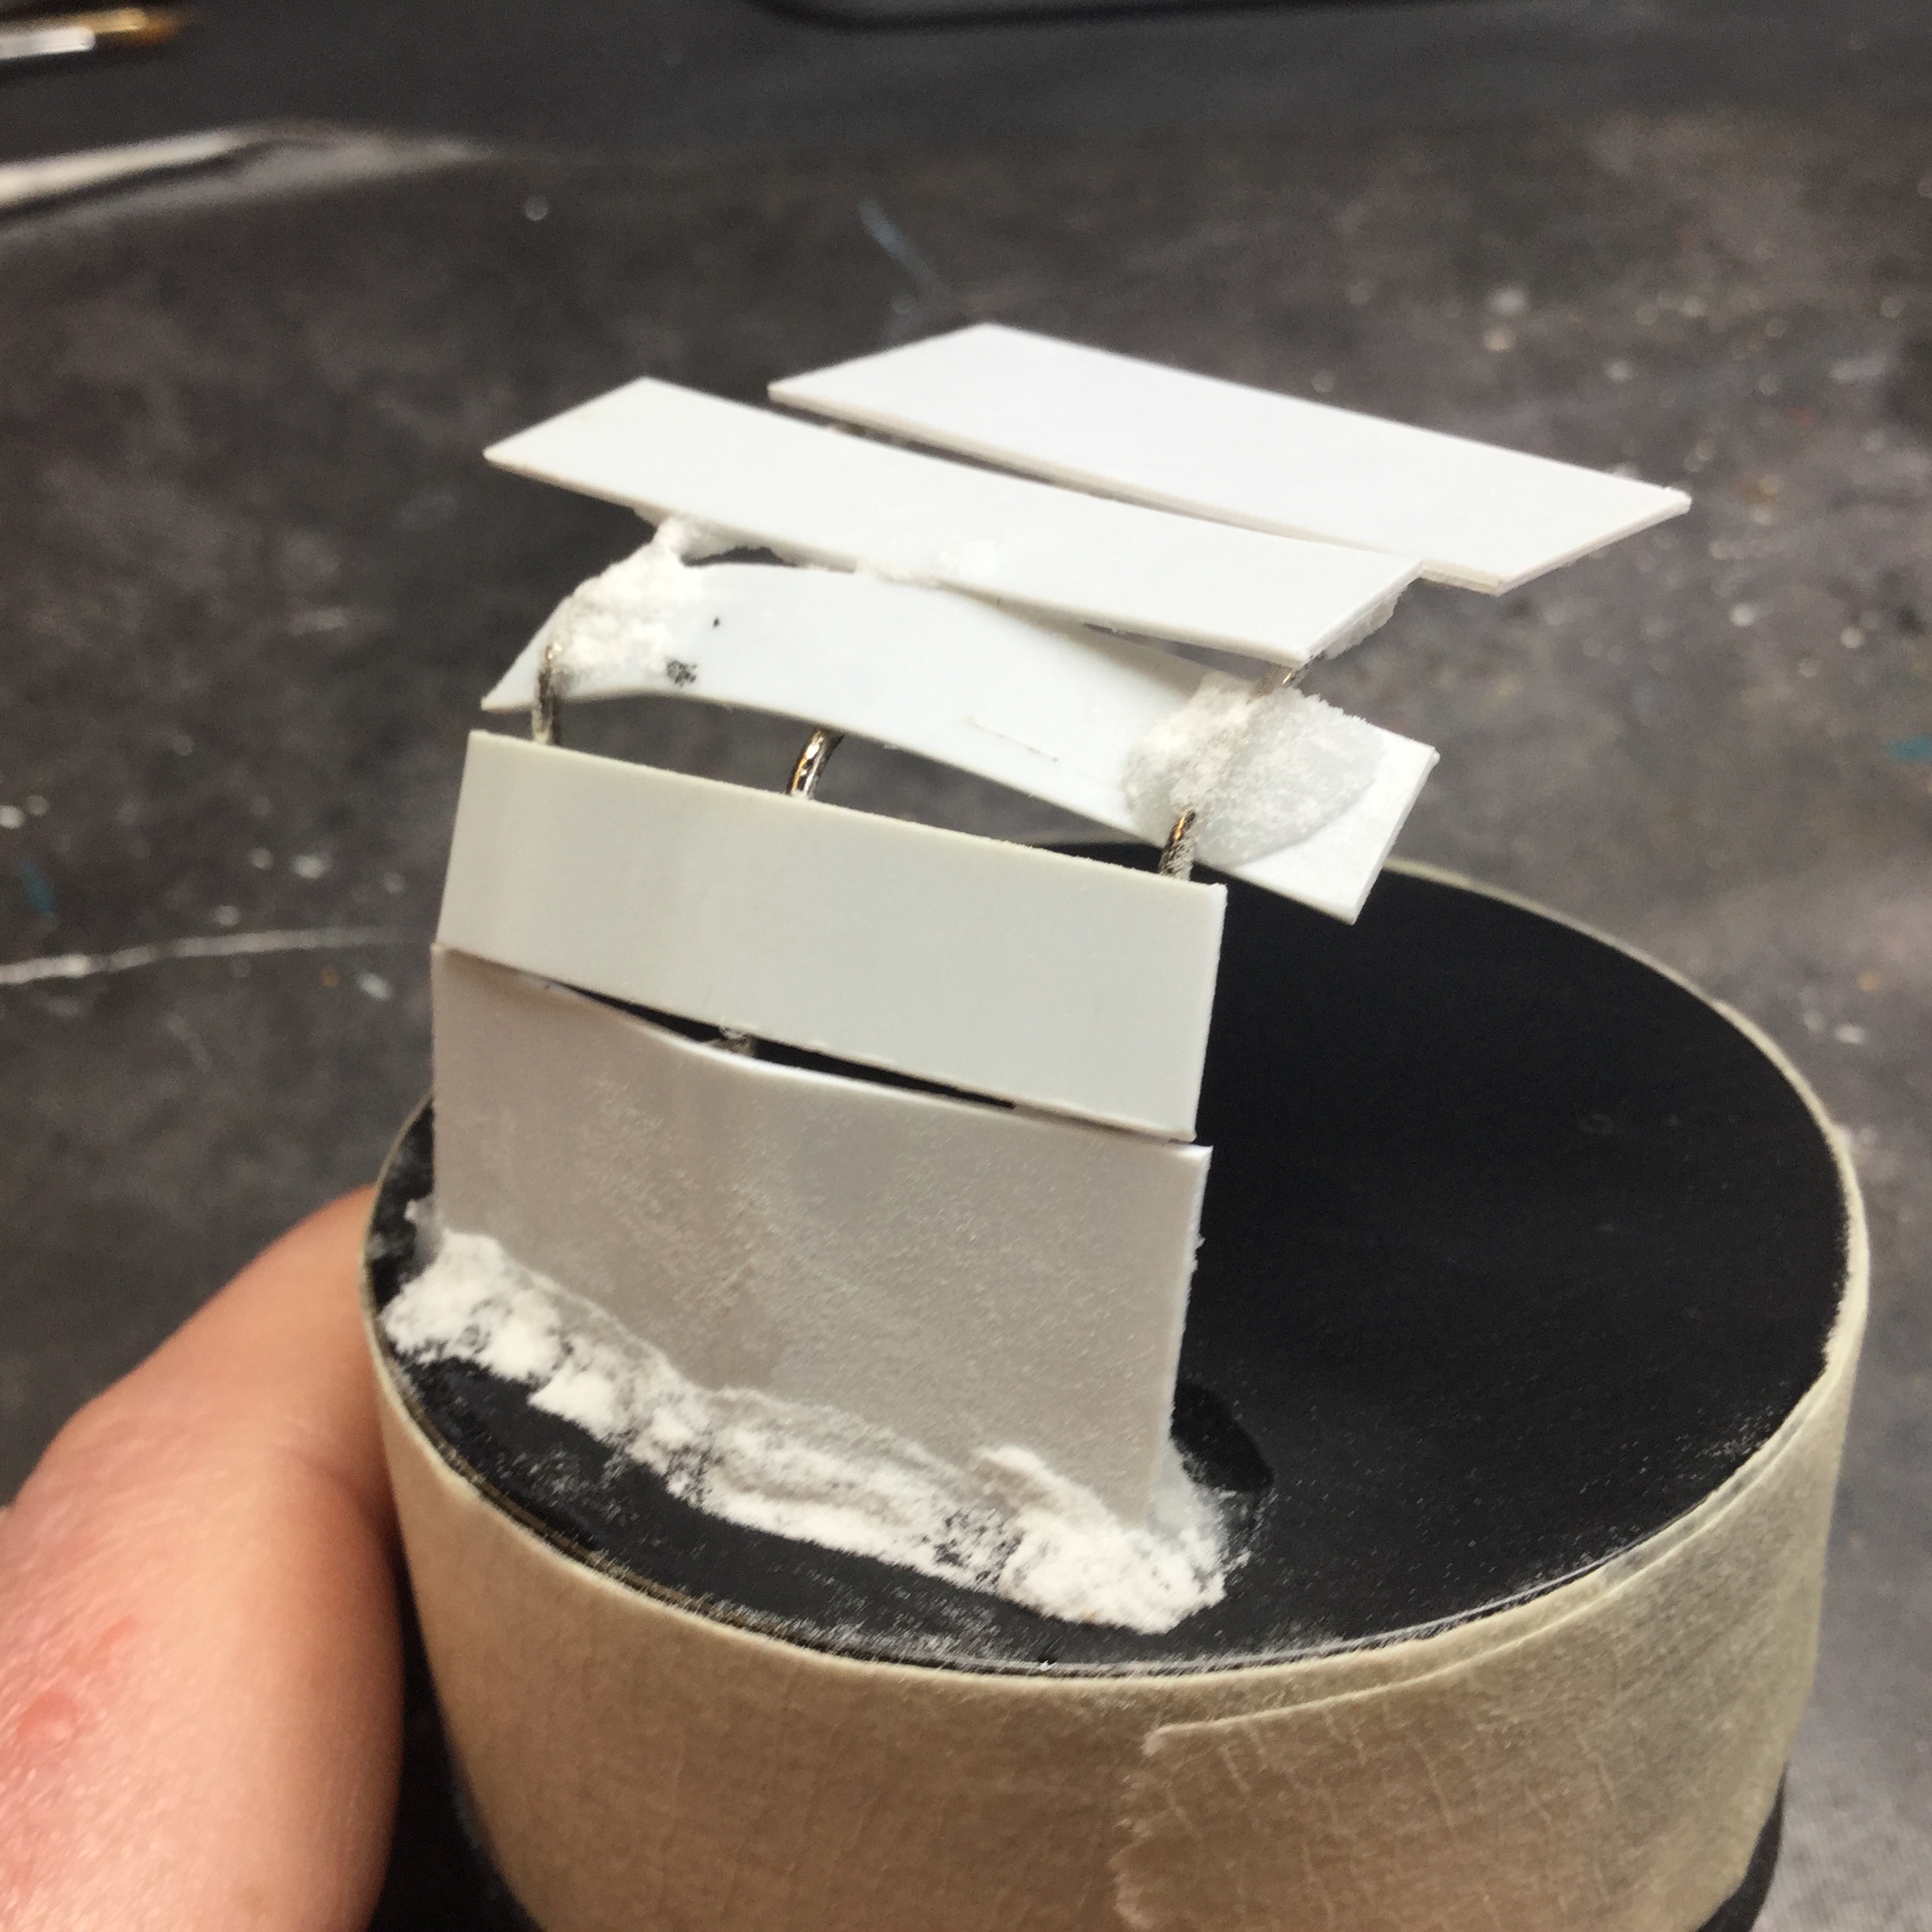
With the ‘pins’ glued in place, bent in the correct direction and trimmed back, next I needed to start added a platform around which to sculpt. I glued on pieces of plasticard to the wire armature then ‘cemented’ them into place with more superglue and baking soda. While some folk use baking soda as a cheap superglue accelerator for superglue, it also makes for a really hard cement with which to secure the armature.
With the armature built and as solid as a Guinness shi……. house, time for some sculpting. First comes the core. For this I used DAS. I hate DAS for the most part as it takes forever to dry and is kinda greasy to work with BUT it is incredibly cheap so I use it for the hard core of a build and then once it (eventually) dries, I sculpted the outer form with milliput extrafine.
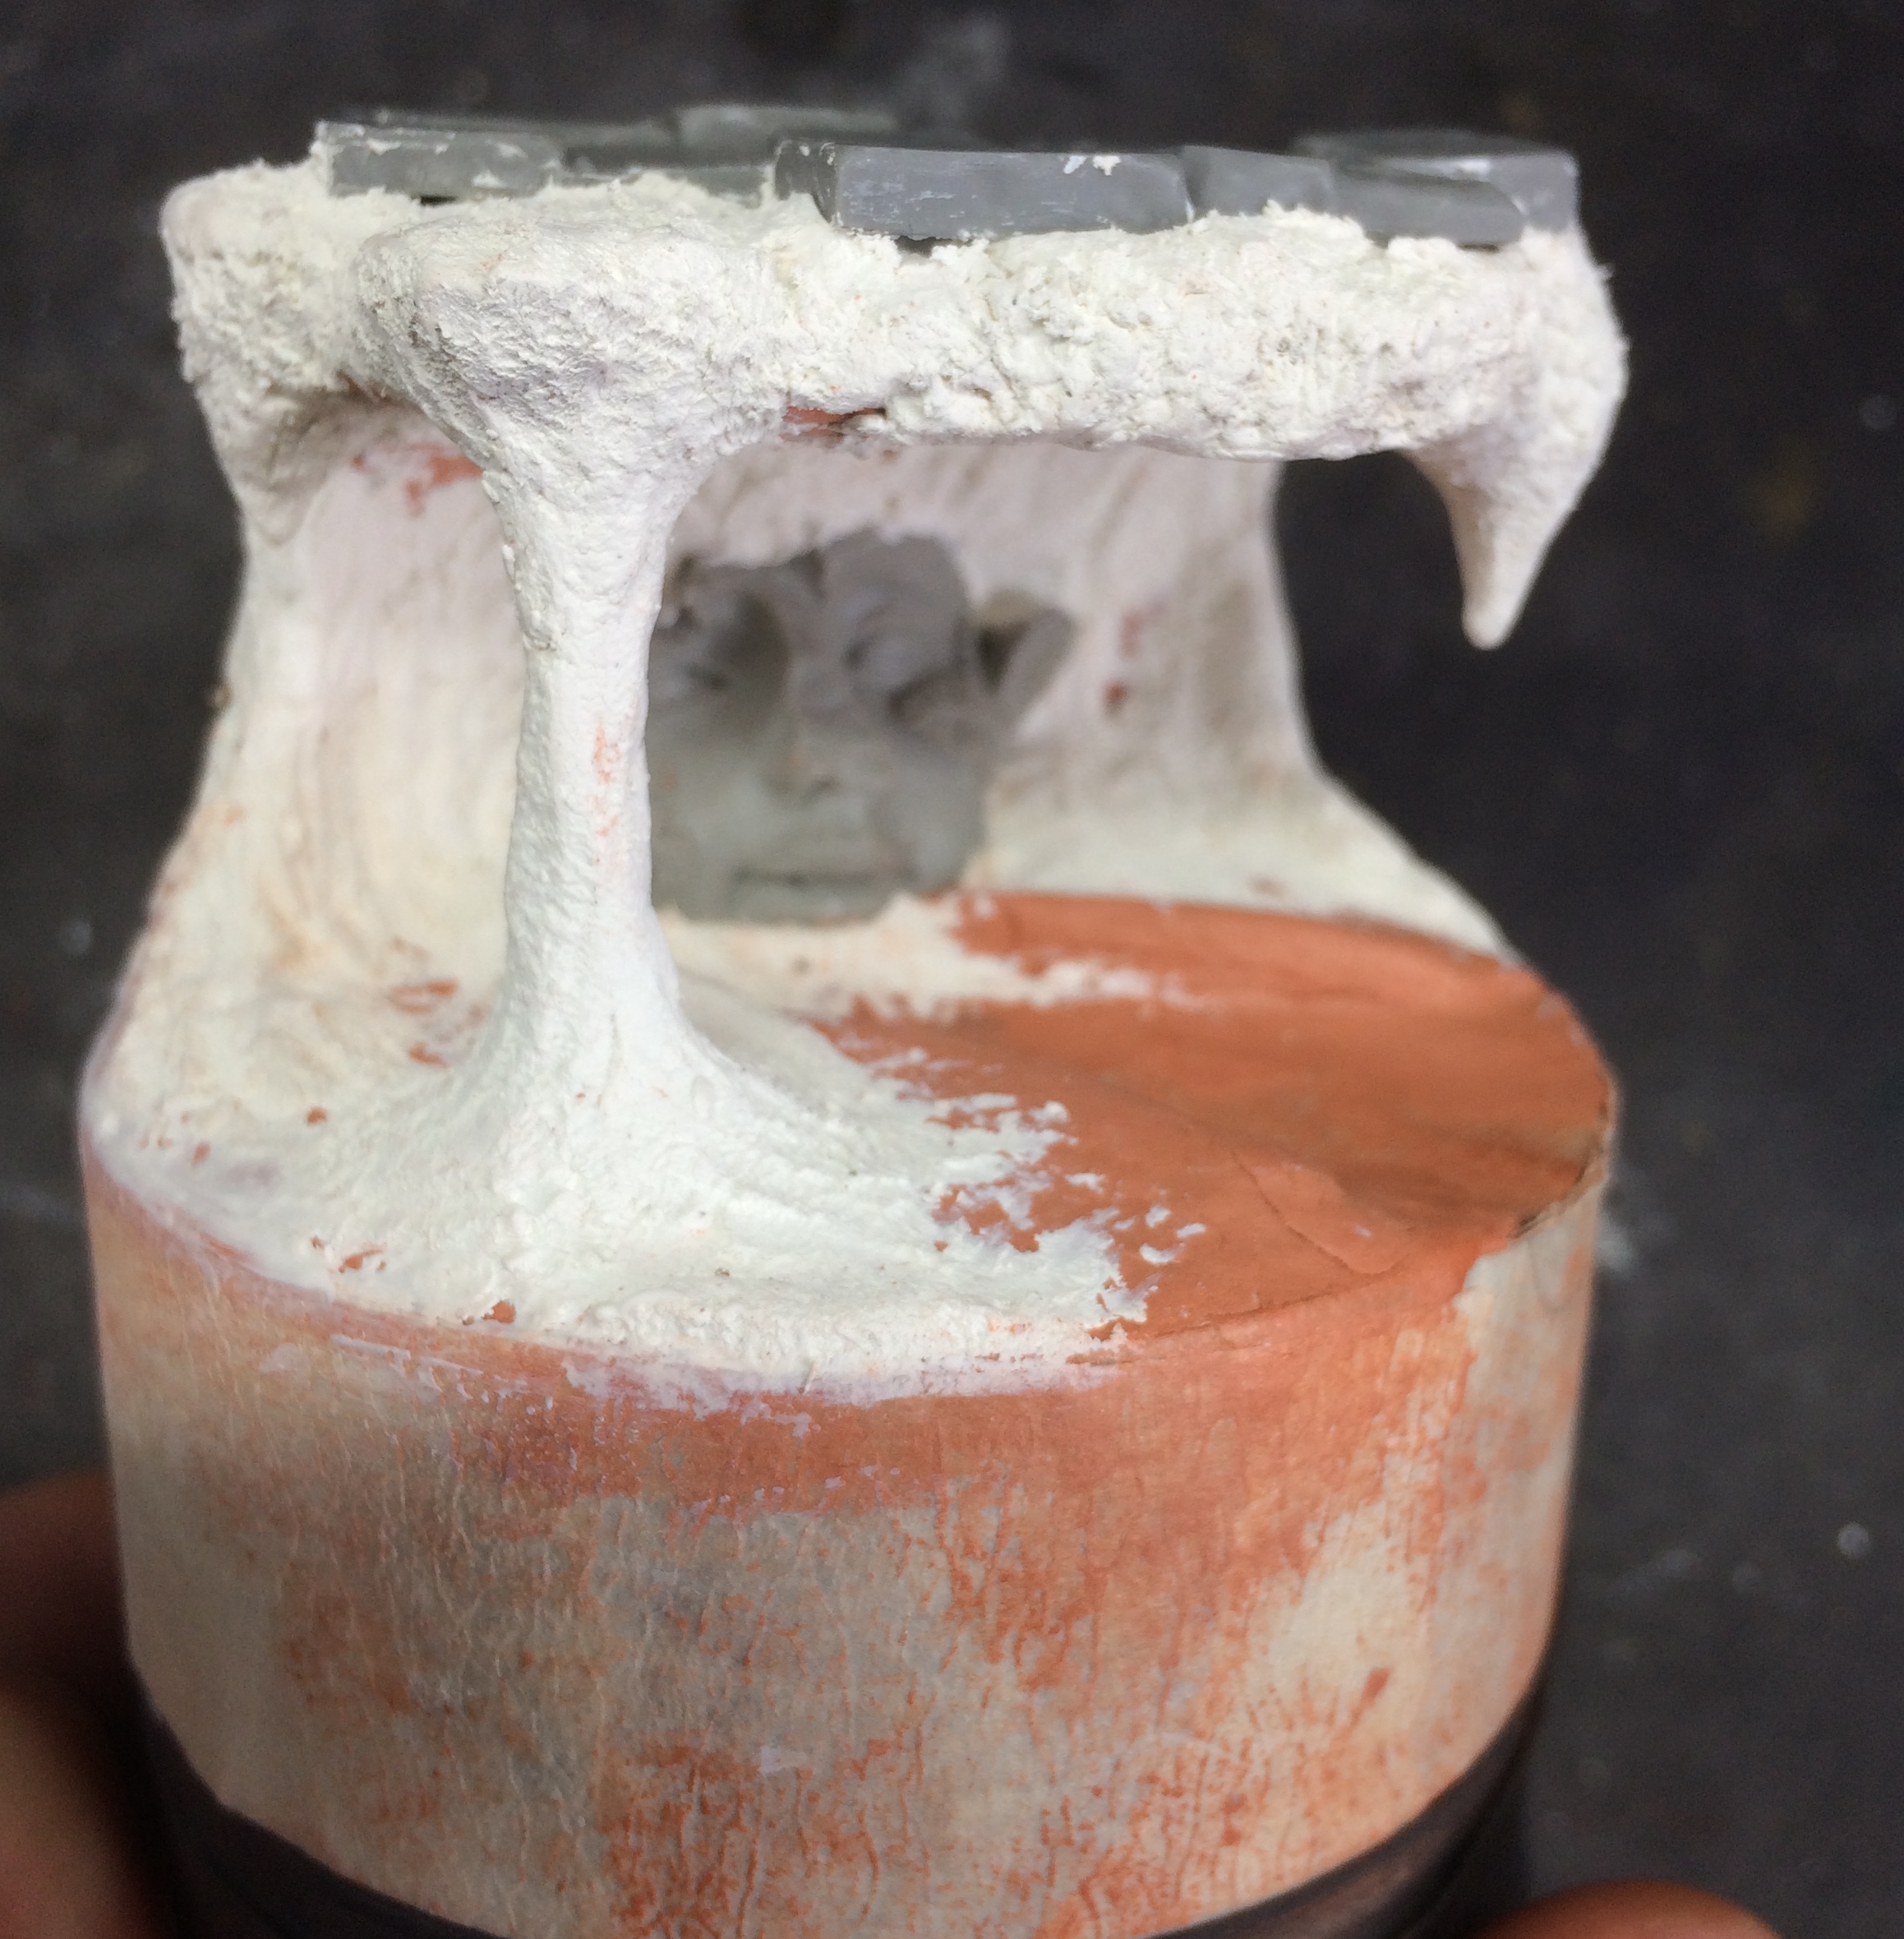
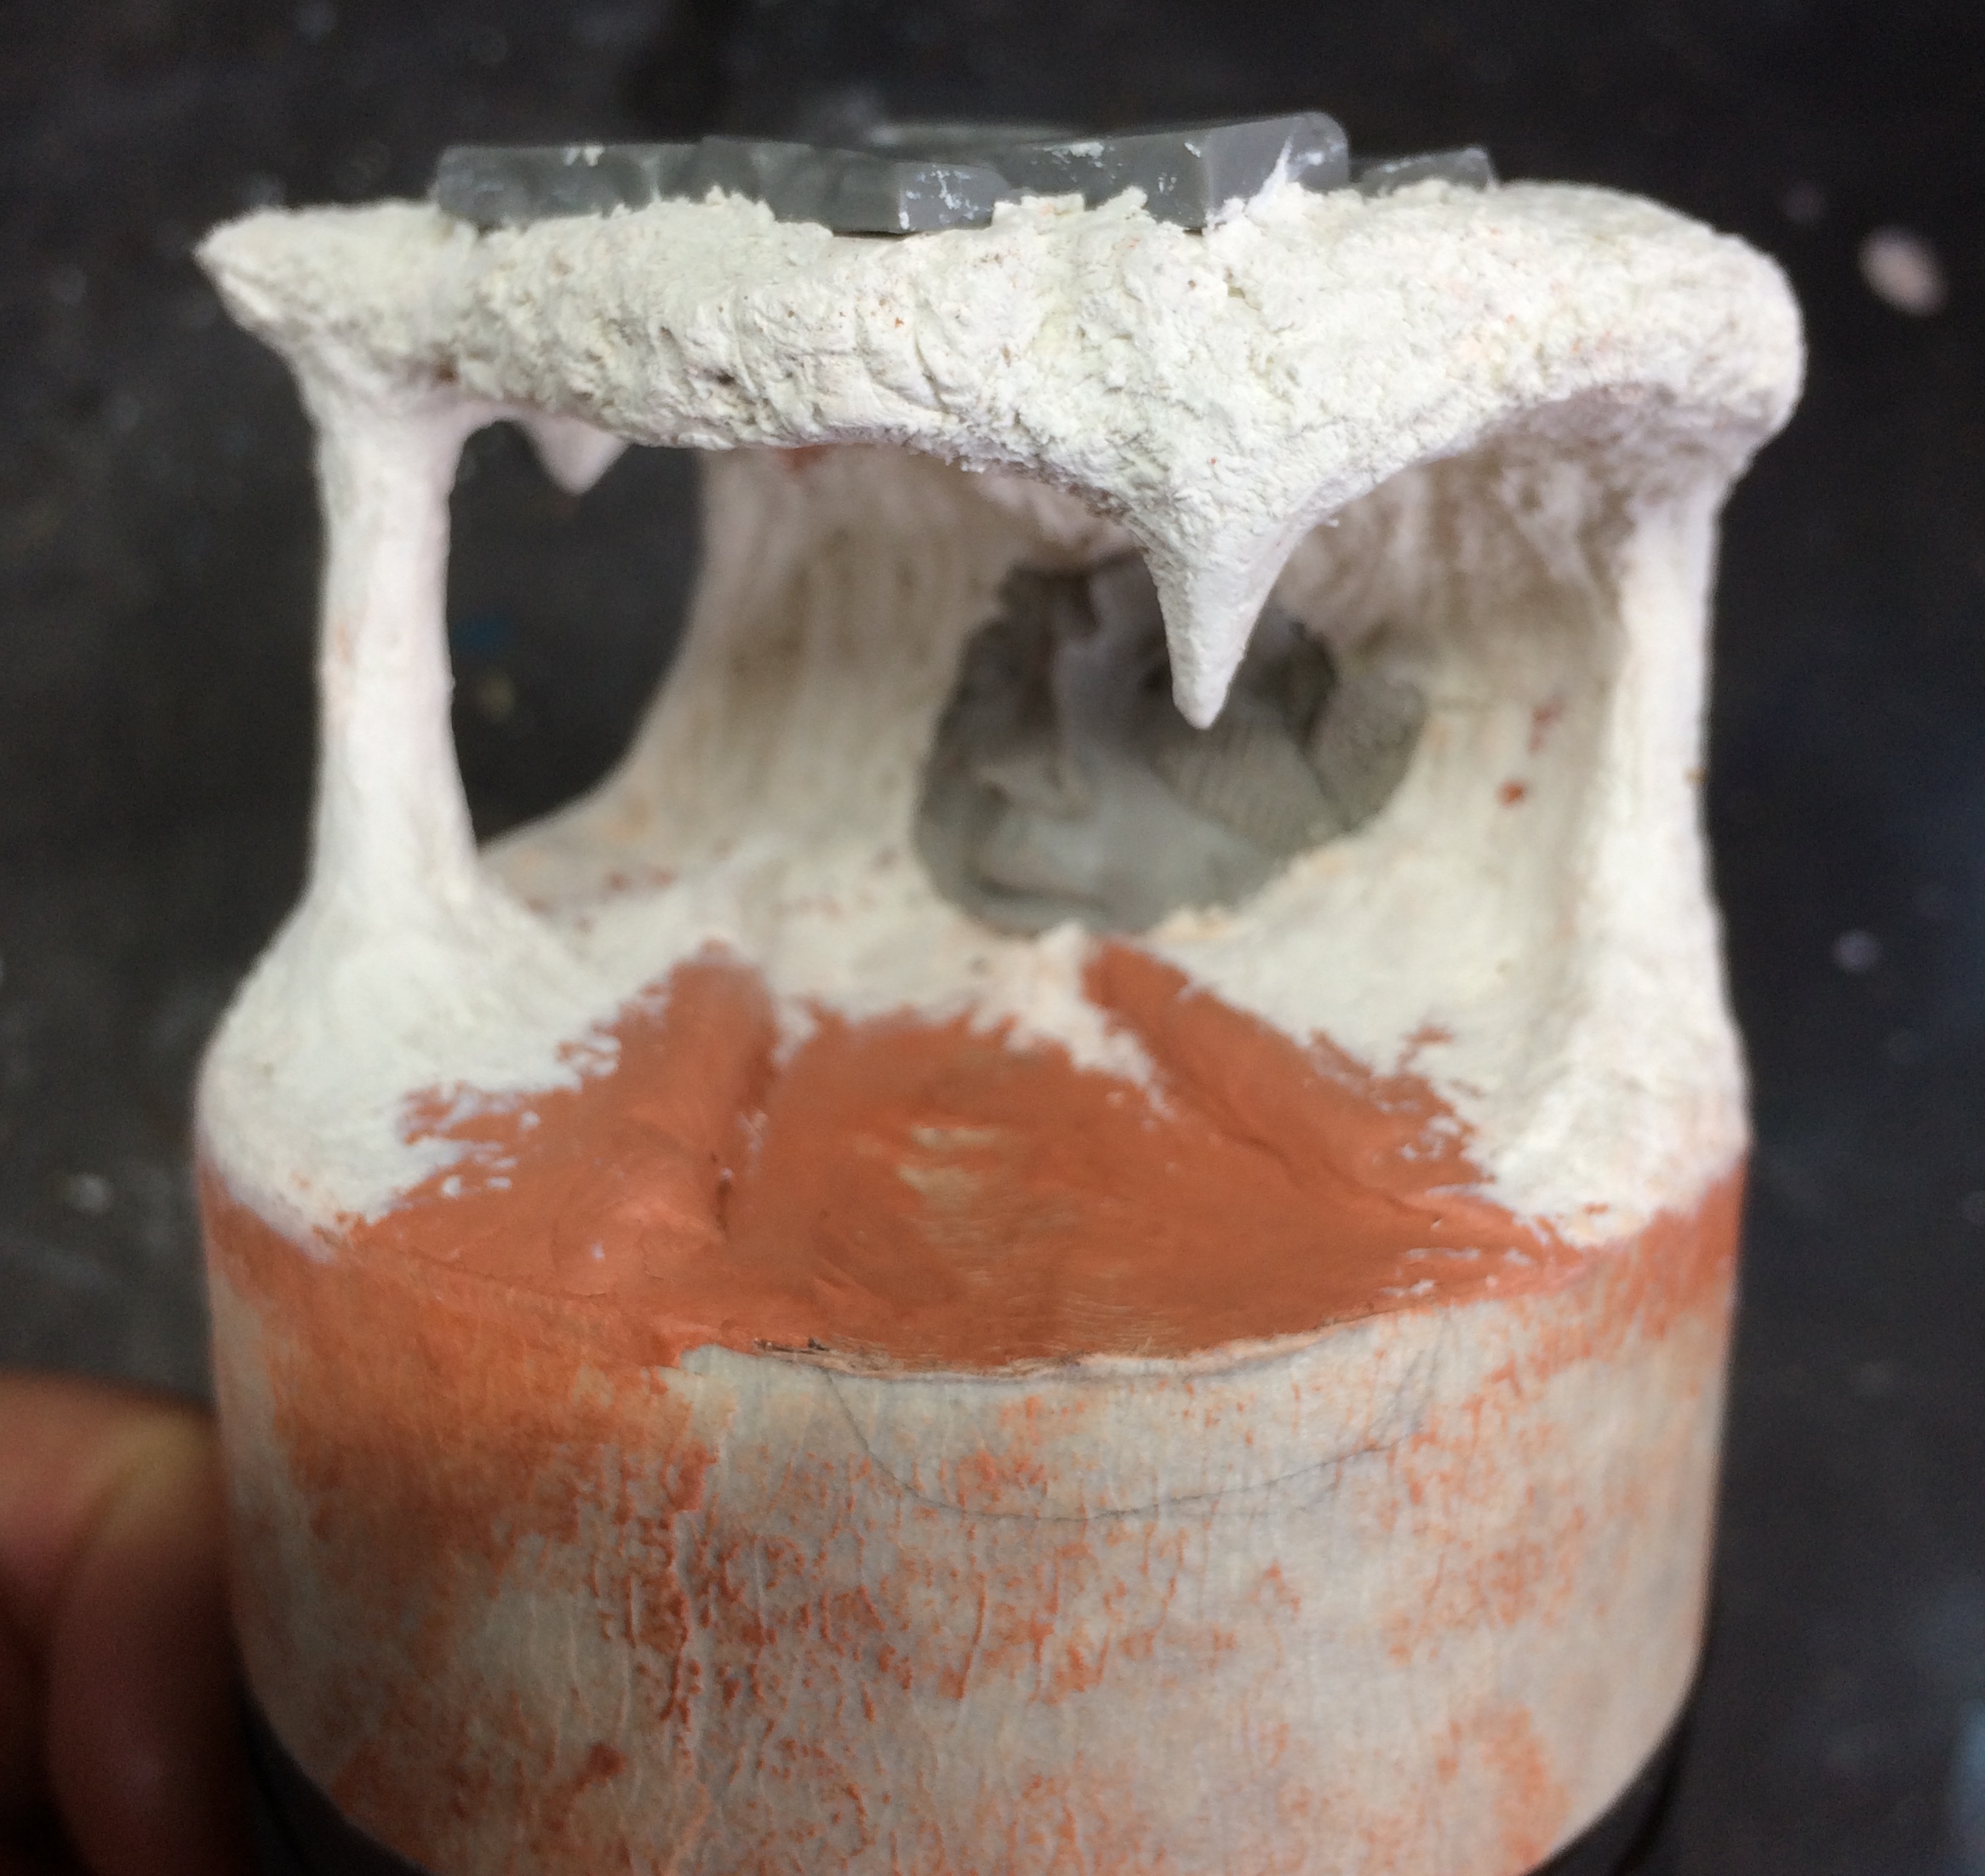
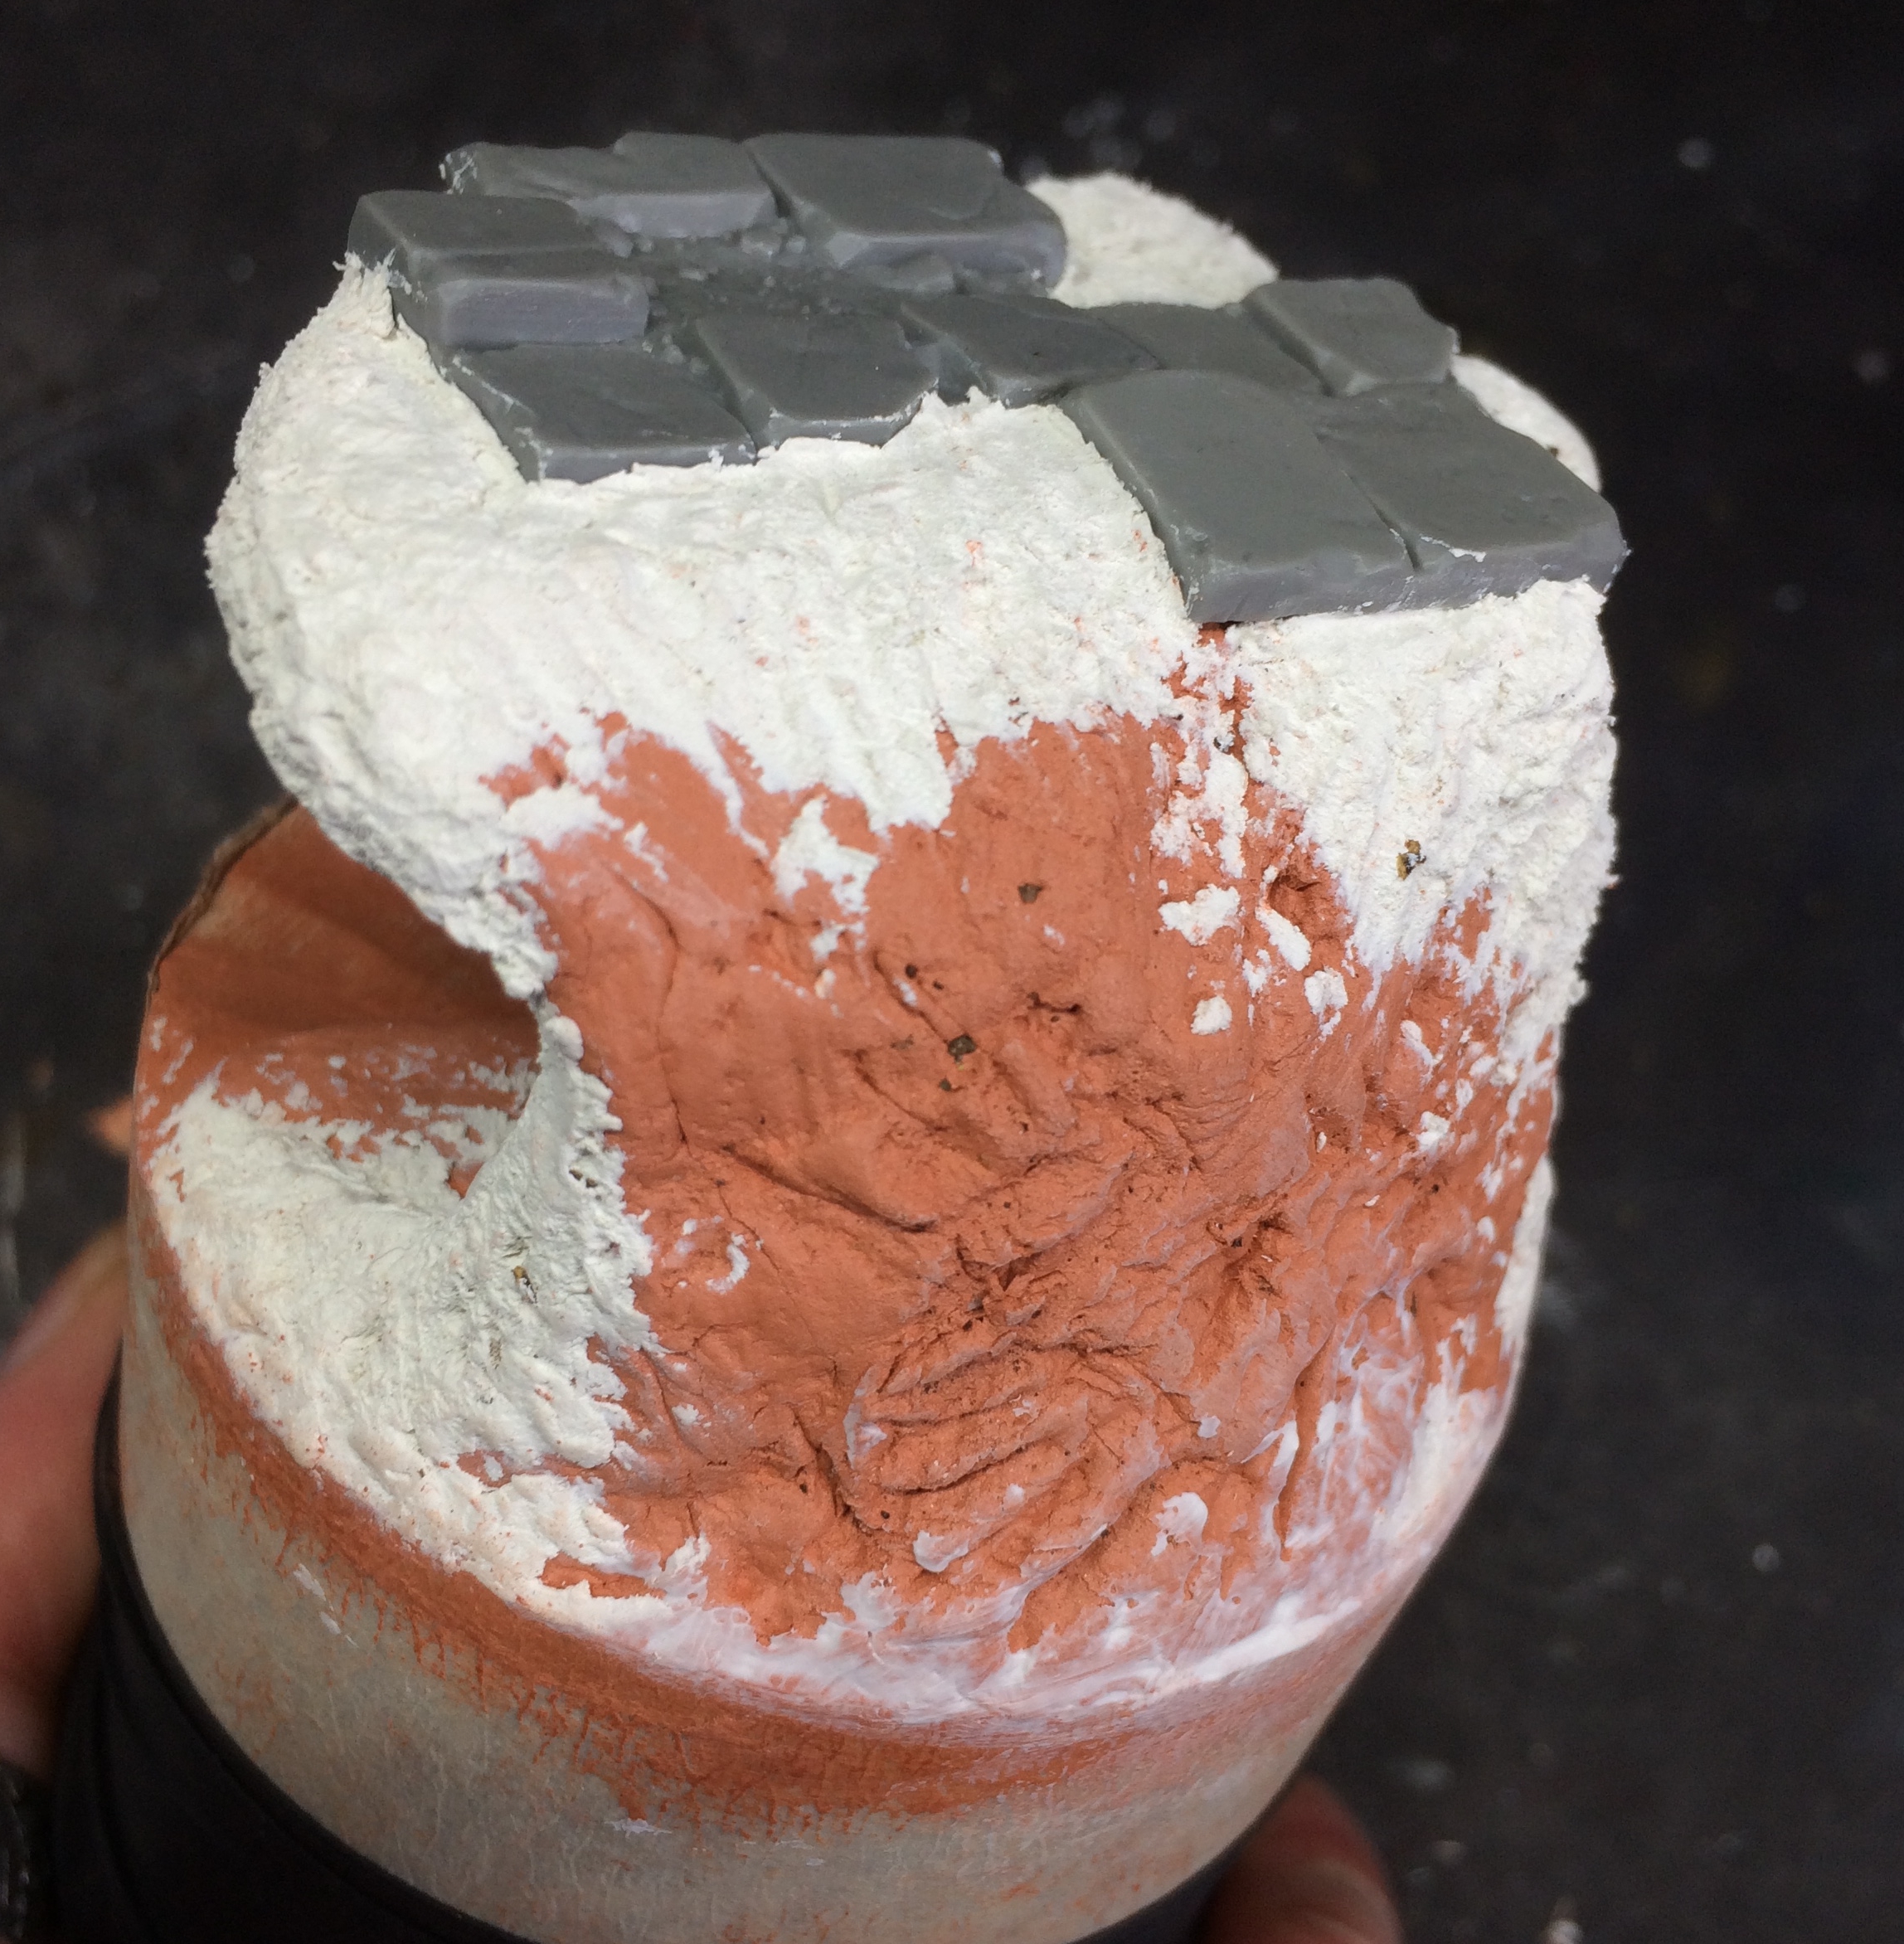
While bulking out and starting to refine the cave, overhang, stalligtites (or however you spell those down pointing buggers) cave column, stream bed and so on I pushed some temple flagstones from gamersgrass into the top and a face from Scribor into the back wall and moulded the milliput around them. I left some of the rougher textured DAS peek through at the back as this would be painted as a rock face.
Right – am knackered so off to bed!! Part II comes tomoro!!
Stay home, stay safe, stay hobbying folks 🙂
Death High - The Archivist
Very very quick update on the latest of the Death High I finsihed. The Archivist. She was a wee treasure to paint!! The base is made from scratch as I do wil all the KDM models as their bases are well…. shite. Tried a few wee new things out on here incl a really nice green triad made with scale fantasy and games paints for her skirt, straps etc. Hopefully get some proper stills taken soon but until then…..
Catching up with the Hoorrrroor~!!
Been a while since I updated the KDM project log (well….. all the project logs) so let’s see what’s been going on!!
Continuing with the fantastic Death High series I finished and made a base for Miko. Love this mini, was a real treat to paint.
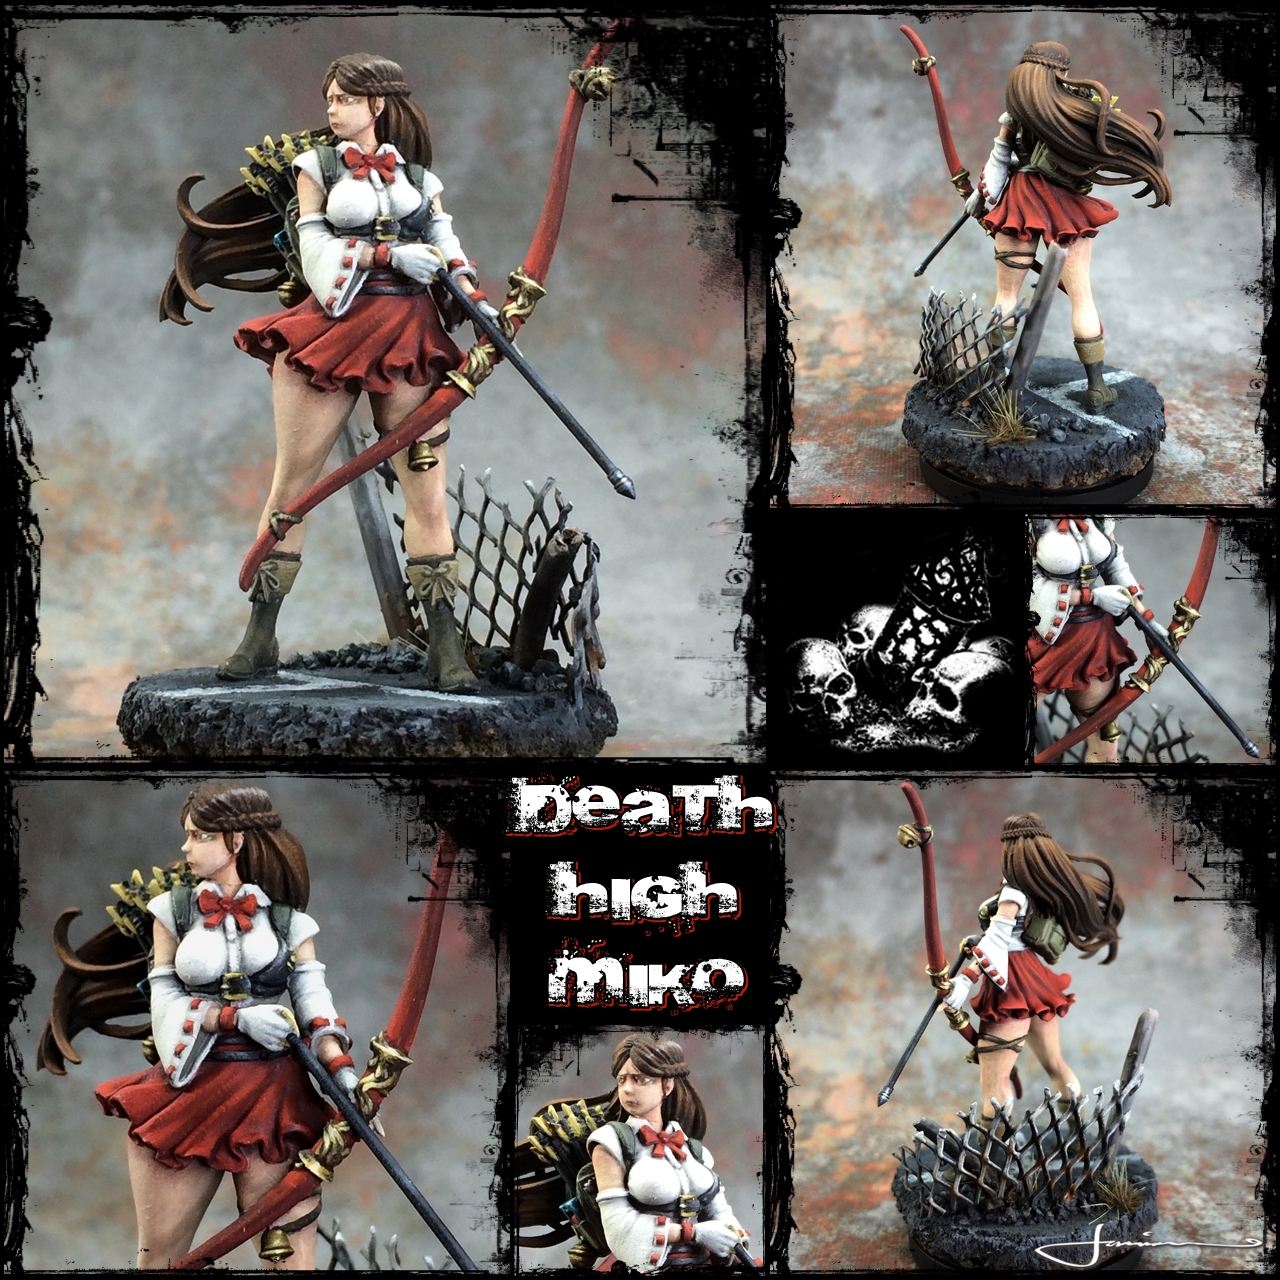 Miko
Miko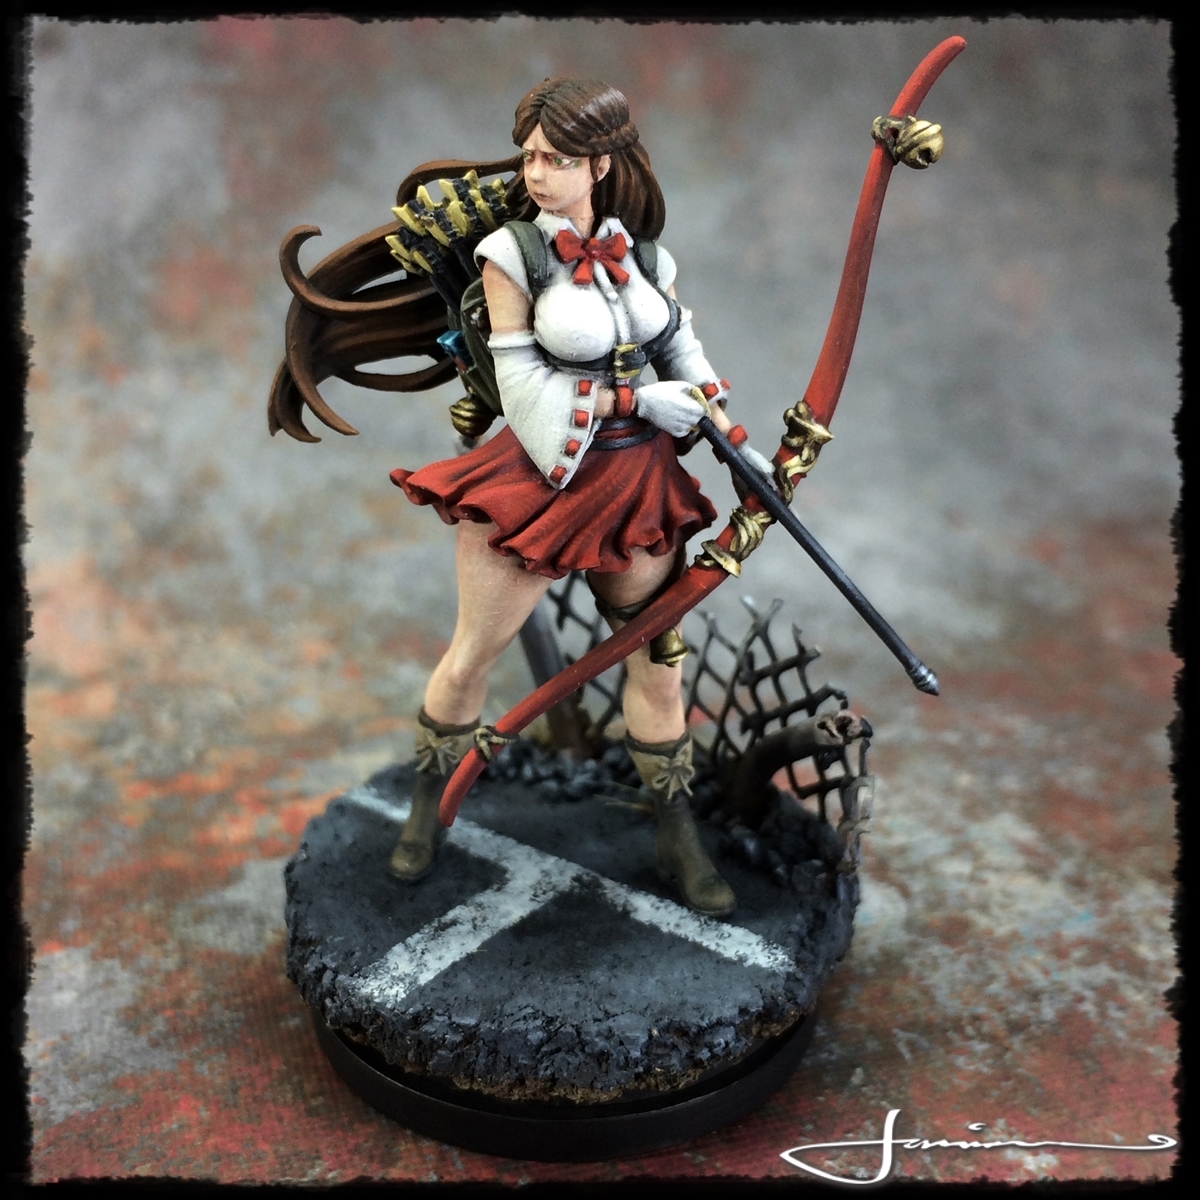

Also finished up the Female Preacher form the same series but still need to get a base made and painted for her so more on her later…………
 Female Preacher
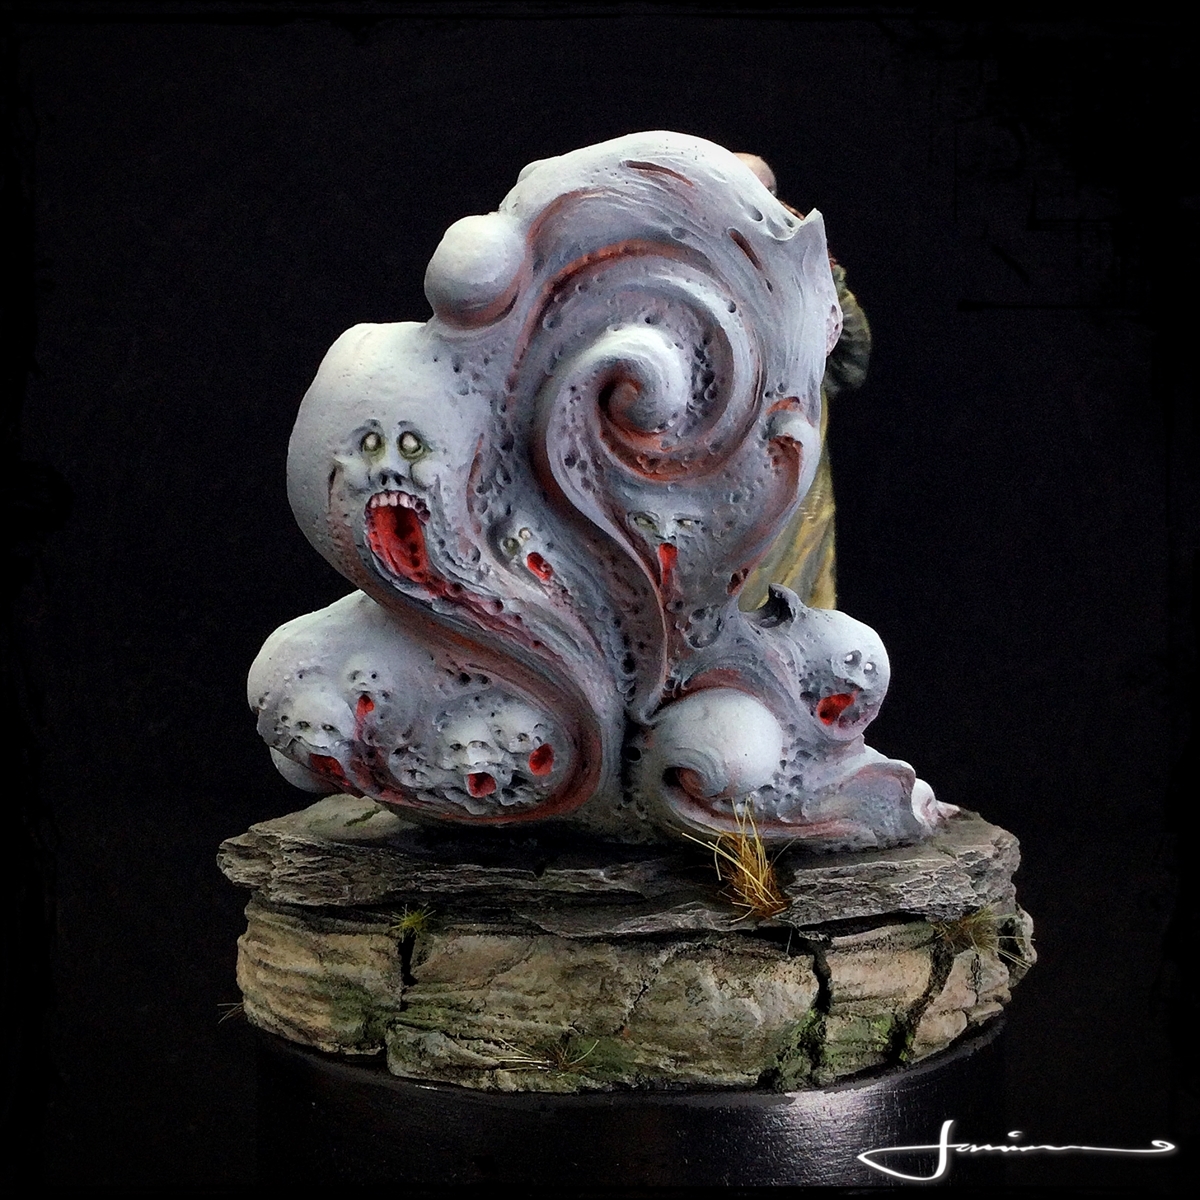
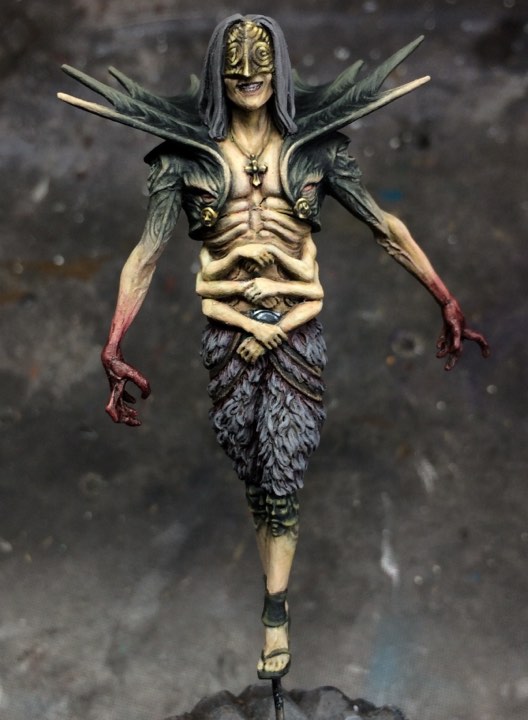
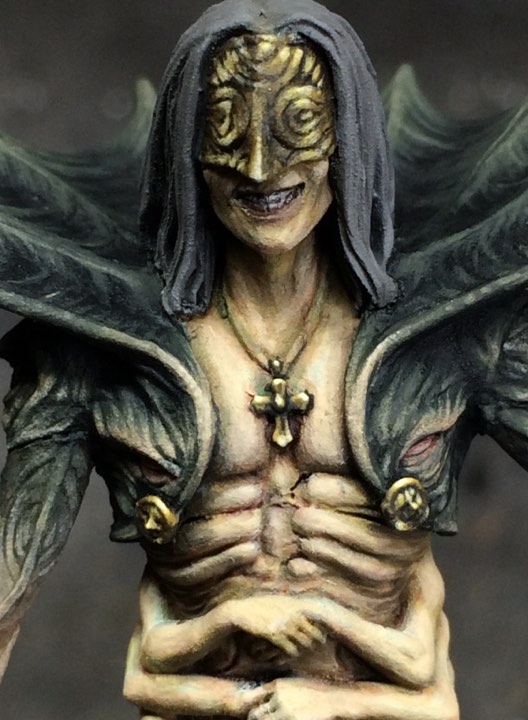
Finally got to take back out the fantastically creepy and awesome Pariah from the White Speaker thread. Love this mini! He’s far from finish but getting a little progress in 🙂
And that’s us mostly caught up………… mostly 😉 maybe a wee sneak peak on how the flower knight is coming along before I go!

Sorry folks – I’ve been trying to upload this photos for 4 days now and ther site just keeps discarding them whenever i hit ‘update’ – Have tried uploading in groups, one by one, differnt shots …….. nothing. Have put up a message in technical support forum but so far no reply or anything. *shrugs*
Edit – photos now up!!! Seems Chrome was just having a hissy fit and using Edge as suggested by the fantastic @ninjily was the key to getting it to works. Sooooo, if you are having trouble uploading photos at all, try using Edge – worked for me 😀
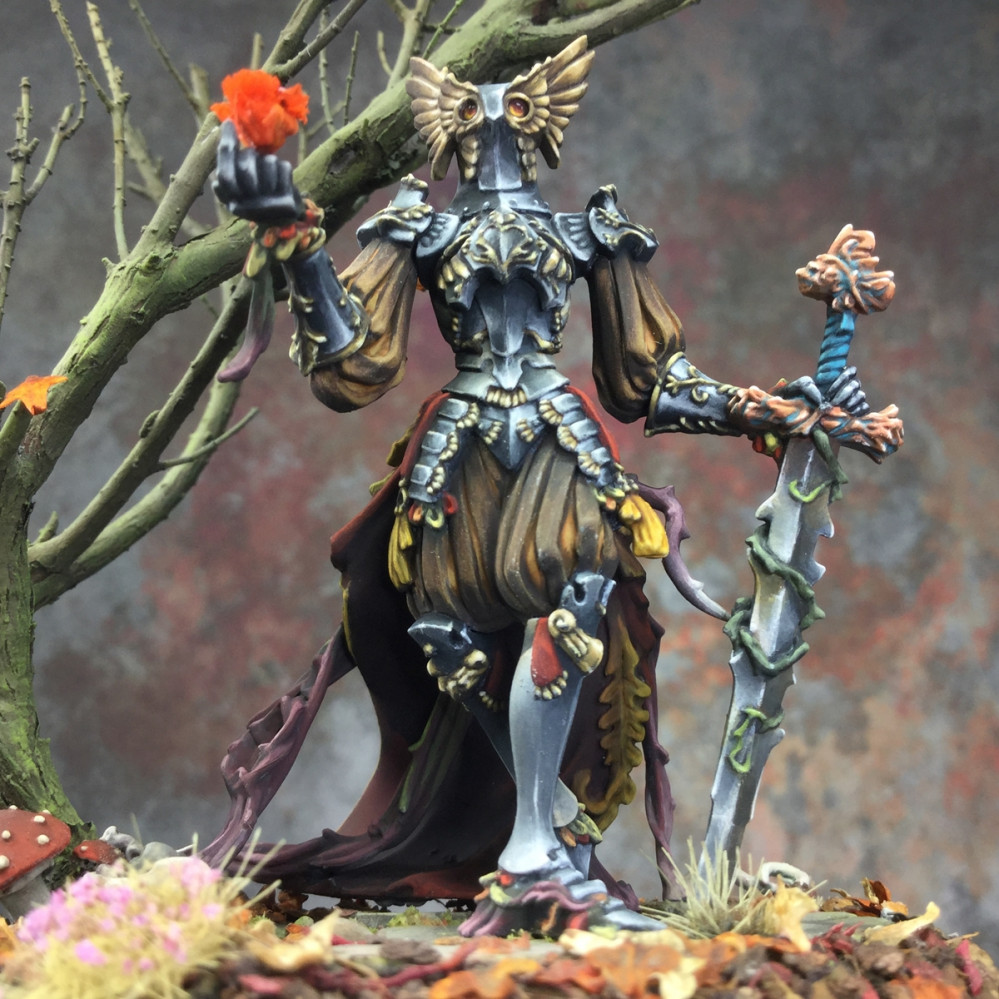
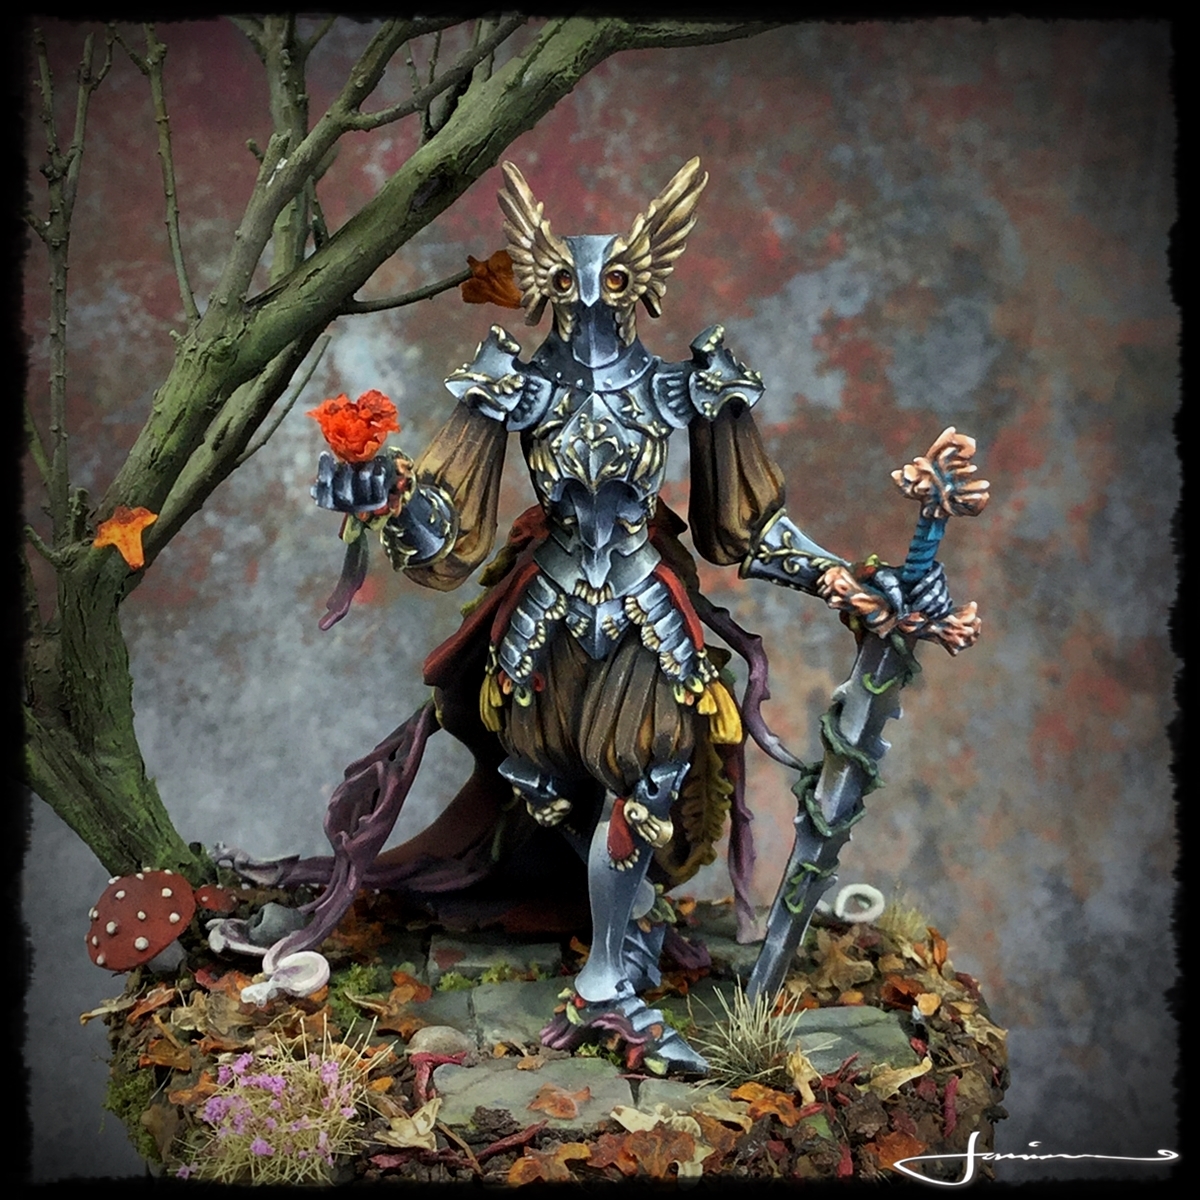
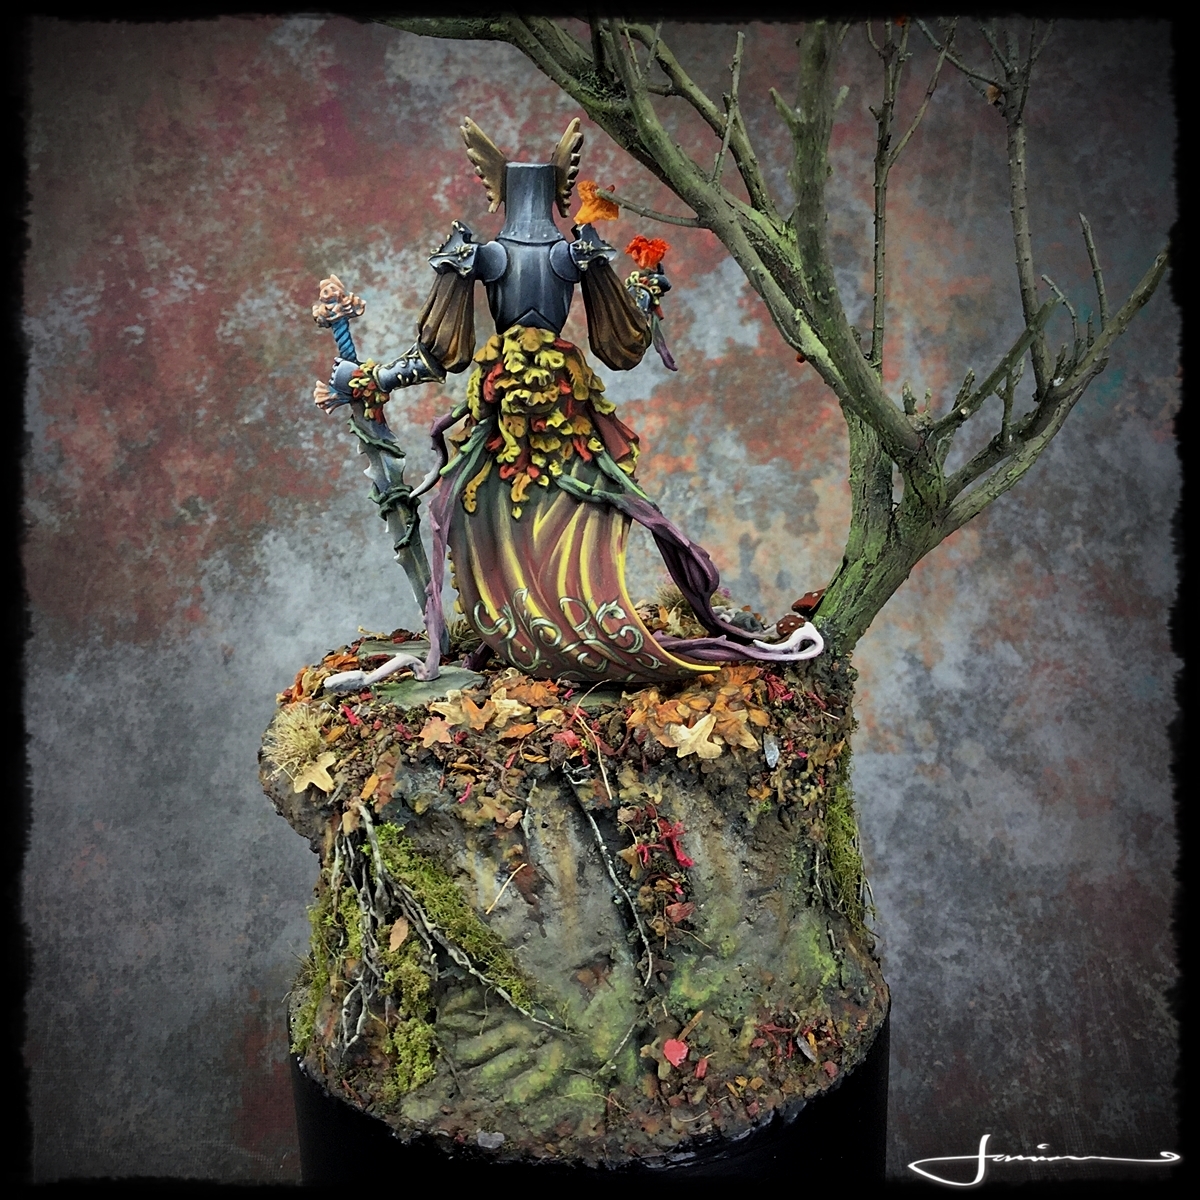
Autumn comes with The Flower Knight
I have been wanting to paint The Flower Knight for an absolute age. It is one of my absolute favourite minis from the house of Poots.
So was thrilled when a client approached me and basically told me to pick a KLD:M model to paint for them as a display piece rather than a game piece.
Initially I picked the black knight but the only copy of him the client had was already assembled and its really needs to be done in sub assembly. So I decided to go with the gorgeous flower knight.
The really nice thing about painting for display rather than play is that Im not constrained by the base size’s footprint. The Flower Knight plays on a 50mm base but wanting a little more real estate to play with I’ll be going with a 70mm diameter plinth for the base.
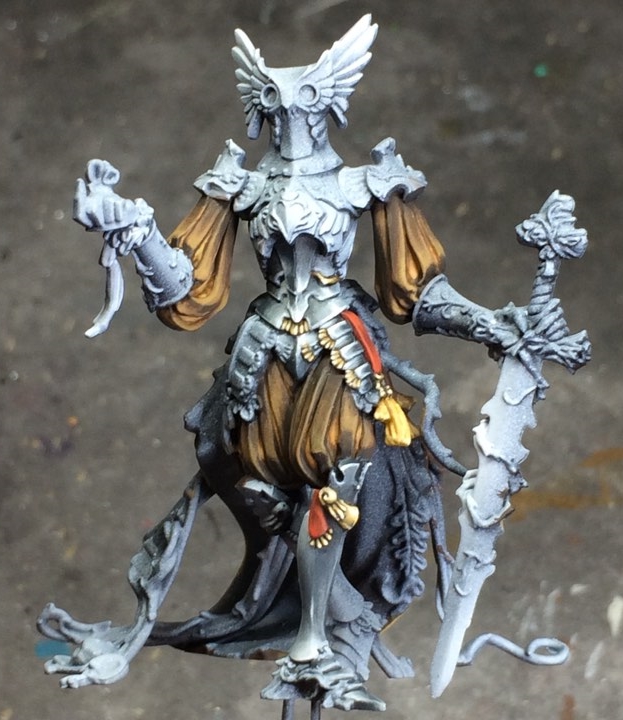
 Tripled primed and ready to go
After recieveing said knight of flowers, immediately got to the prepping, assembling and priming. Very nice kit and an easy build with no real gap fill or GS work being needed unlike some other of the monsters *cough white lion cough cough*
Standard triple prime that i usually go with through the airbrush: light coat of base black then a second lateral coat using grey and then a final top coat hitting areas of reflection and light using white. (All Stylynrez primers btw)
 Autumn Comes
Decided on an overall Autumnal theme for the knight – plently of browns, oranges, yellows n reds for any cloth and then silver and gold for the armour. Silver will be quite cold and then a nice older browning gold for the filagree, detailing and helemt wings. The roses on the pommel and crossguard of the sword may be done in a reddish copper for variety as well as keeping with the overall autumnal palette.
I started with the german puff and slash sleeves and knickerbockers the knight is sporting. Choosing a soft orange for the silk interiors and then a nice rich soft brown for the outer panels.
The outside of the cloak beneath the leaven bustle echoe the puff n slash but continues on into an ochre at the bottom. I will probably glaze in a more reddish brown to the top of the cloth disappearing beneath the leaves.

Unusually for me I am going nmm for the metals. With KD:M as a whole I have always felt that nmm suits the aesthetic better than tmm.
So made a start by sketching in dark silver of the many many armour panels on the knight. Ont he rare occasions when i turn my hand to nmm I usually sketch it in first and plot the main highlights while pushing fairly quick transitions from shadow to light. Any dodgy transitions can be smoothed out later when i add in some secondary tones and reflections from surrounding elements like a few touches of brown from the cloth reflecting form the cloth onto the armour.
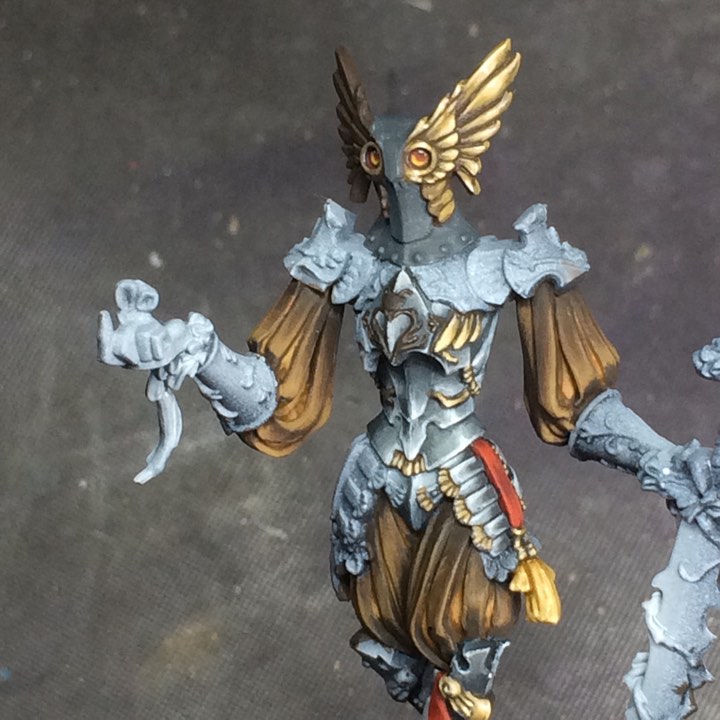
With the armour panels started, I then make a start on the gold filigree and elements to get an idea how it will play with and reflect on the silver panels and also to get an early idea/feel of how the overall paint scheme is working and that brings us up to current point.
Oh – for the eyes – I could have gone with a more complementary colour to the yellow/browns of the surrounding golds. As the brown here is really a dark and muted kind of orange going into yellow – the comp colour to that would blue- blue/green aand that would have worked very nicely BUT would have interrupted the autumnal palette I want to keep quite strictly to so I opted to go with analogous choices rather than complementary ones – yellow/orange/red for the eyes – focusing more towards the red end.
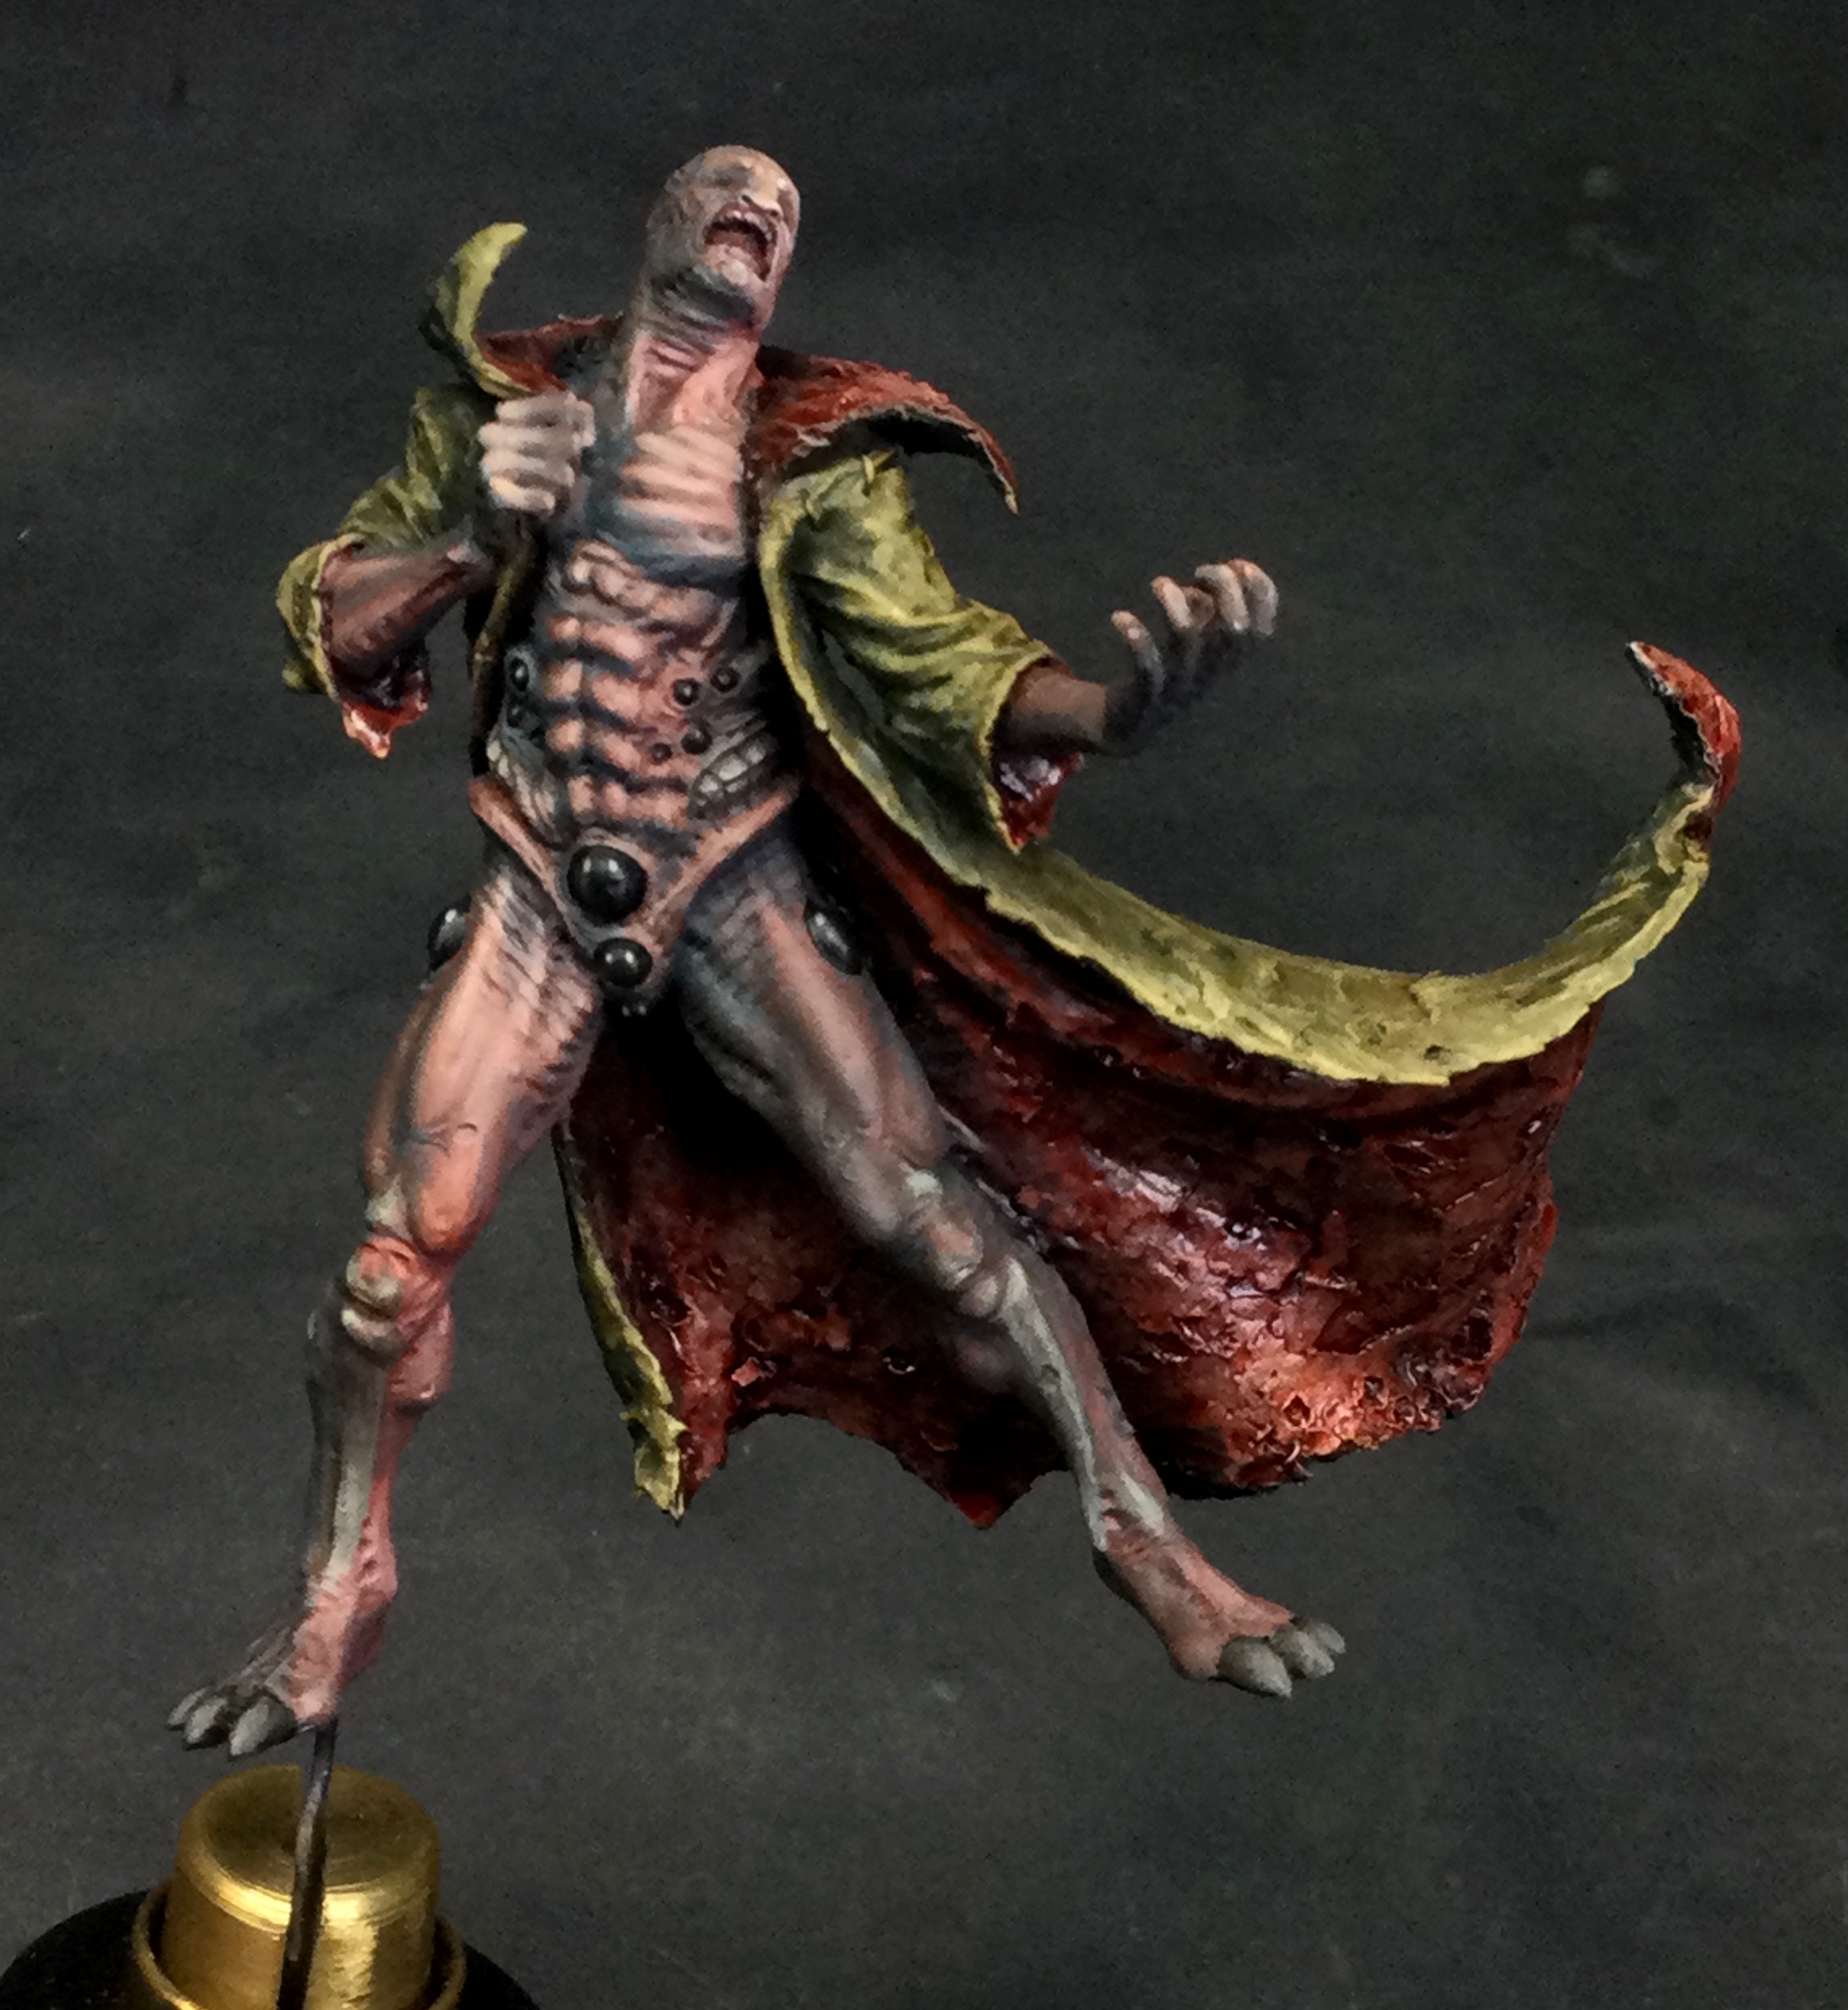
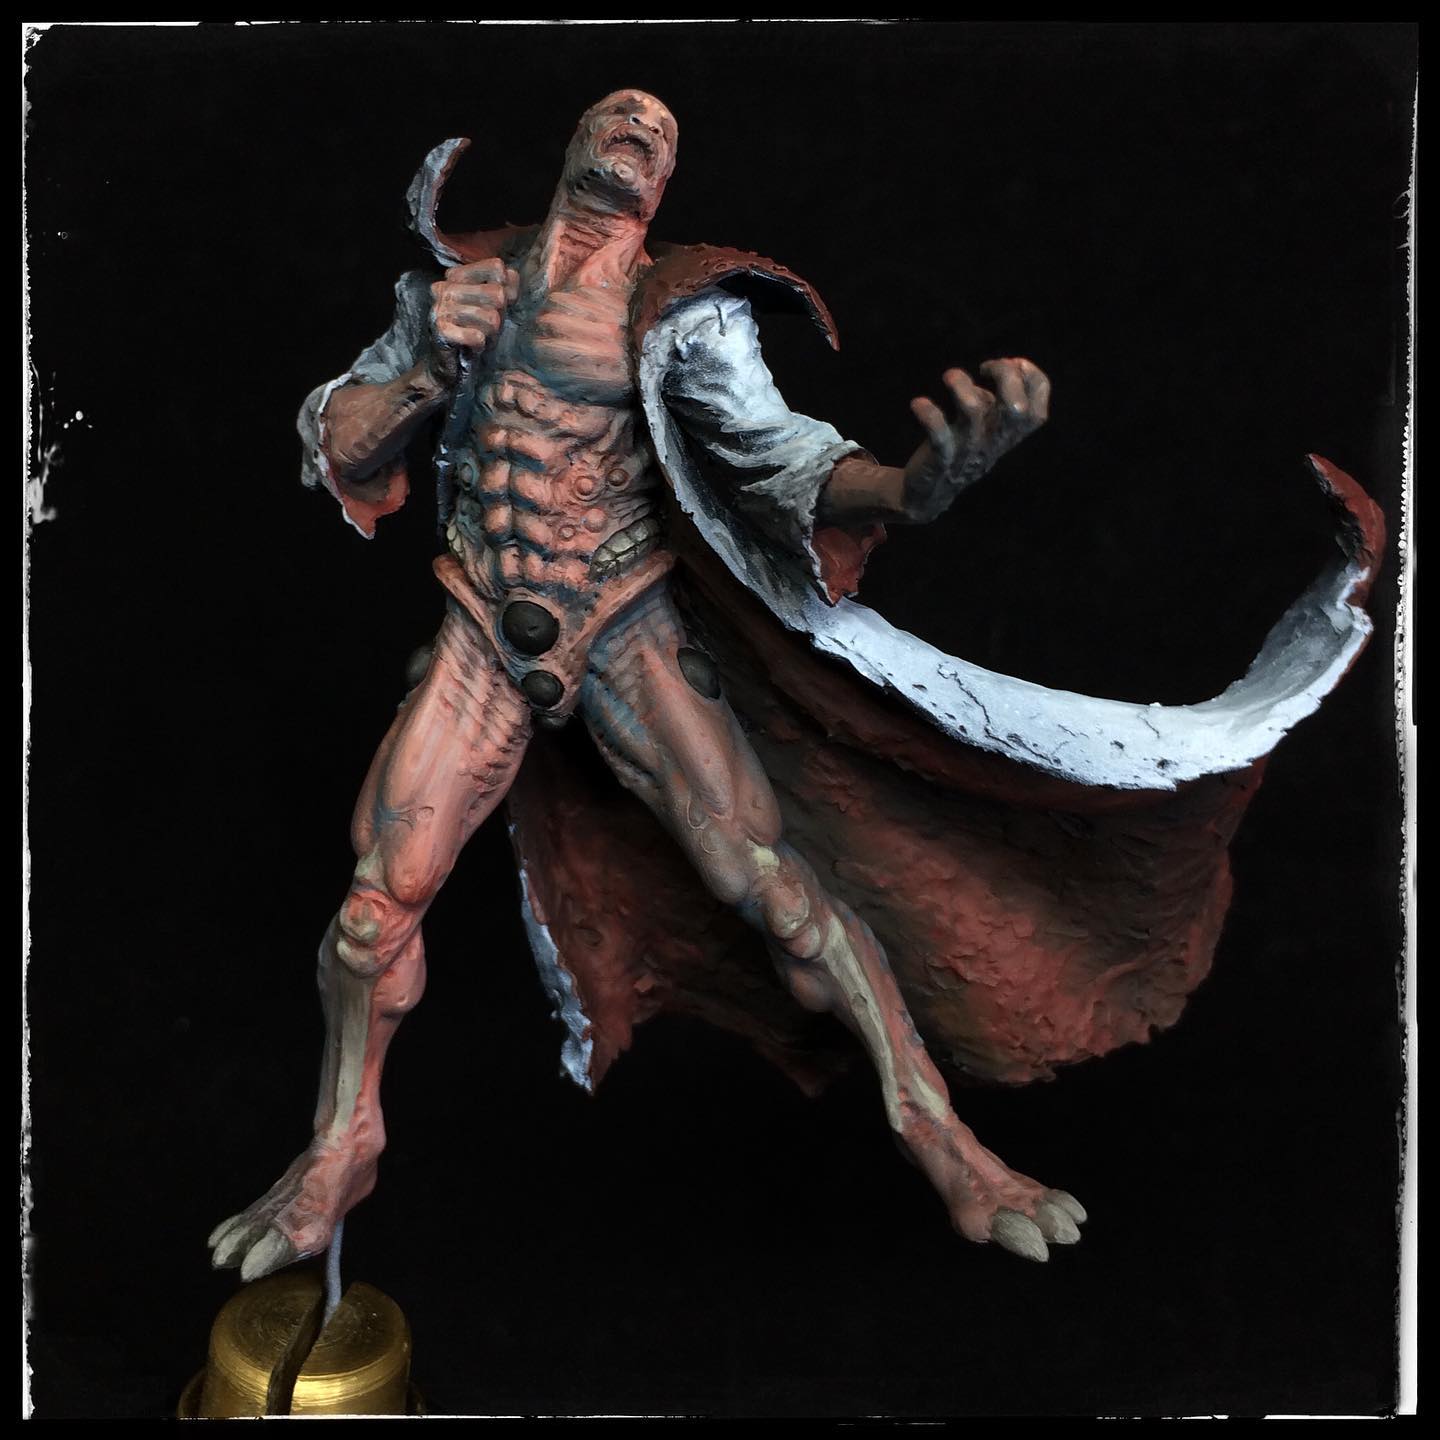
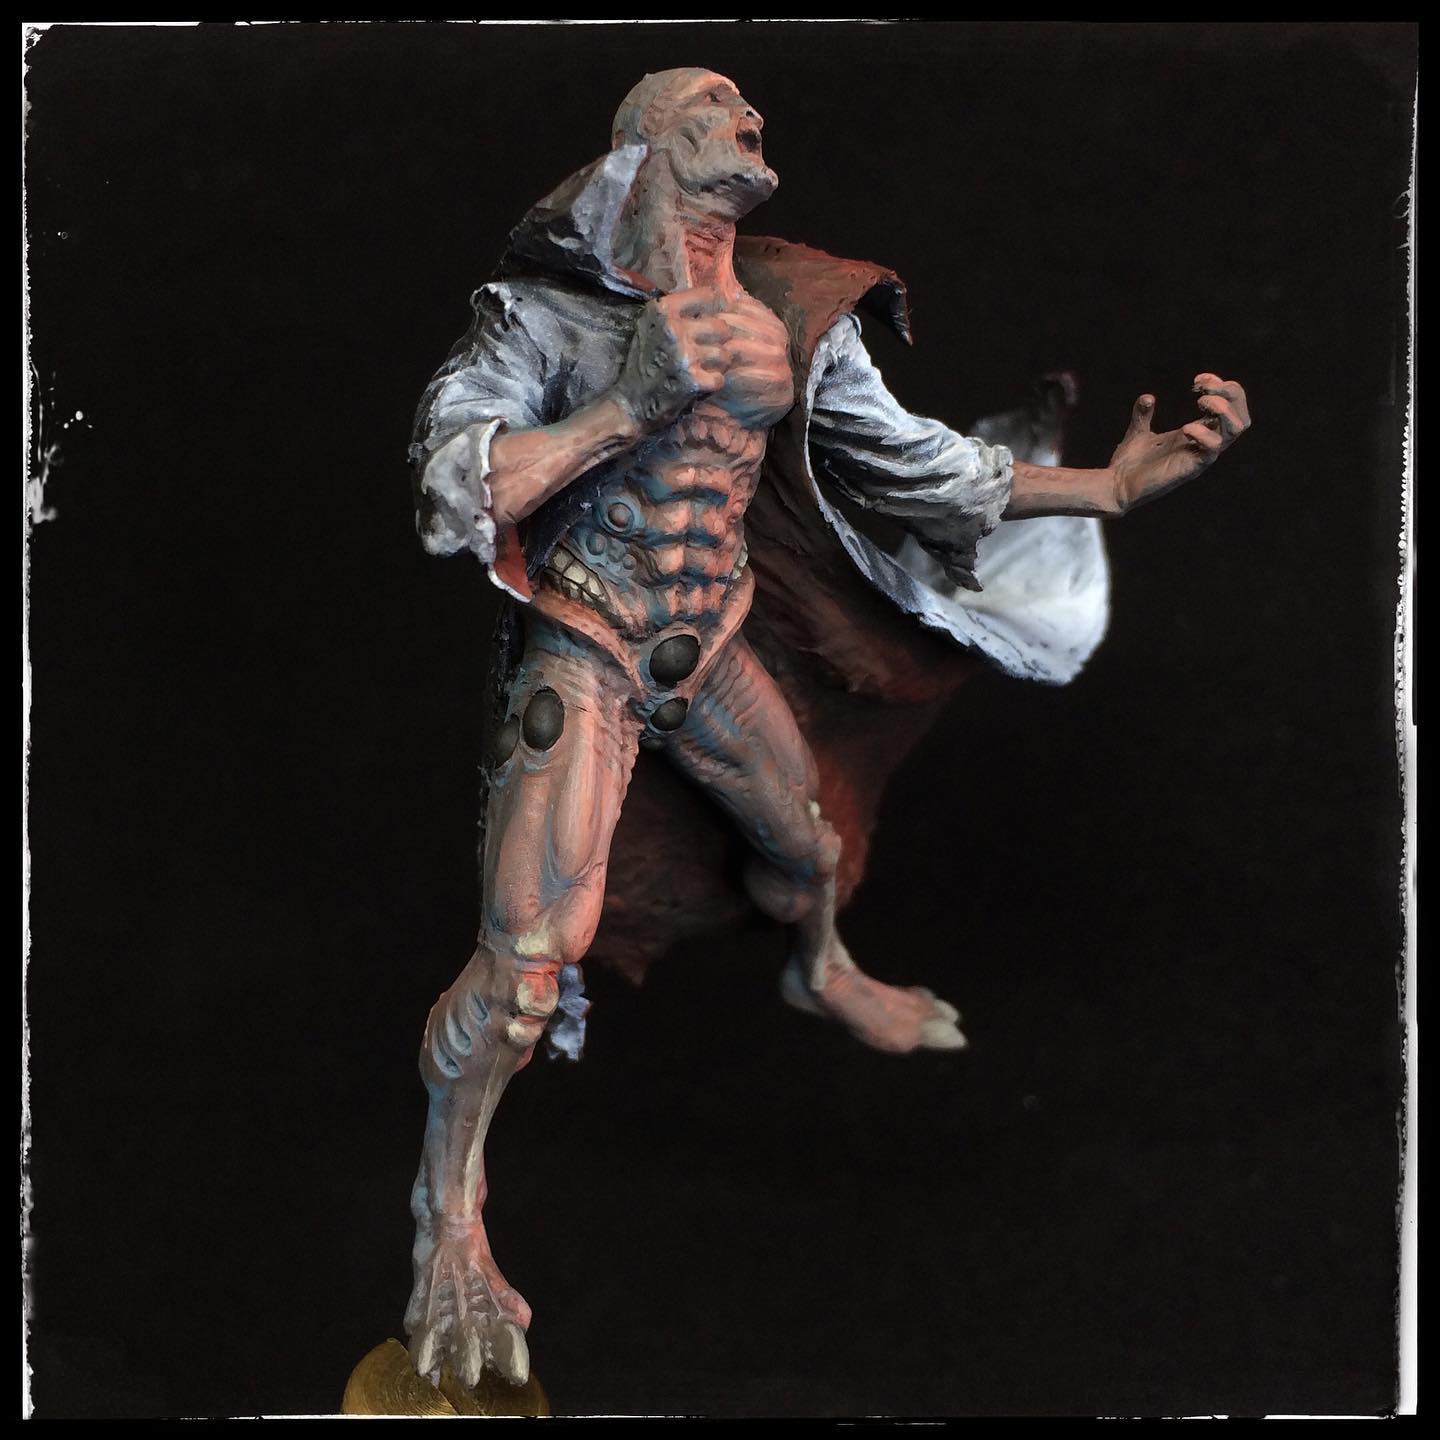
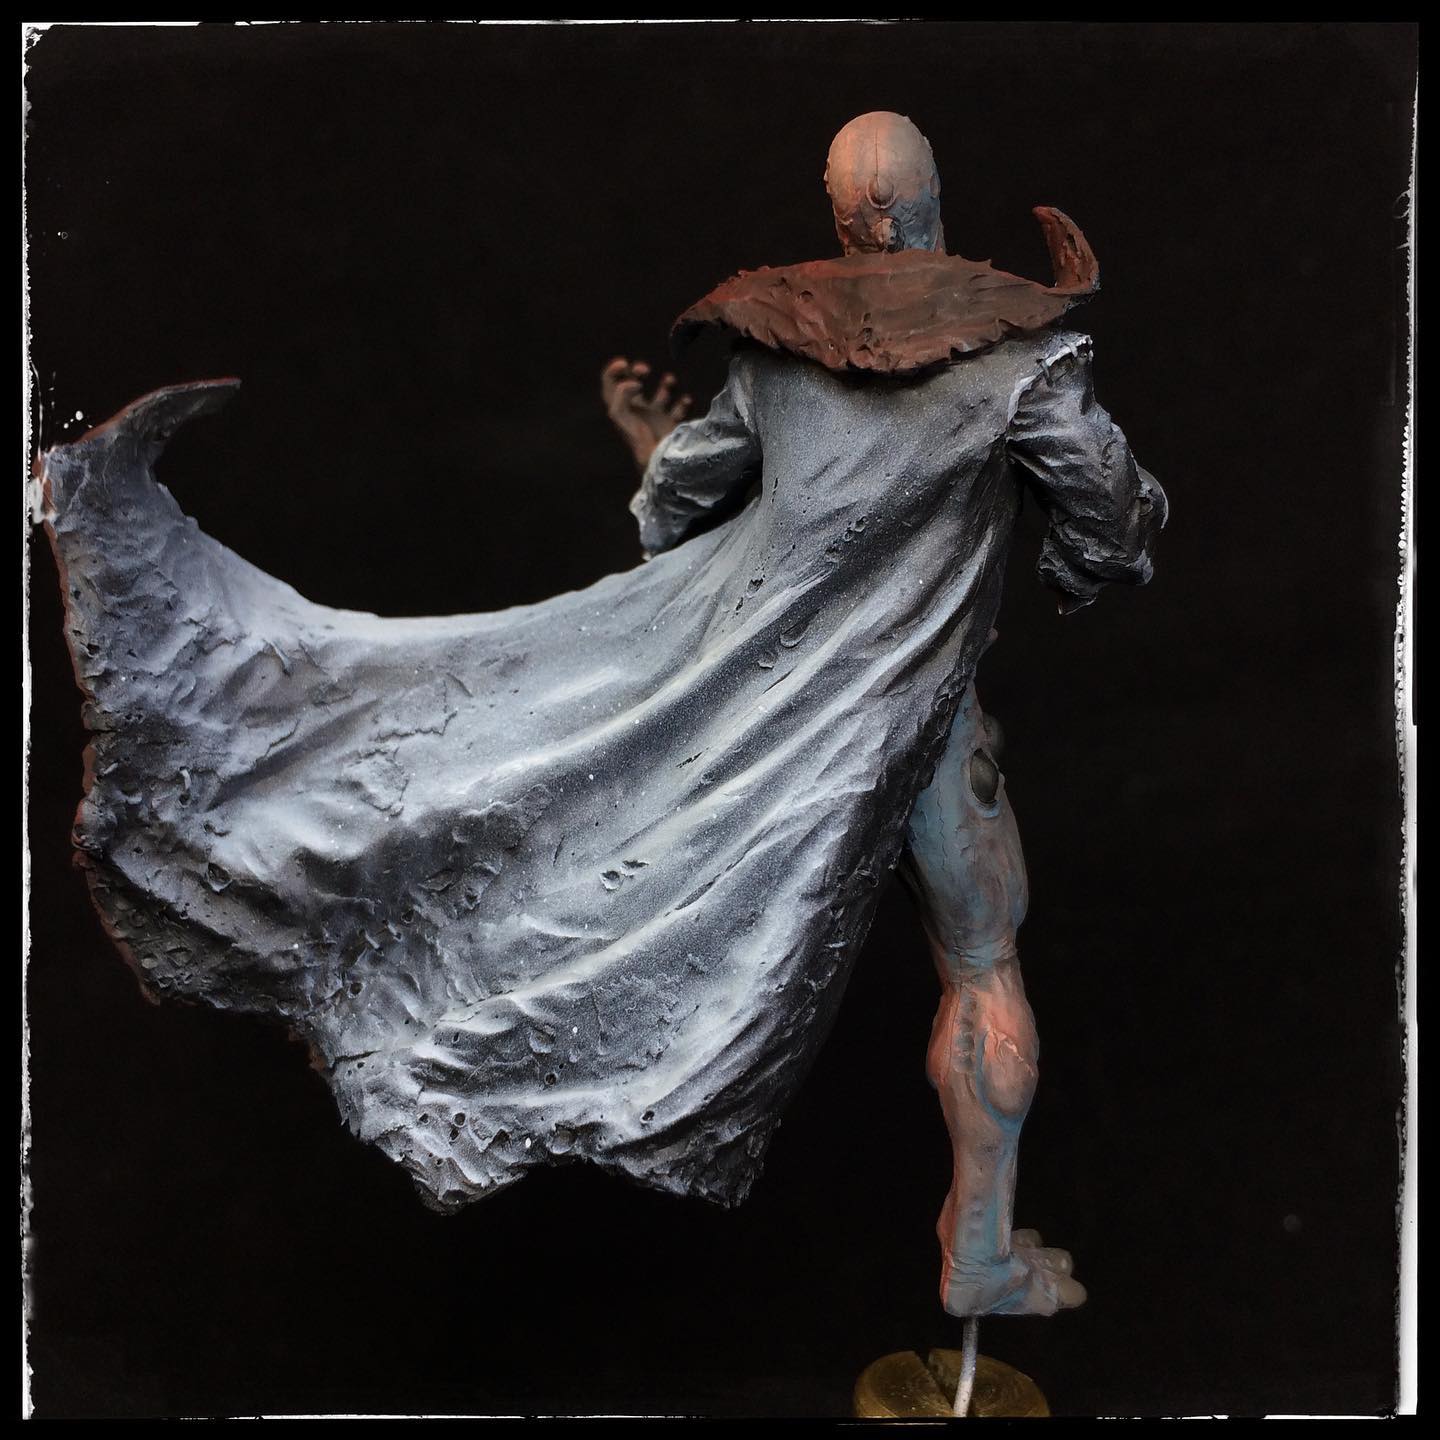
Butcher & Pariah
Two other KDM minis I’ve been trying ot work on and keep putting back on the shelves are The Butcher from the core box and one of my favourite characters/sculpts -The Pariah.
I started these two evil boyos ages ago and they’ve been languishing on (one of ) my WiP shelves for a while….. I need to get them done!!!

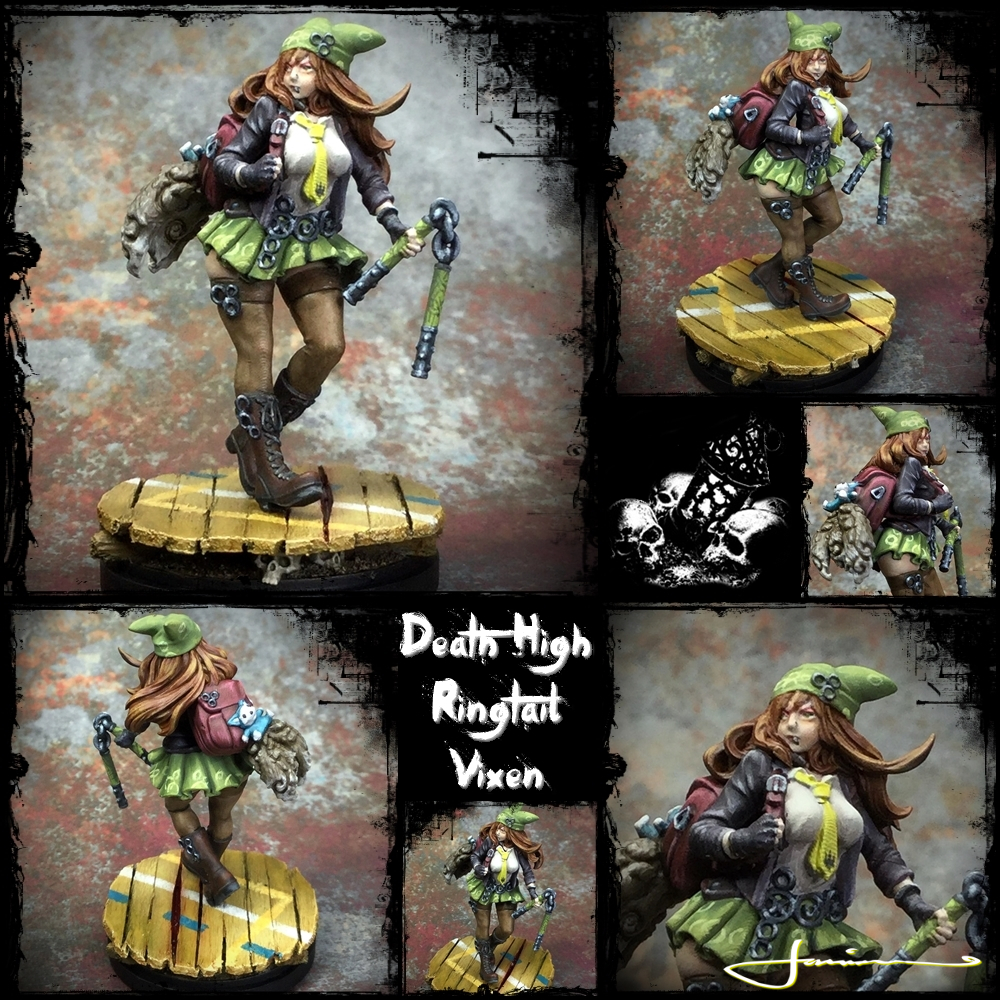
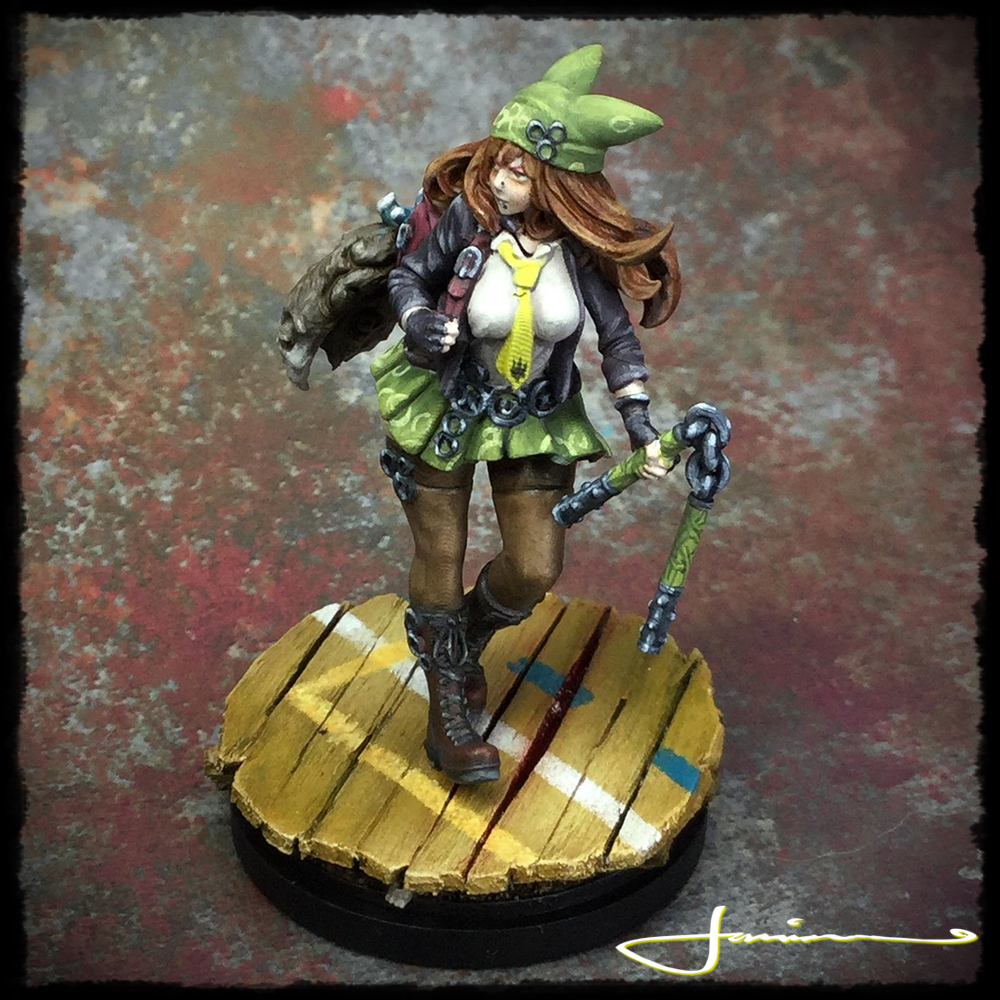
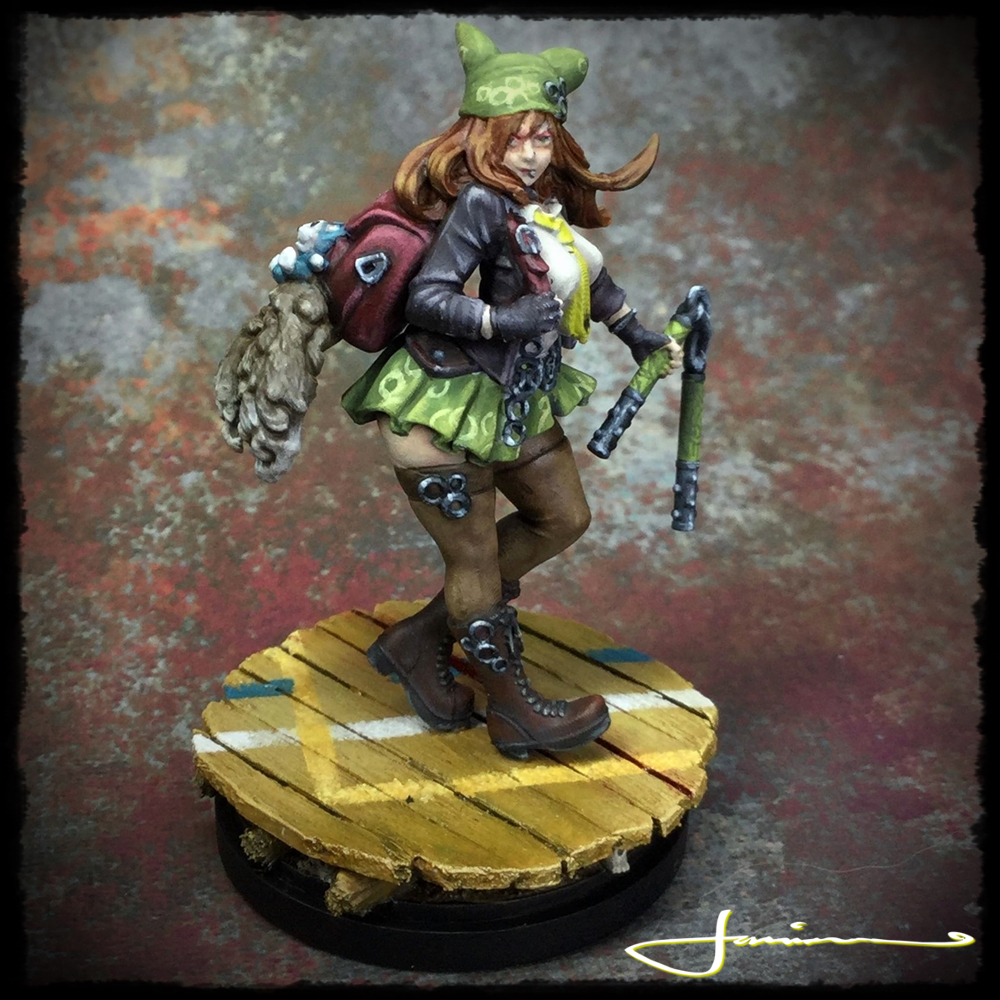
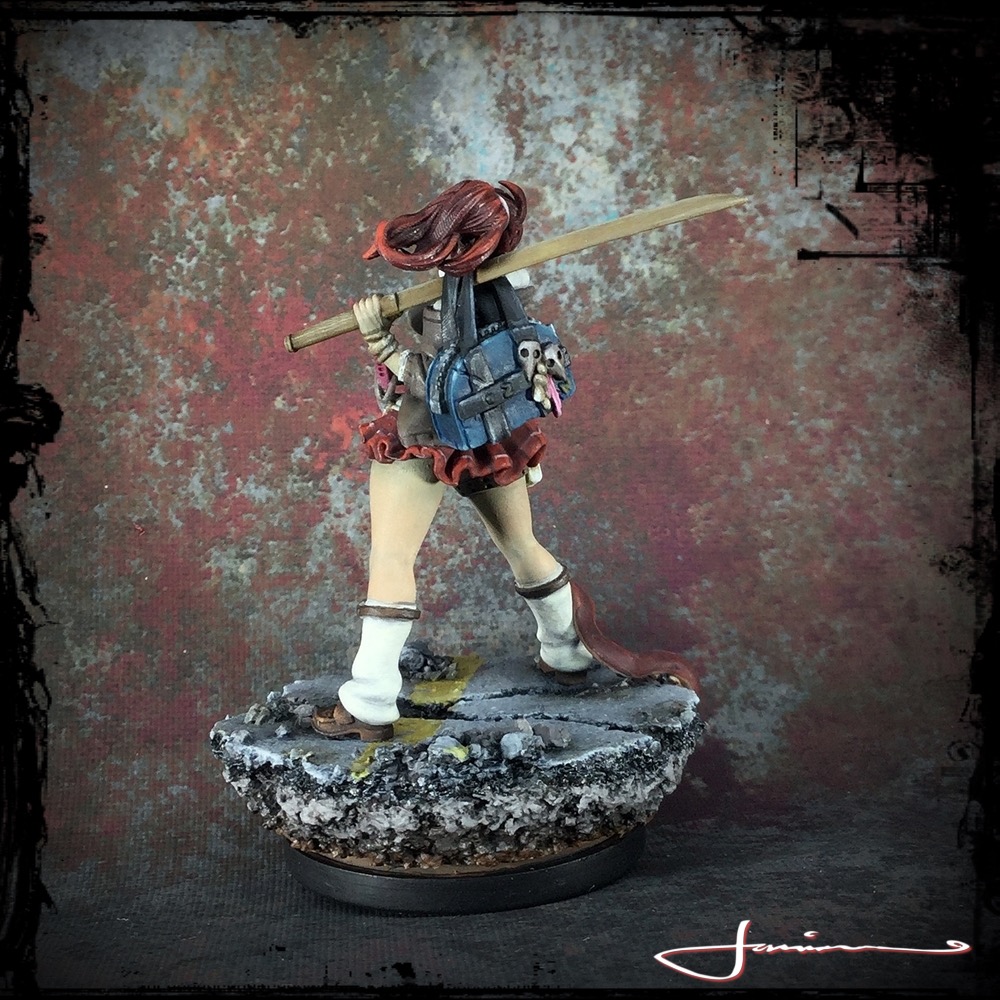
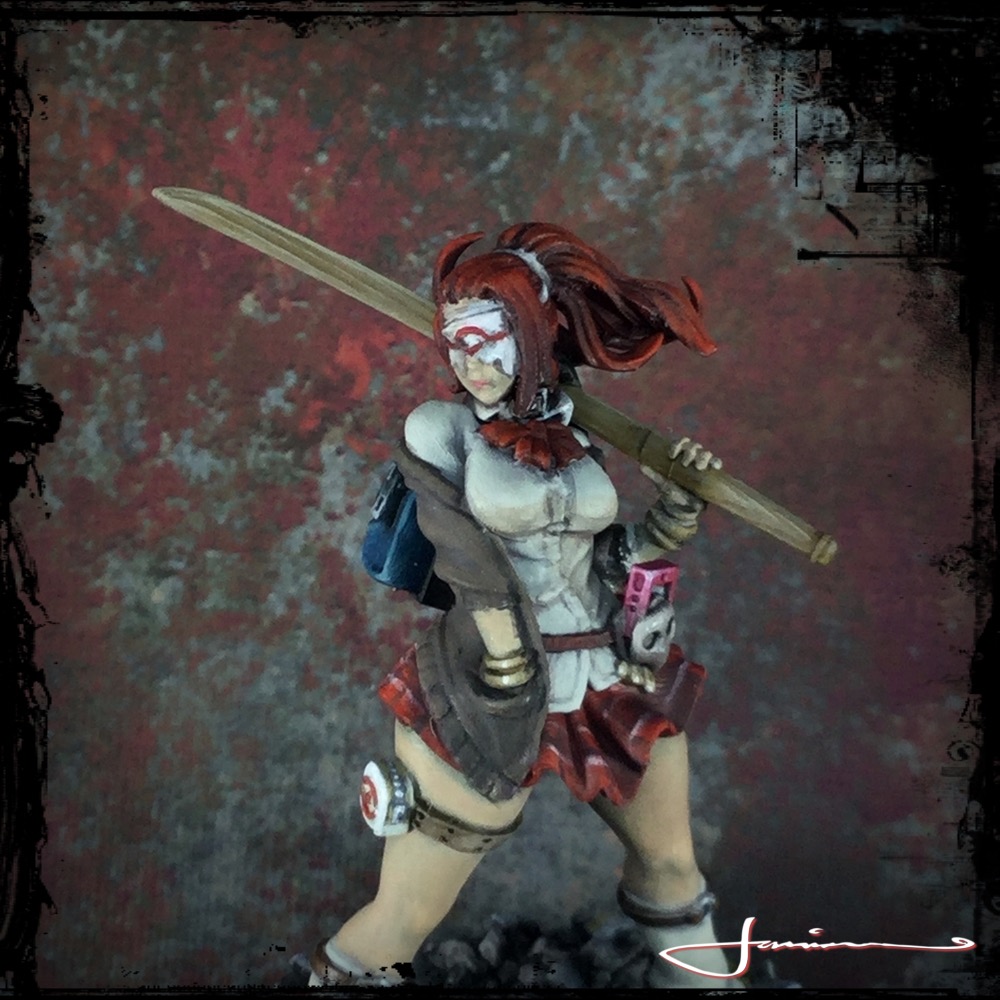
Death High - The Vixen
urgghhh it’s been a horrible amount of time since I updated my projects – I suck I know. Things have been crazy busy with RL, streaming and commission work BUT still managing to get a little KDM loving in! The Death High series are one of my favourite sub sets of KD and was gifted the second mini in teh series a wee while ago by a really kind friend and finally managed to get some paint on her.
The Death High Ring Tail Vixen


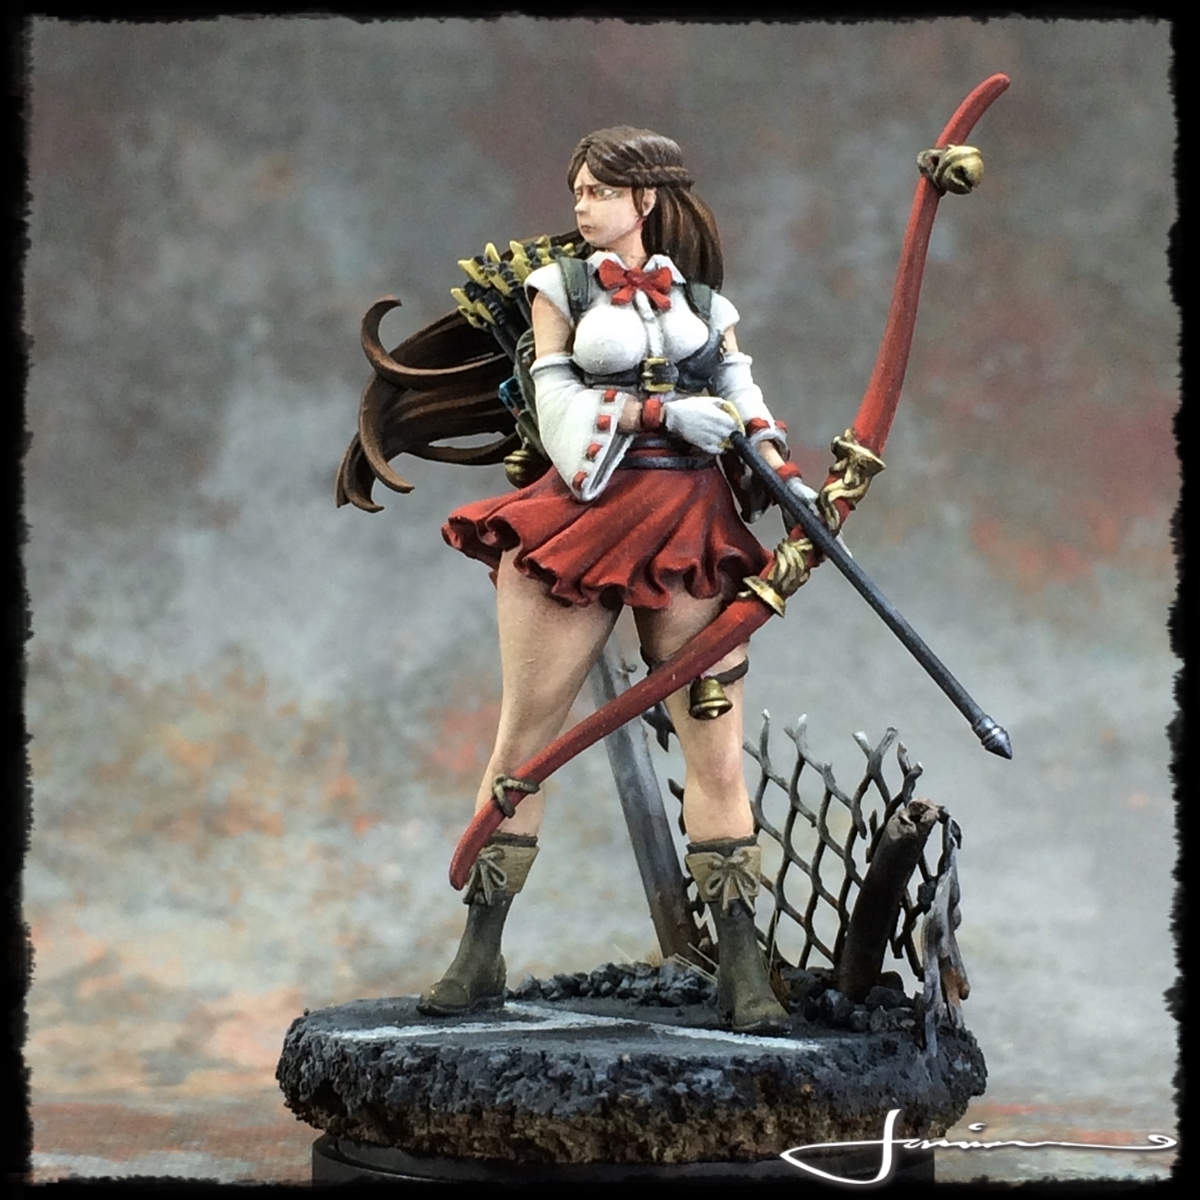
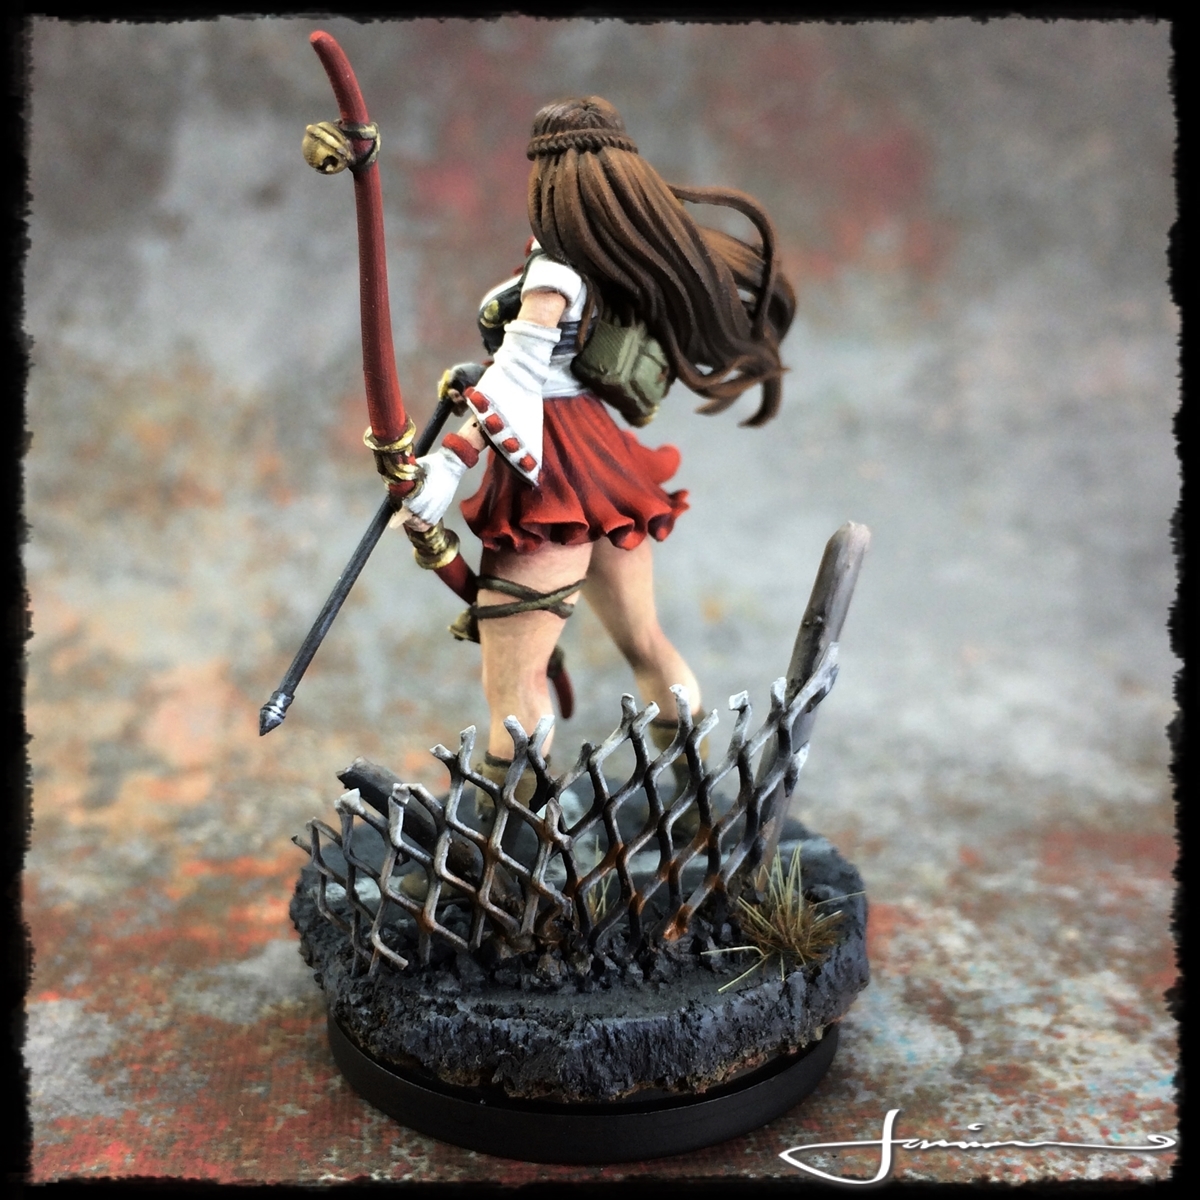
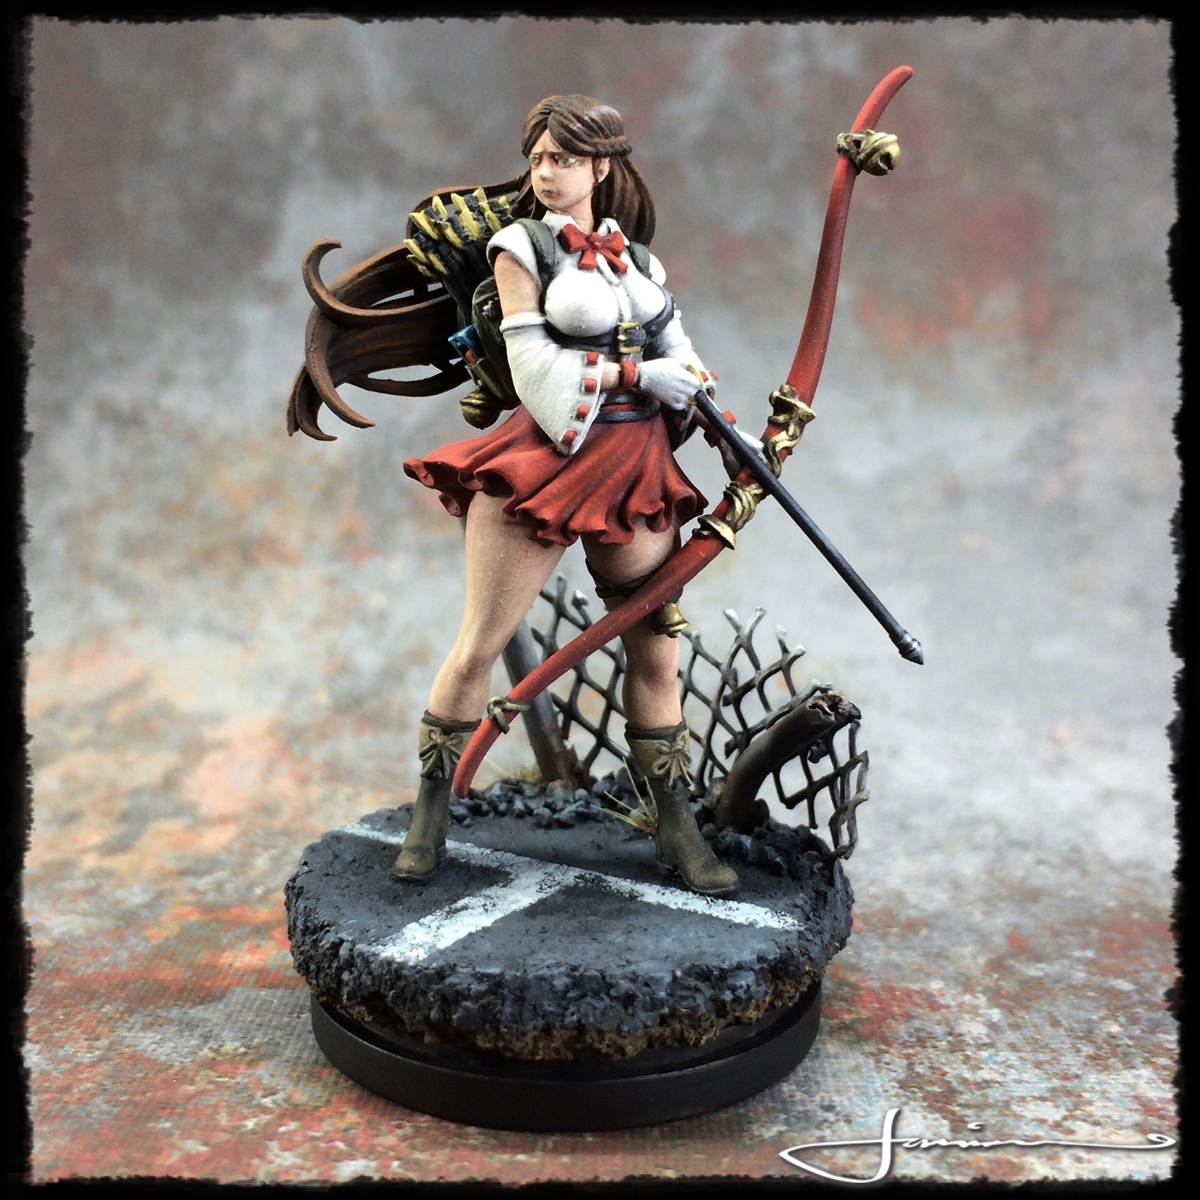
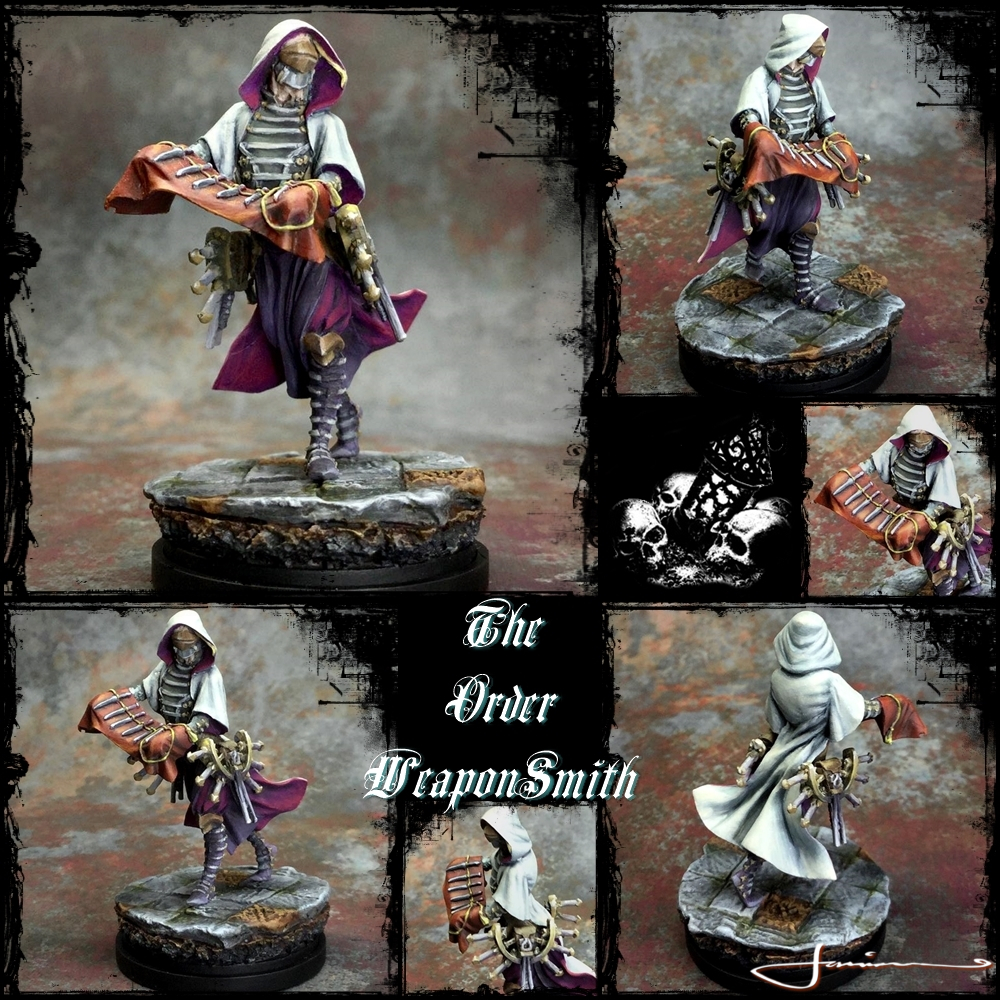
The Order Weaponsmith
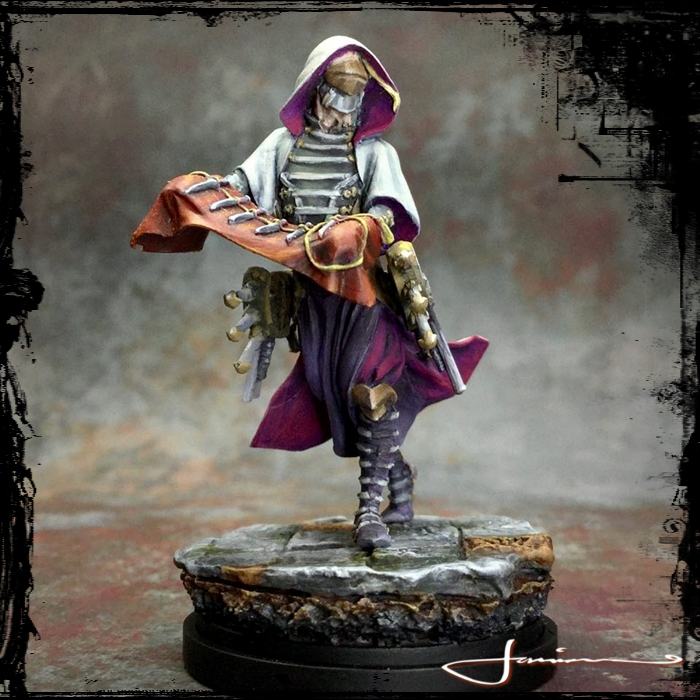
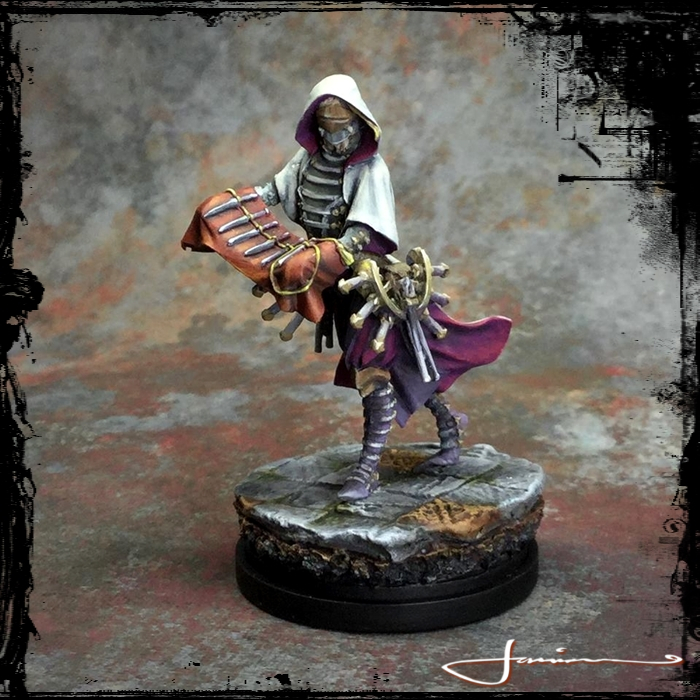
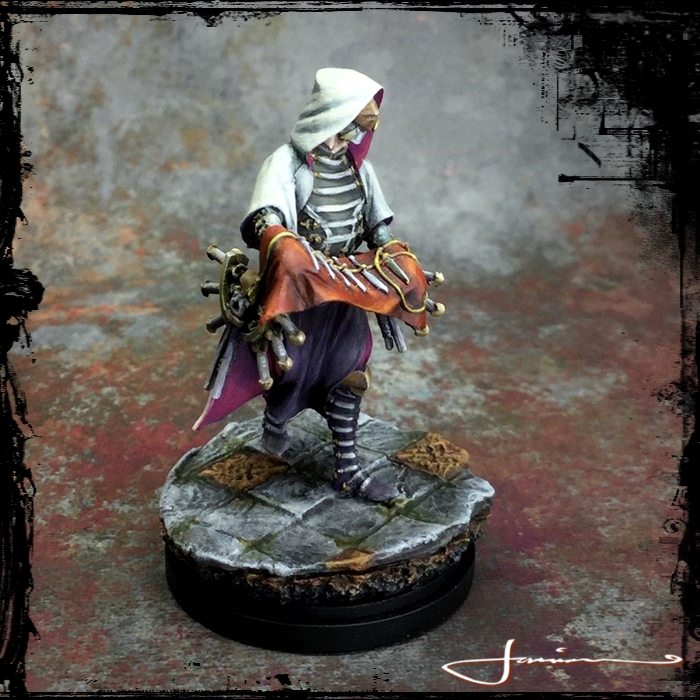
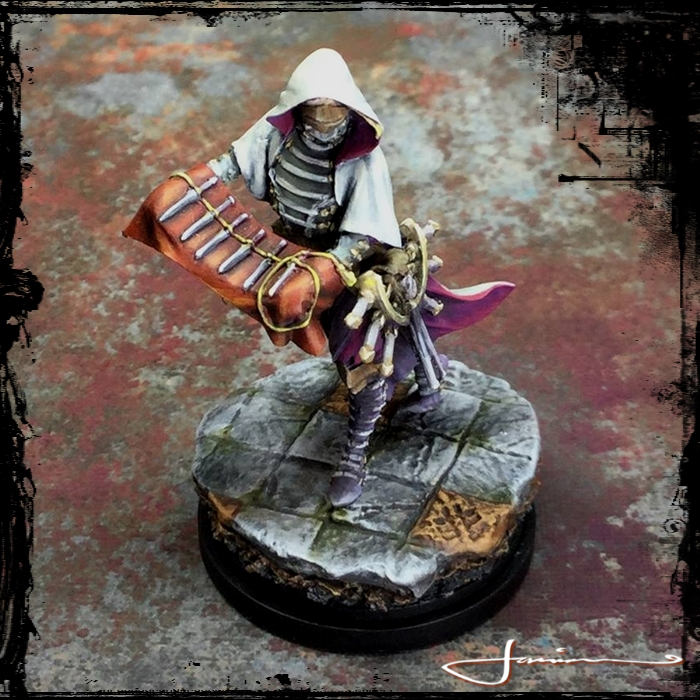


Death High Love This Mini!!
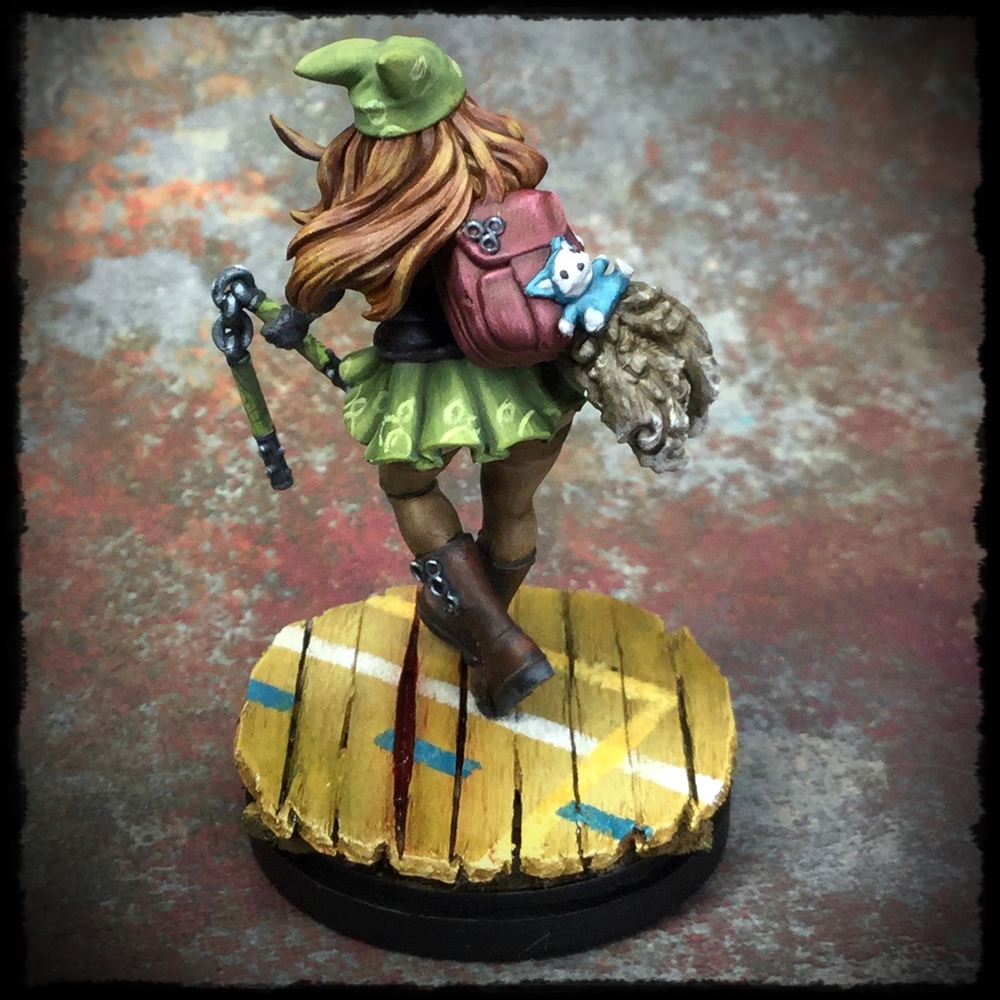
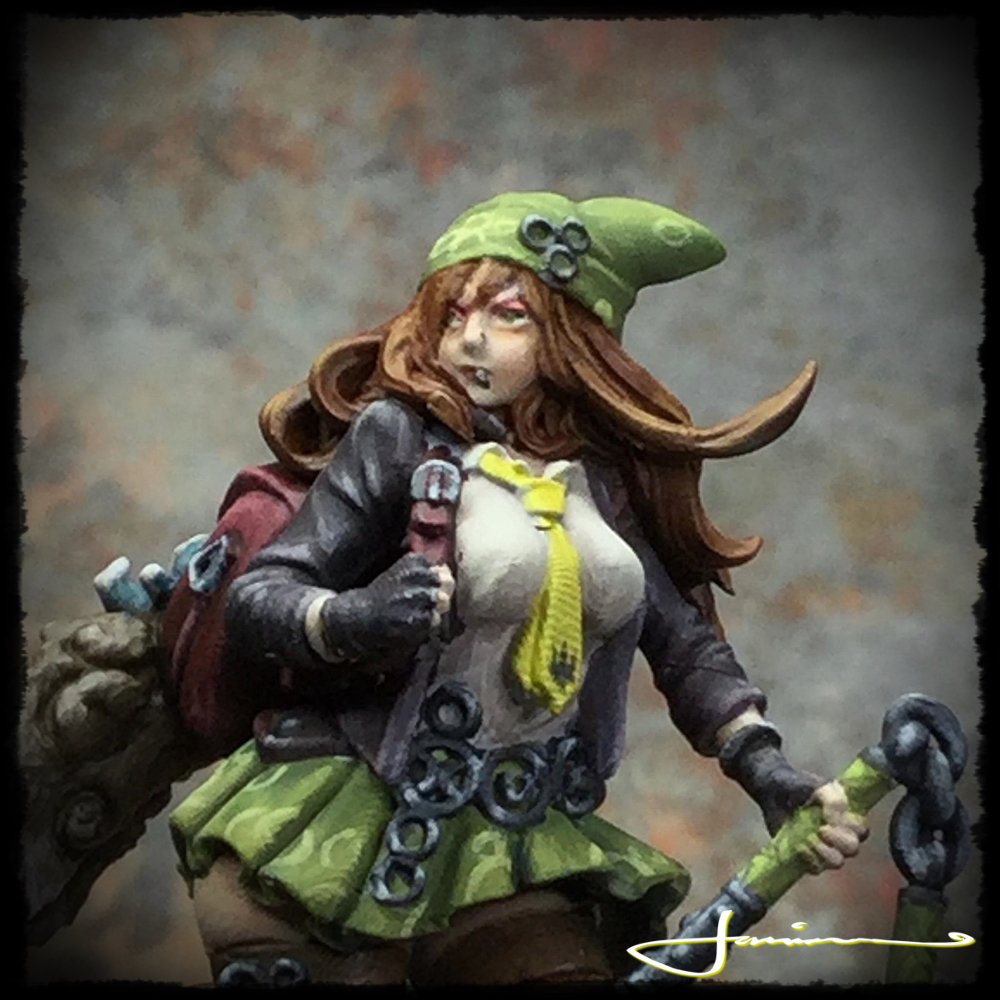
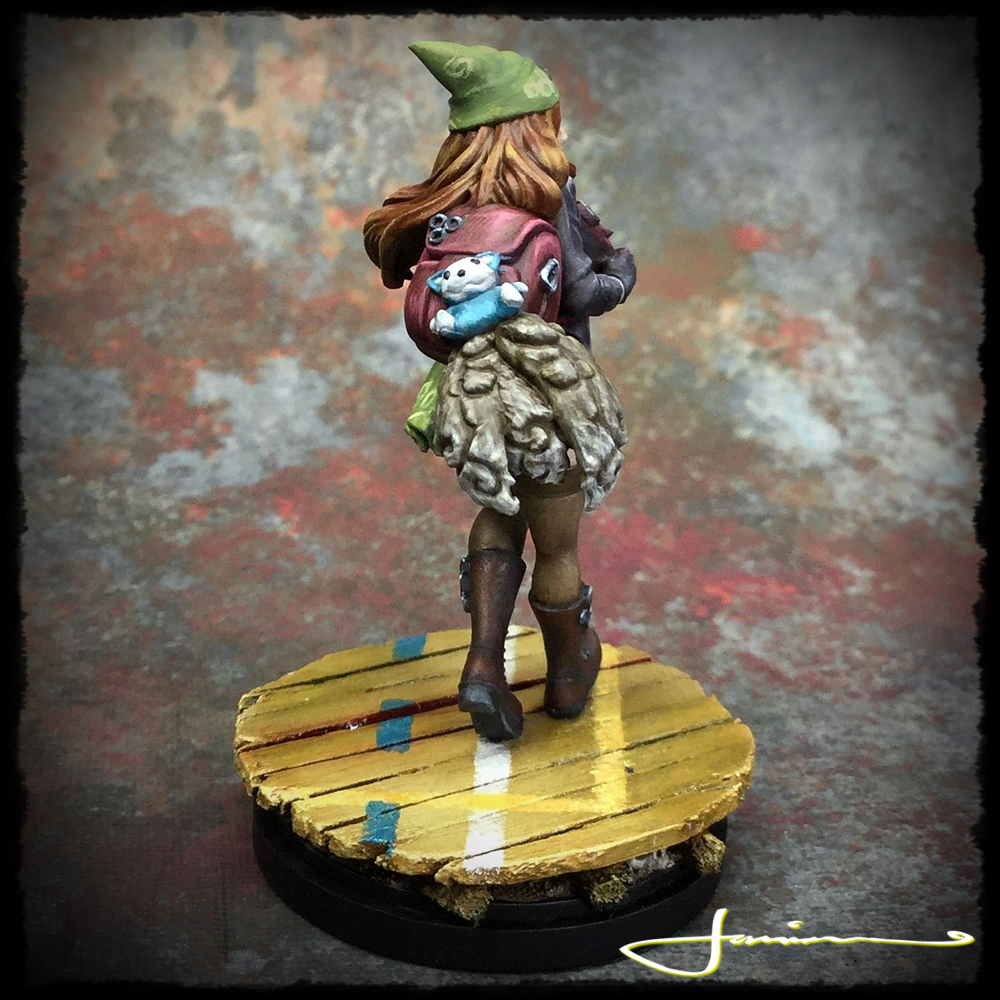
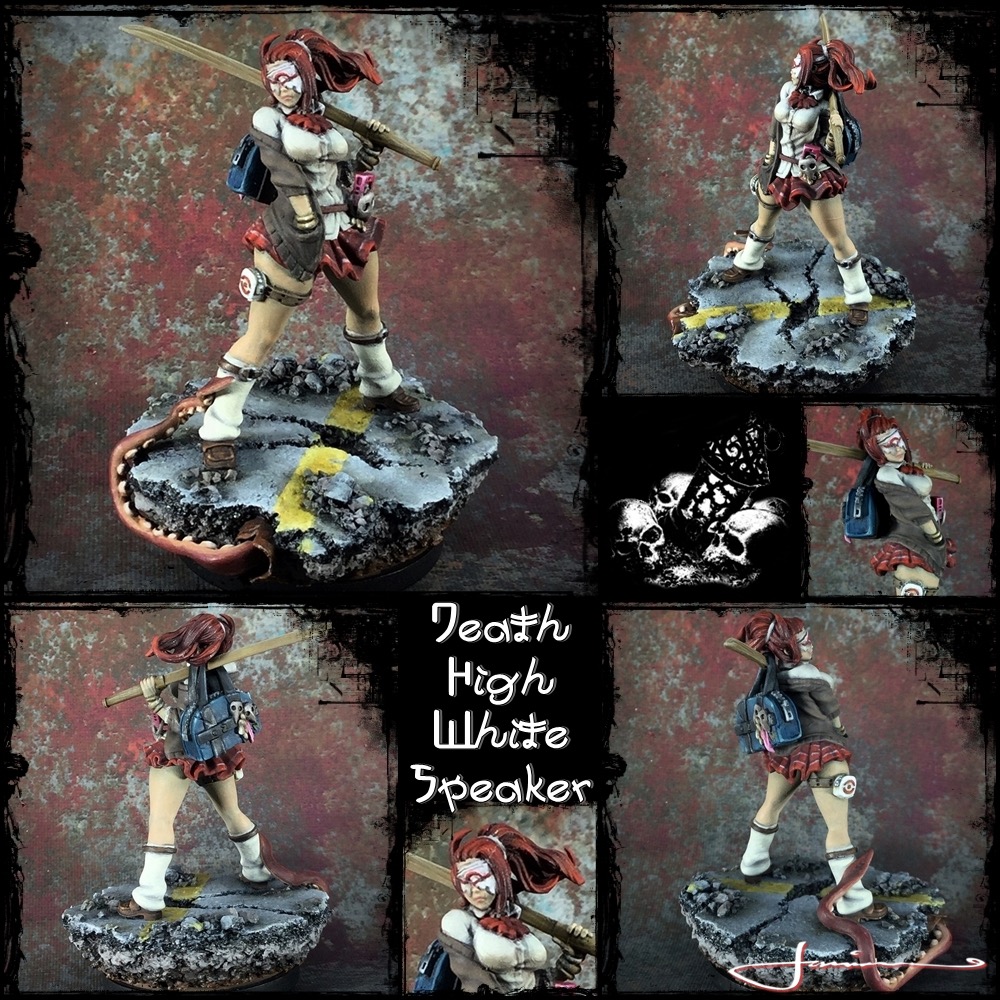
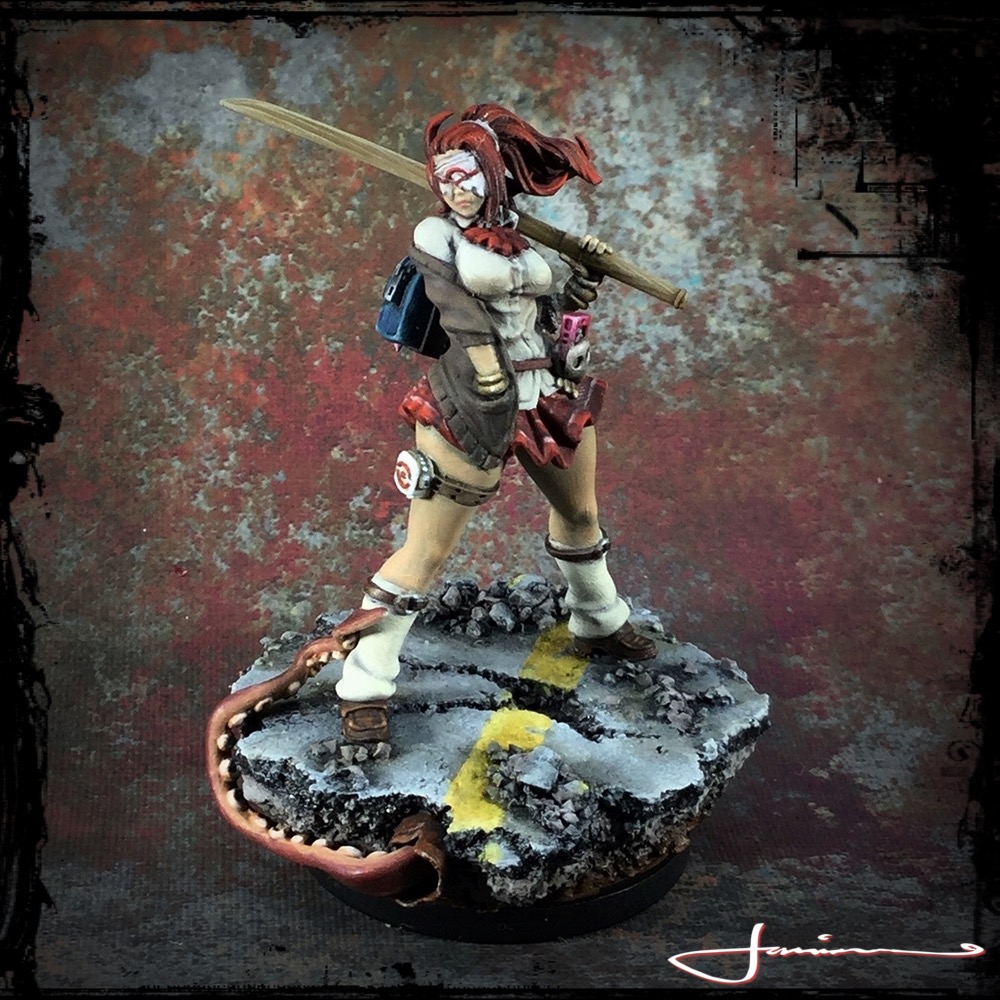
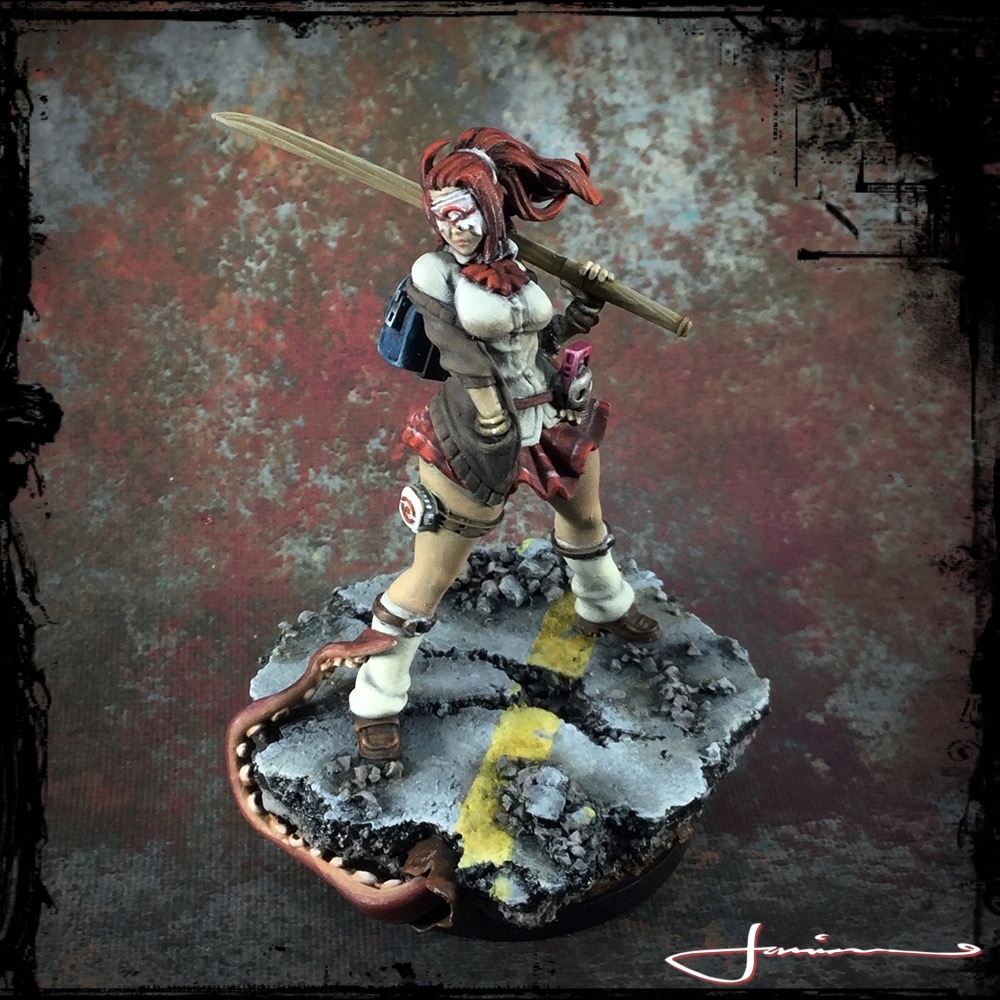
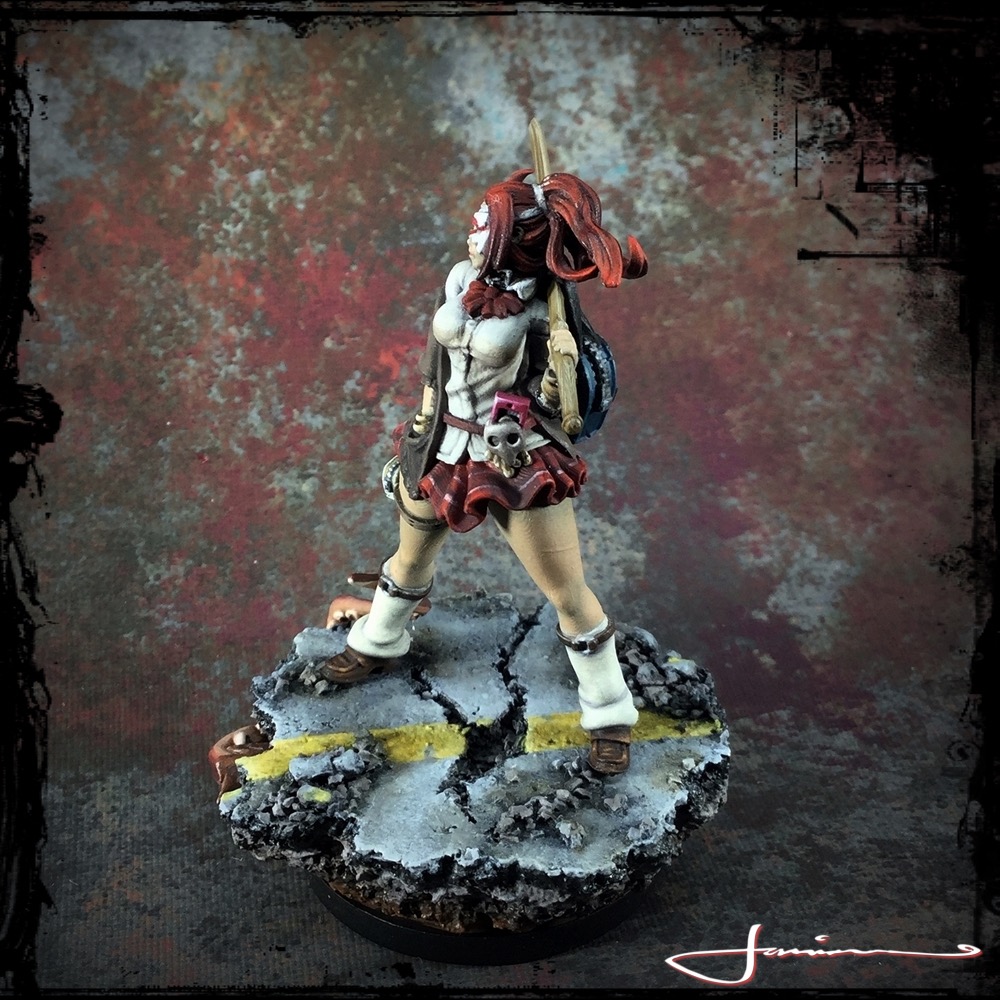
Furthering the quest to get some finished minis actually photographed, today we have one of my absolute favourites – The Death High White Speaker. An absolute joy to work on from start to finish. The base is scratch built simpley enough from cork coasters, grit/gravel and greenstuff for the tentacle for a cheeky wee nod to certain genres 😉 Hope you like her as much as I – Jan


The Fugly.......I mean..... White Lion
Finally finally getting around to getting some decent photos taken of some of the minis n projects I have finished recently. First up from the KD:M prologue, one of the most irritatingly bad sprue cut minis out there – The White Lion.
After the horror of building this guy and ALL the damn filling he needed, he was a really enjoyable paint and I got to try out a few new things and learnt a lot along the way. Very happy with the result 🙂

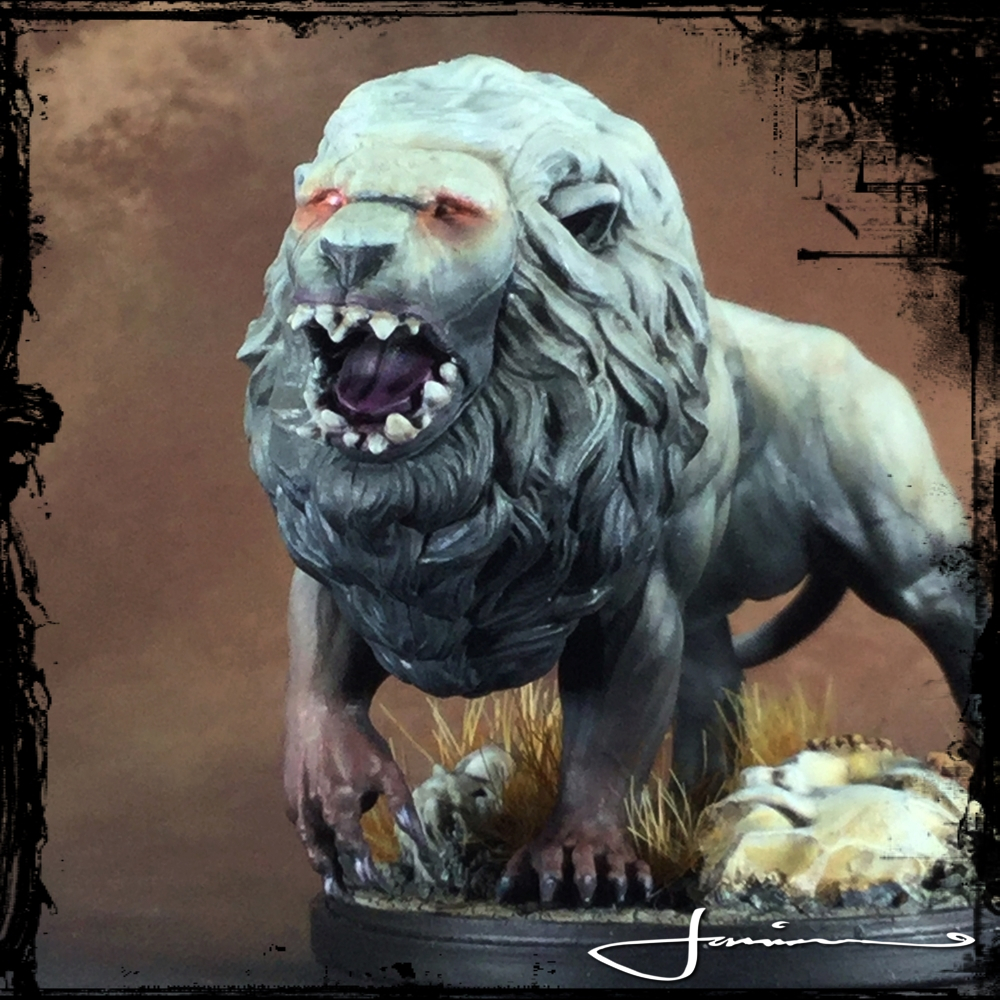
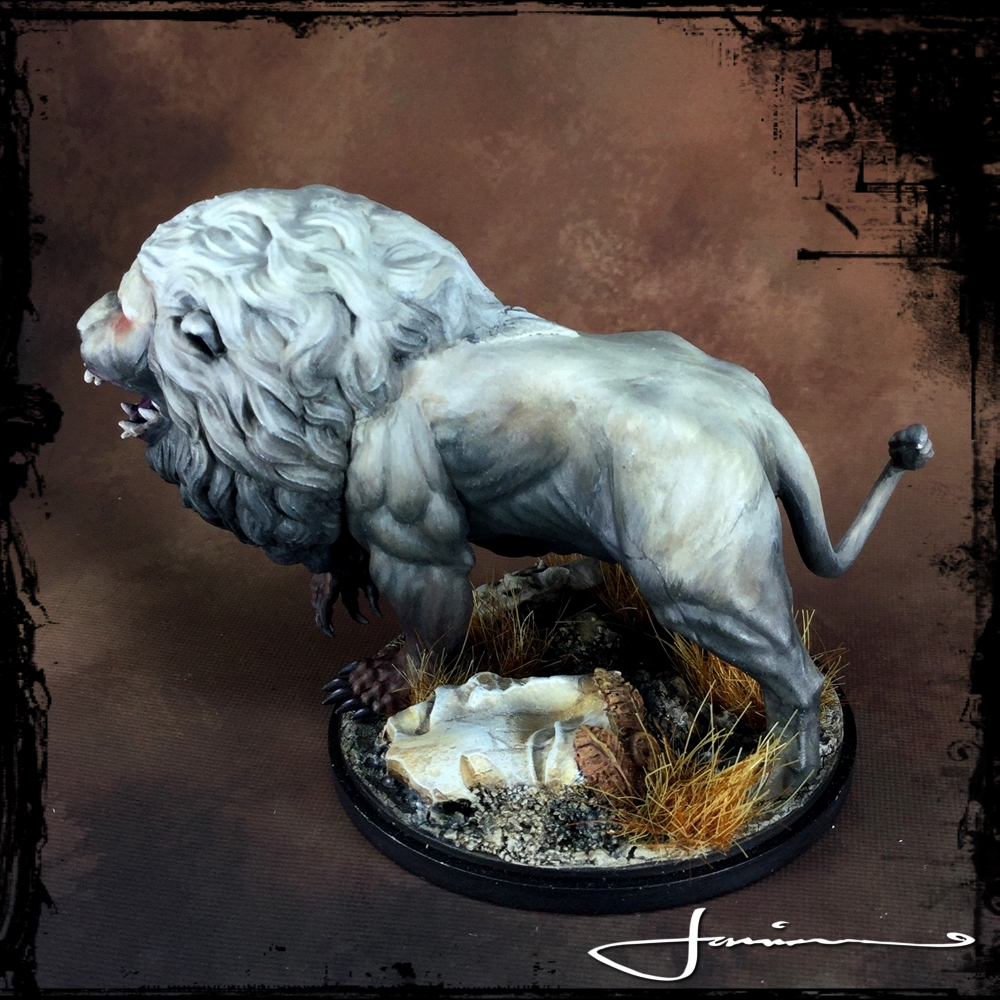
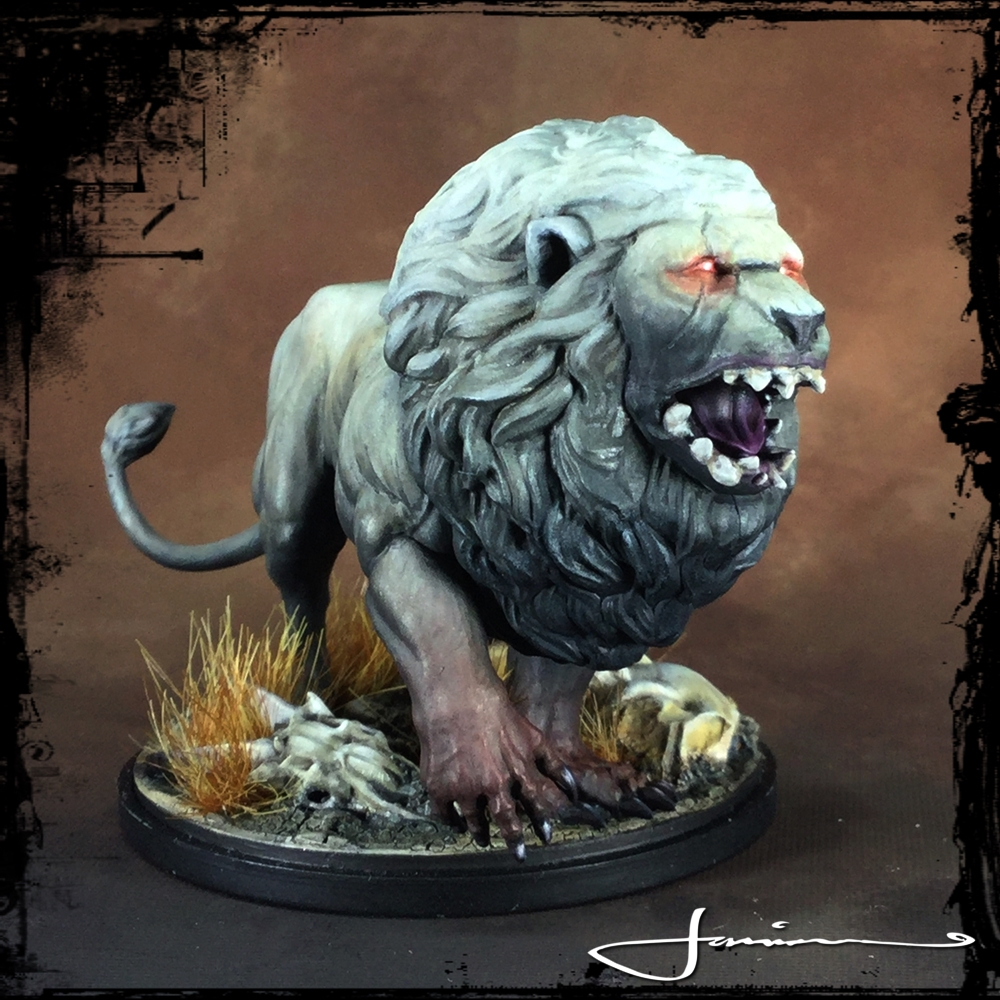

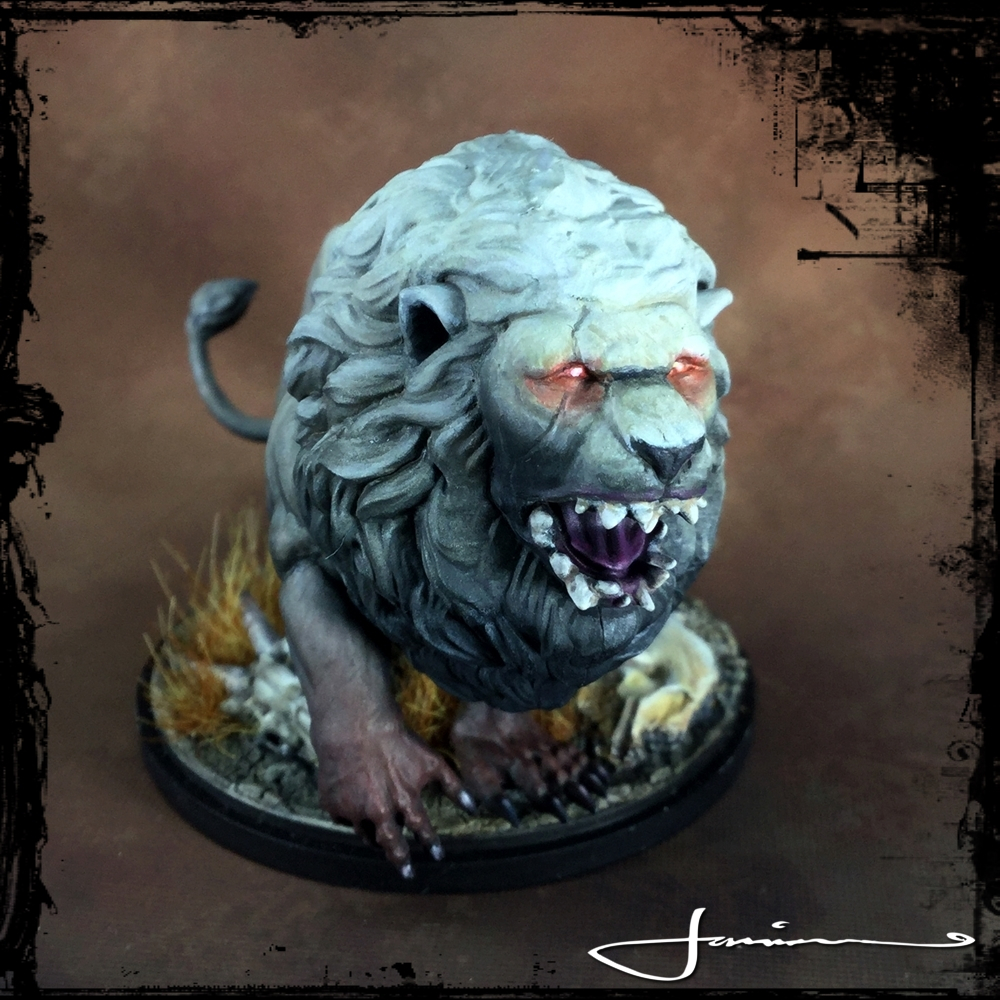

Hope you like him 🙂 More Kingdom Death coming in the next few days


